KPD Studio · User guide
Hello World: a guided tour of KPD
Build one small, complete data pipeline from an empty screen, step by step, and use every part of KPD on the way.
This tutorial is for your first hour with KPD. You build one simple pipeline from start to finish, and on the way you use every part of the tool: projects, the domain map, clusters and compute pools, schemas, connectors, topics, Flink, governance, access, data quality, dead letter topics, exports, notes and decisions. When you finish, you will have a design that validates cleanly, a picture of it, a design document and Terraform.
Every step says exactly what to click and what to type, and there are pictures throughout. Nothing here connects to Kafka or Confluent Cloud: KPD only designs, so you can't break anything.
What you will build
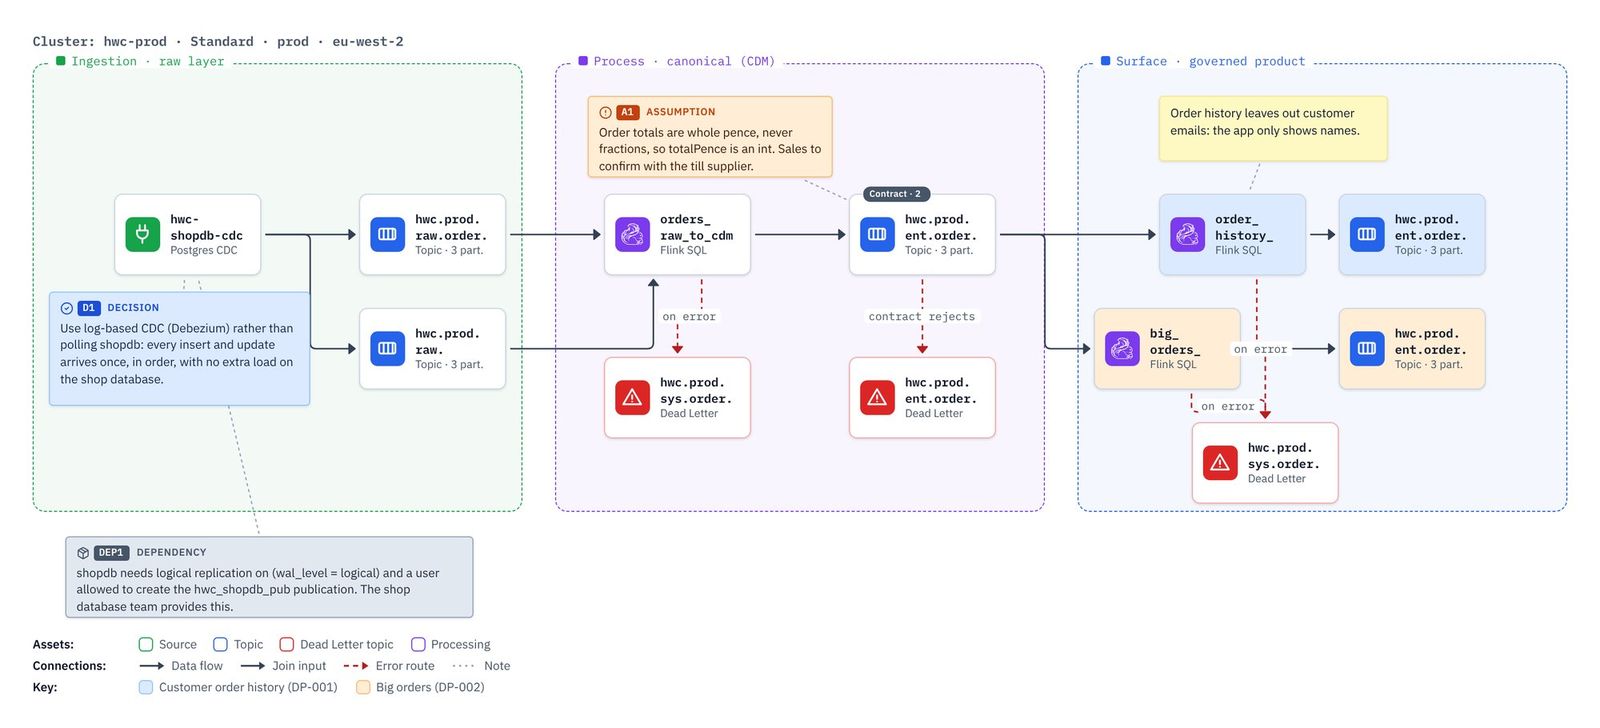
Hello Coffee Co runs coffee shops. Every order goes into a PostgreSQL database called shopdb. The Sales team wants two things from it, as orders happen:
- Customer order history: every order with the name of the customer who placed it, for the order history screen in the app.
- Big orders: orders of £20 or more, so store managers can spot them straight away.
So the pipeline is:
- A CDC connector watches two tables in the shop database,
ordersandcustomers, and writes every change to two raw topics. - A Flink statement joins each order to its customer and writes a tidy canonical order topic.
- Two more Flink statements read the canonical topic and each write a data product topic.
- Every topic has an Avro schema; data quality rules check the canonical orders; failures go to dead letter topics.
Contents
- 1. Create the project
- 2. Draw the domain map
- 3. Set up dev, test and prod
- 4. Build the pipeline
- 5. Governance: tags and the catalogue
- 6. Service accounts and role bindings
- 7. Data quality and dead letter topics
- 8. Export the picture, design document and Terraform
- 9. Notes, decisions, actions, groups and shading
- 10. Share it: export and import
Tip: tick each numbered step as you finish it. Printing tip: choose Background graphics in your browser's print options to keep the coloured notes and tables.
1. Create the project
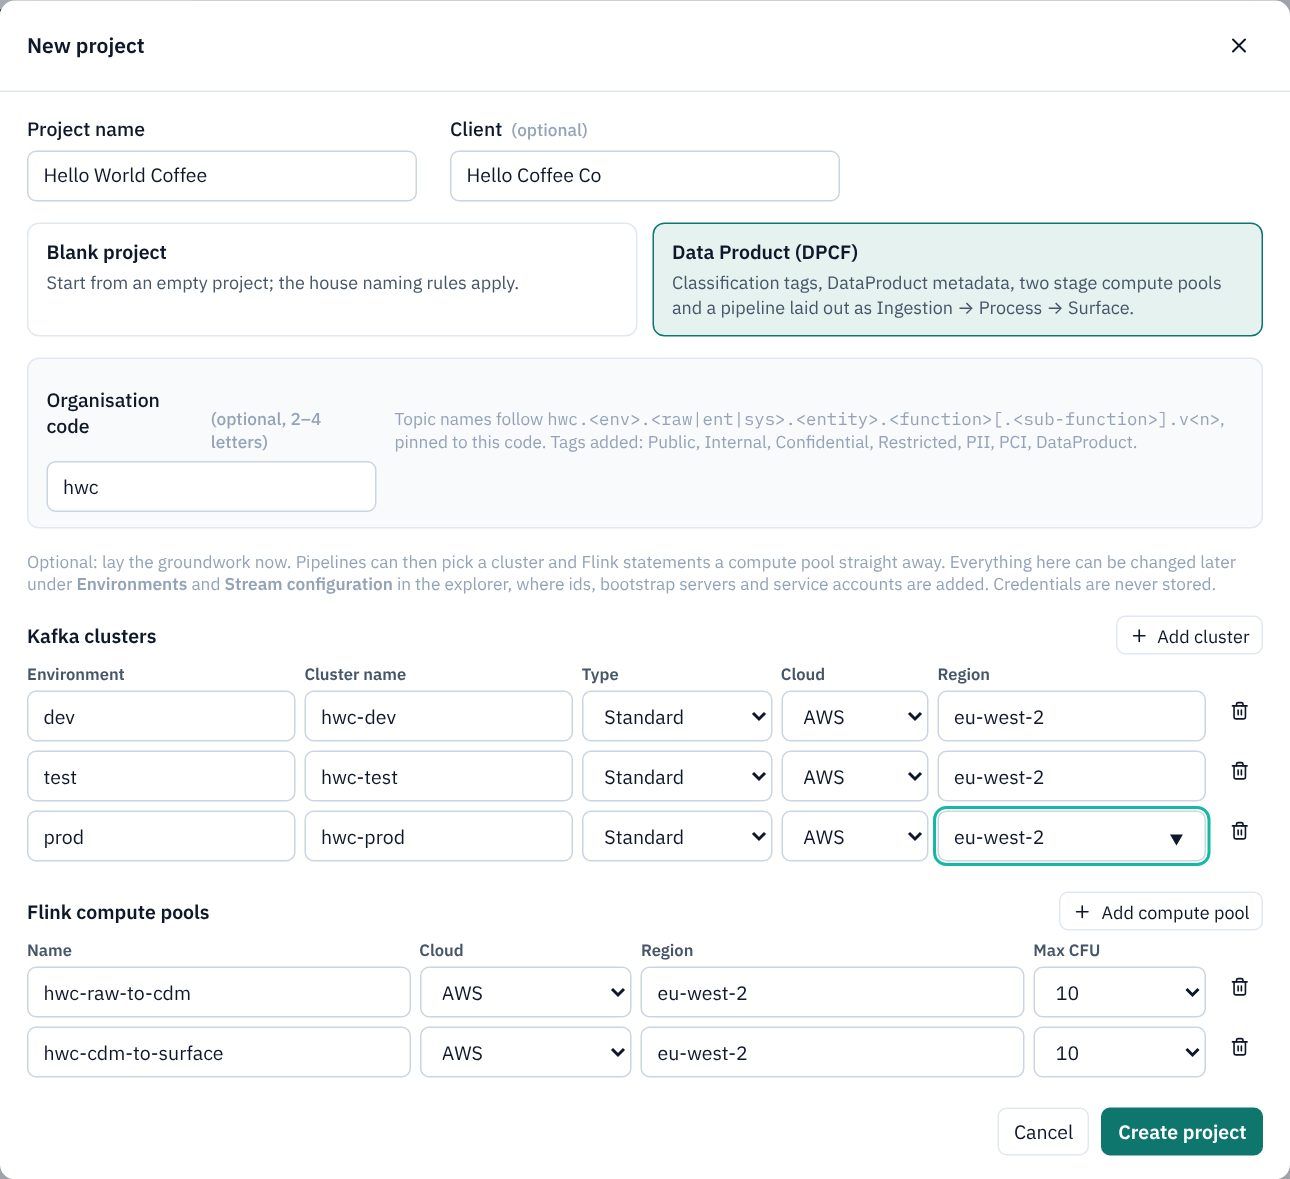
A new project from the Data Product (DPCF) template, with three clusters and two compute pools.
A project is a folder that holds everything for one piece of work: its pipelines, schemas, clusters, accounts, tags and rules. You start every design by creating one.
Open the New project dialog
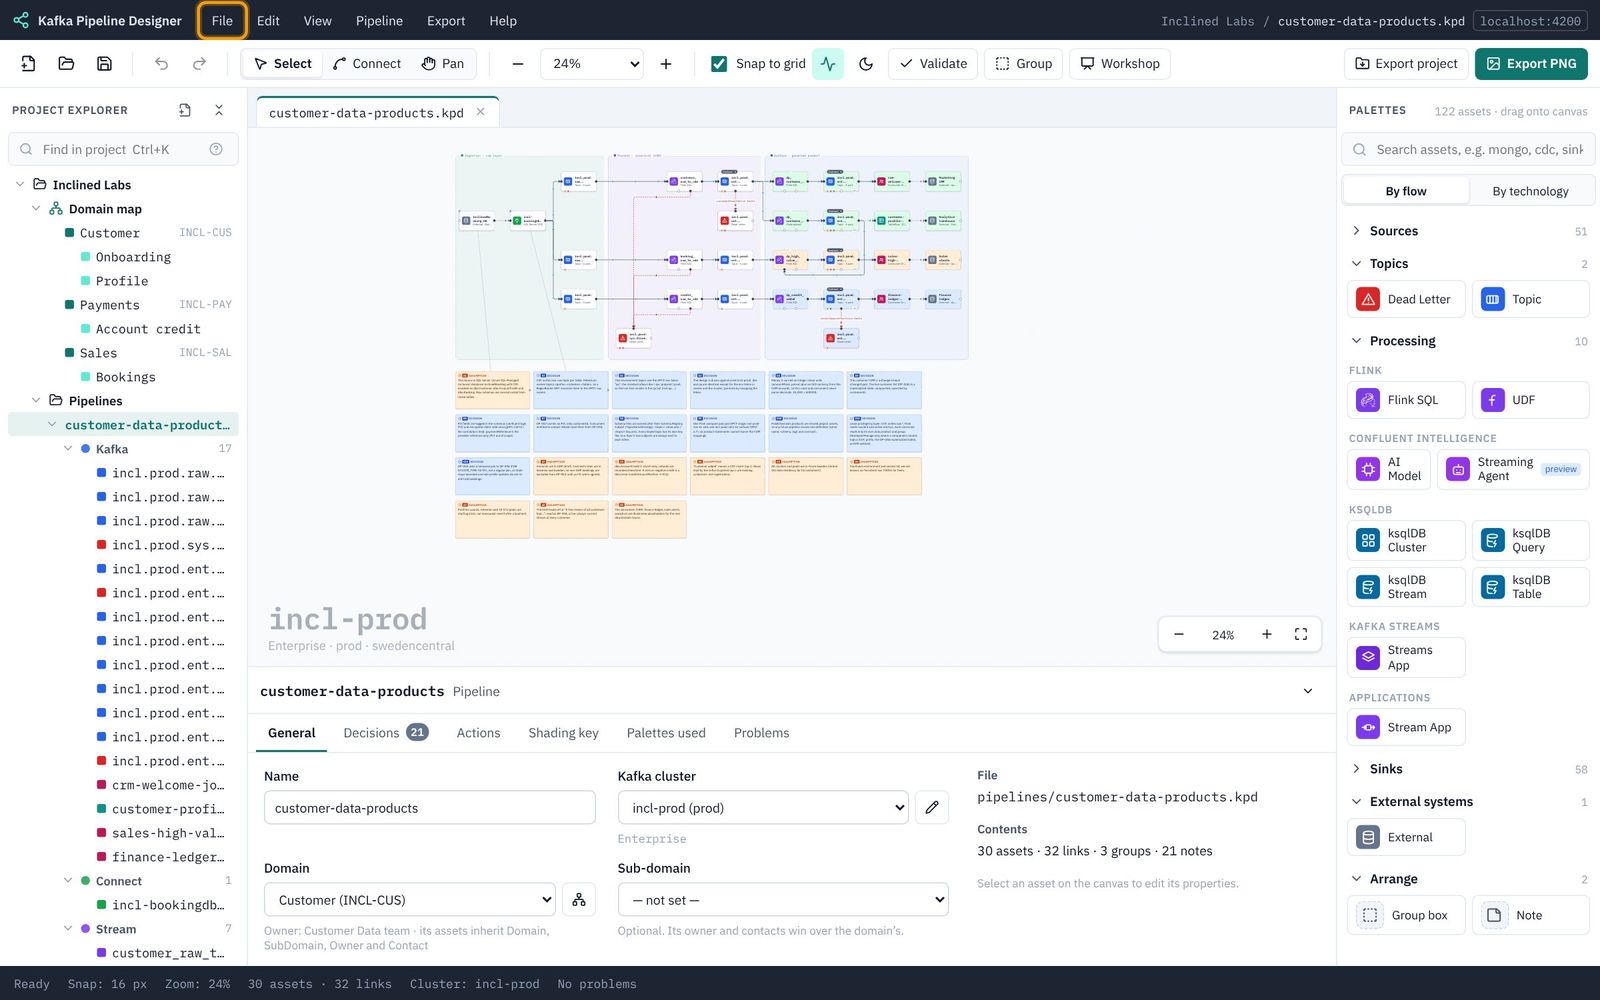
- Open KPD. You see whichever project you had open last (here, the Inclined Labs sample), or the welcome screen if this is your first time.
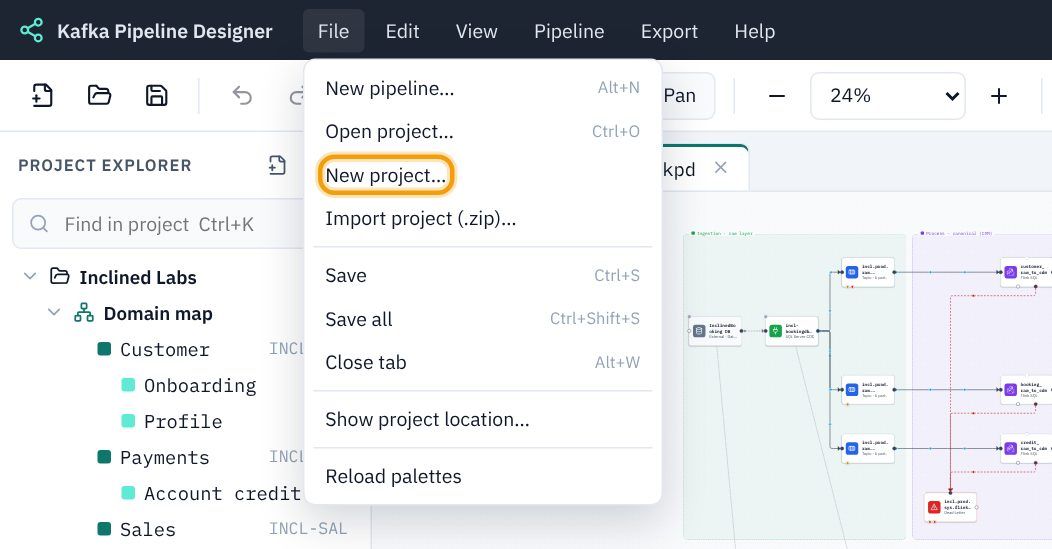
- Click the File menu at the top left.
- Choose New project…
Name it and pick the template
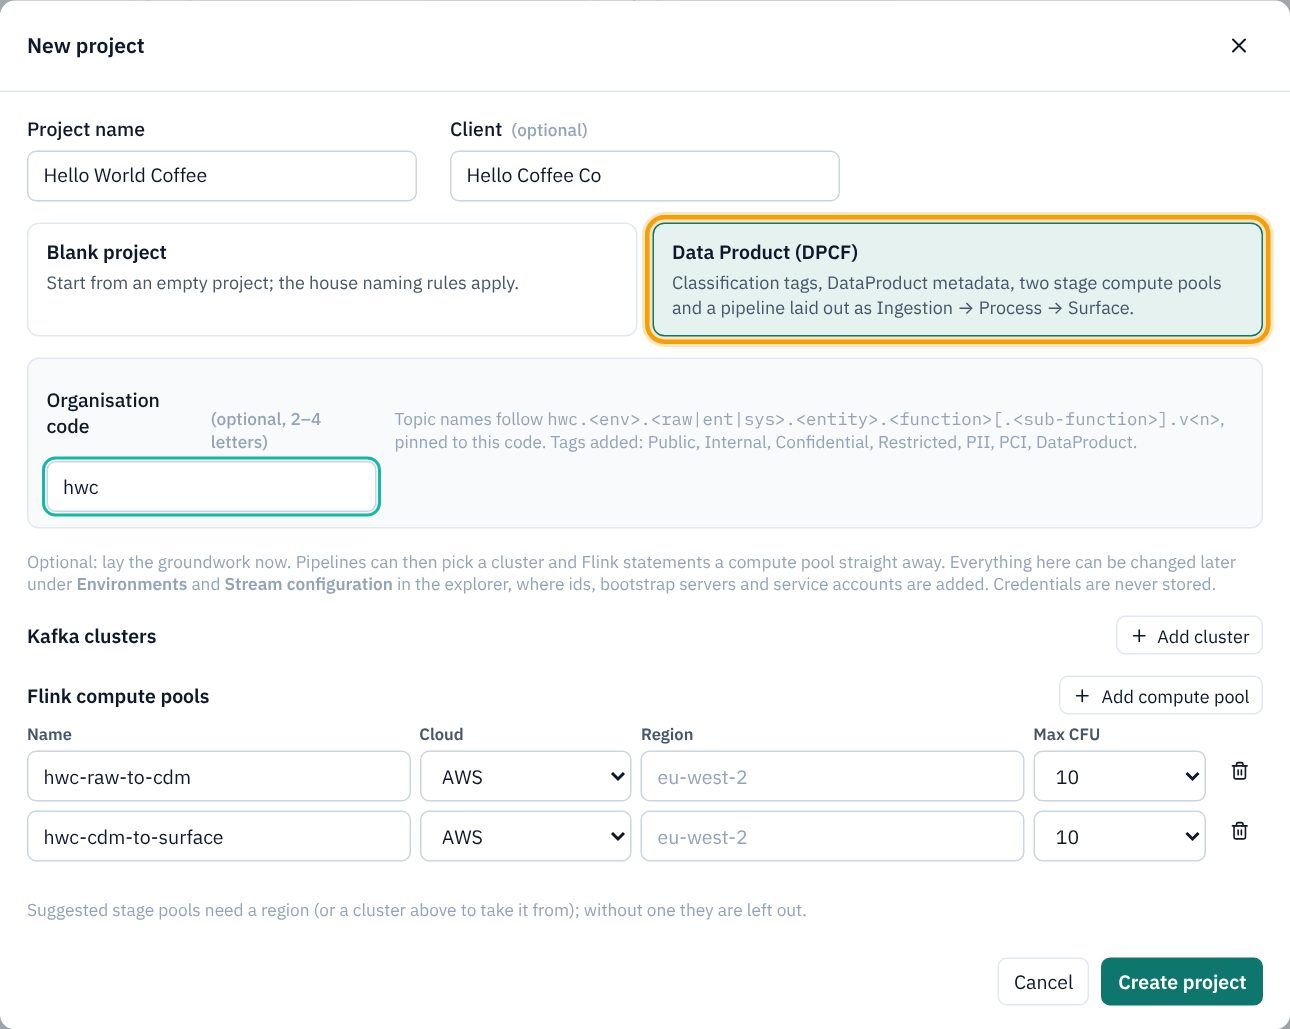
- Project name: type
Hello World Coffee. This is the only required field. - Client: type
Hello Coffee Co. It appears on the design document and the Terraform README. - Click the Data Product (DPCF) card. The template gives you classification tags, a DataProduct catalogue metadata definition, the DPCF topic naming rule, two suggested compute pools, and a first pipeline laid out as Ingestion → Process → Surface.
- Organisation code: type
hwc. Every topic name will start with it: the hint shows the patternhwc.<env>.<raw|ent|sys>.<entity>.<function>.v<n>.
hwc.hwc.prod.raw.order.shopdb.v1 means: organisation hwc, environment prod, layer raw (as captured; ent is the cleaned enterprise layer and sys is for system topics such as dead letters), entity order, function shopdb (where it came from), version 1. KPD checks every topic name against this rule as you type. See Topic naming standards.Add three clusters and check the pools
Lower down the dialog you can describe your Kafka clusters and Flink compute pools now, so pipelines can use them straight away. Part 3 looks at them in more detail.
- Under Kafka clusters, click Add cluster three times to get three rows.
- Fill them in like this:
Environment Cluster name Type Cloud Region devhwc-devStandard AWS eu-west-2testhwc-testStandard AWS eu-west-2prodhwc-prodStandard AWS eu-west-2 - Under Flink compute pools the template has already suggested two pools, one per processing stage:
hwc-raw-to-cdm(raw to canonical) andhwc-cdm-to-surface(canonical to data products). Leave them at 10 max CFU. Once a cluster has a region, the pools take it.
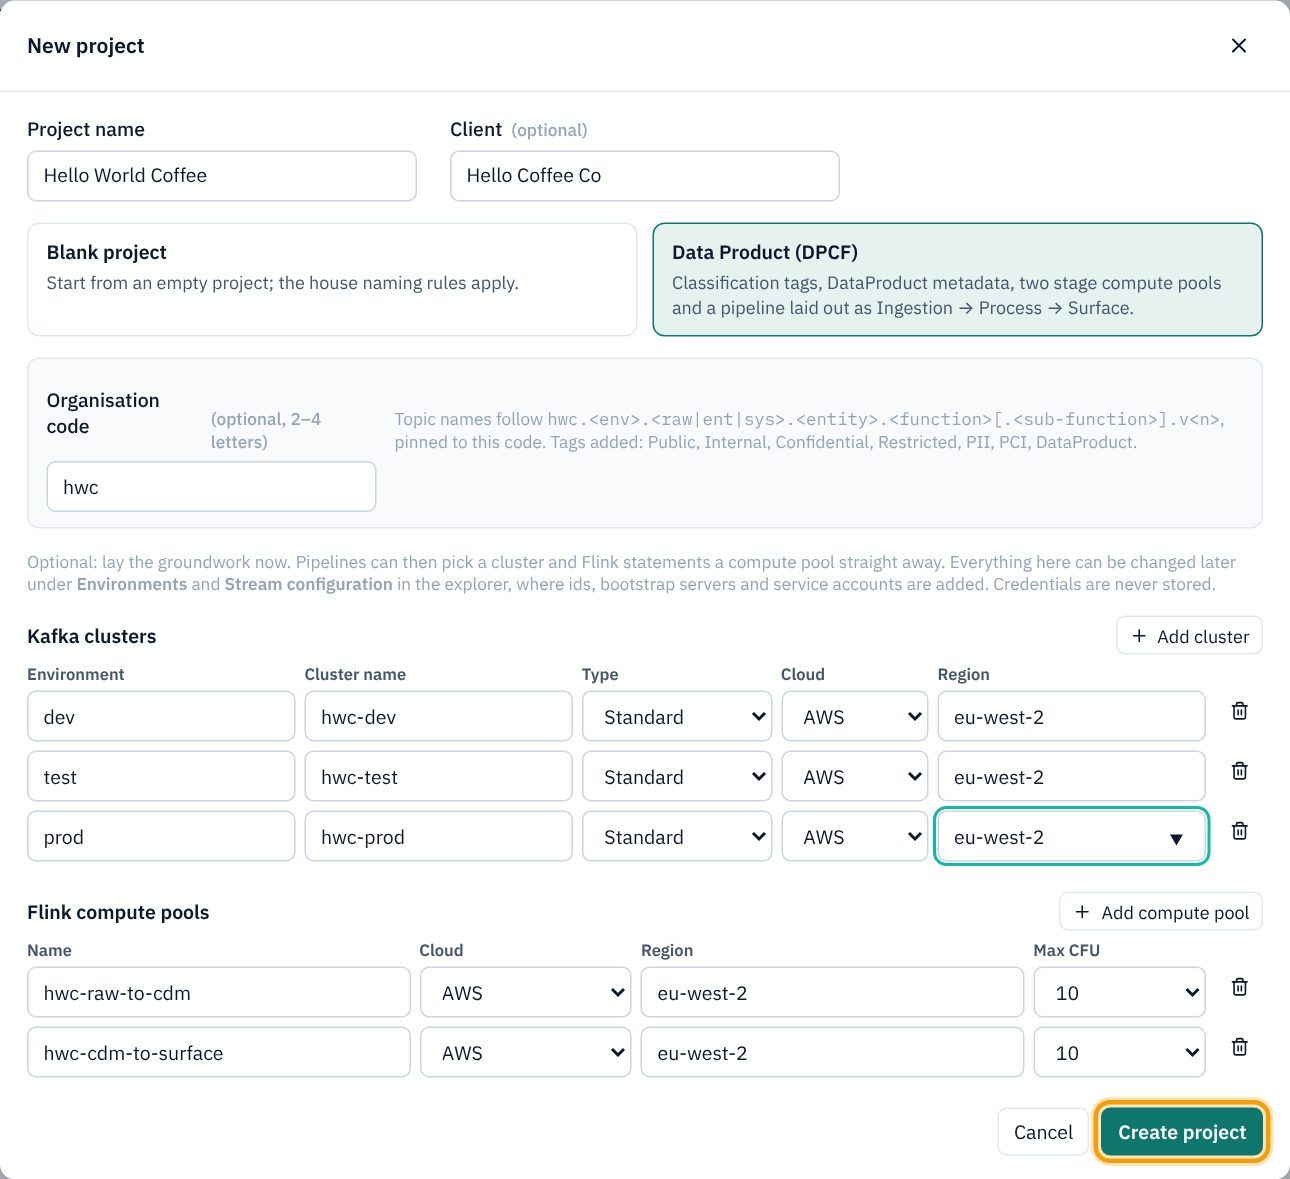
- Click Create project.
A quick look around
KPD creates the project folder and opens its first pipeline, data-product.kpd, with the three layer boxes already drawn and a Start your pipeline card in the middle.
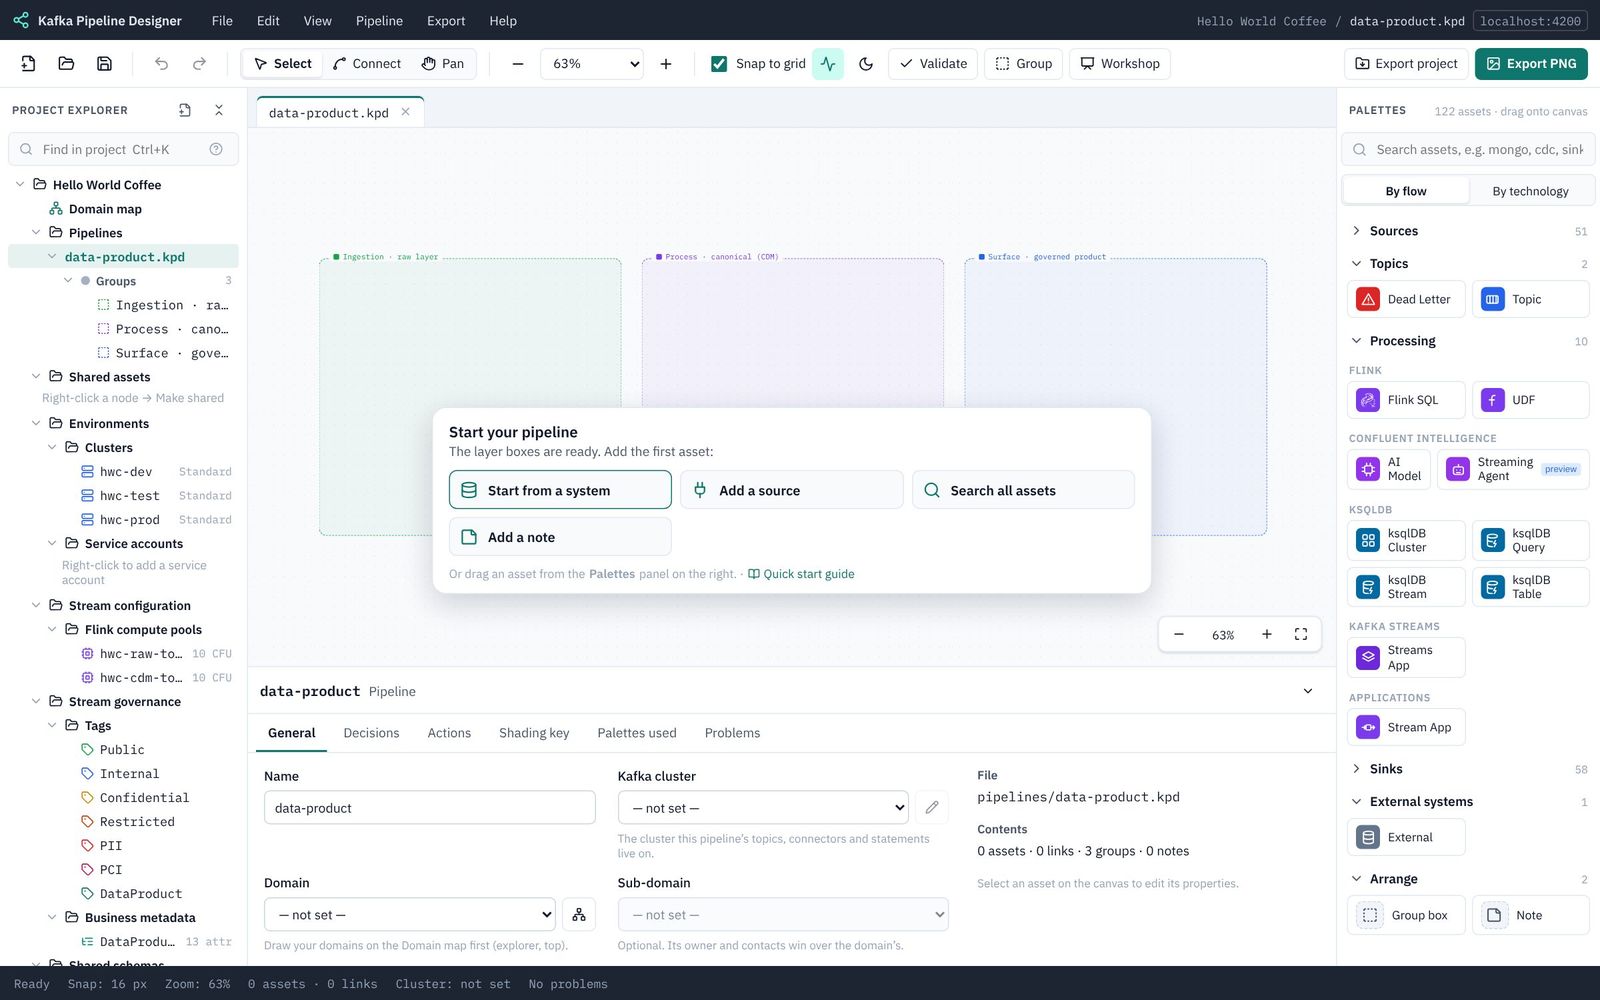
- Project explorer (left): everything in the project. Under Environments you can already see the three clusters; under Stream configuration the two compute pools; under Stream governance the tags (Public, Internal, Confidential, Restricted, PII, PCI, DataProduct) and the DataProduct business metadata, all from the template.
- Canvas (middle): where you draw the pipeline. The three dotted boxes are groups for the DPCF layers.
- Properties panel (bottom): the settings of whatever is selected. With nothing selected it shows the pipeline itself.
- Palettes (right): every kind of asset you can add. You will mostly use quick add instead (Part 4).
Press Ctrl/⌘+S to save. Next: 2. Draw the domain map.
2. Draw the domain map
A Sales domain with a Store orders sub-domain, their owners and contacts, and the pipeline linked to them.
The domain map records which part of the business owns the data, and who to talk to. Pipelines link to it, and their data products then take their domain, sub-domain, owner and contact from it automatically (you will see this in Part 5). We use one domain, Sales, with one sub-domain, Store orders.
Open the domain map
- In the explorer, click Domain map (just under the project name).
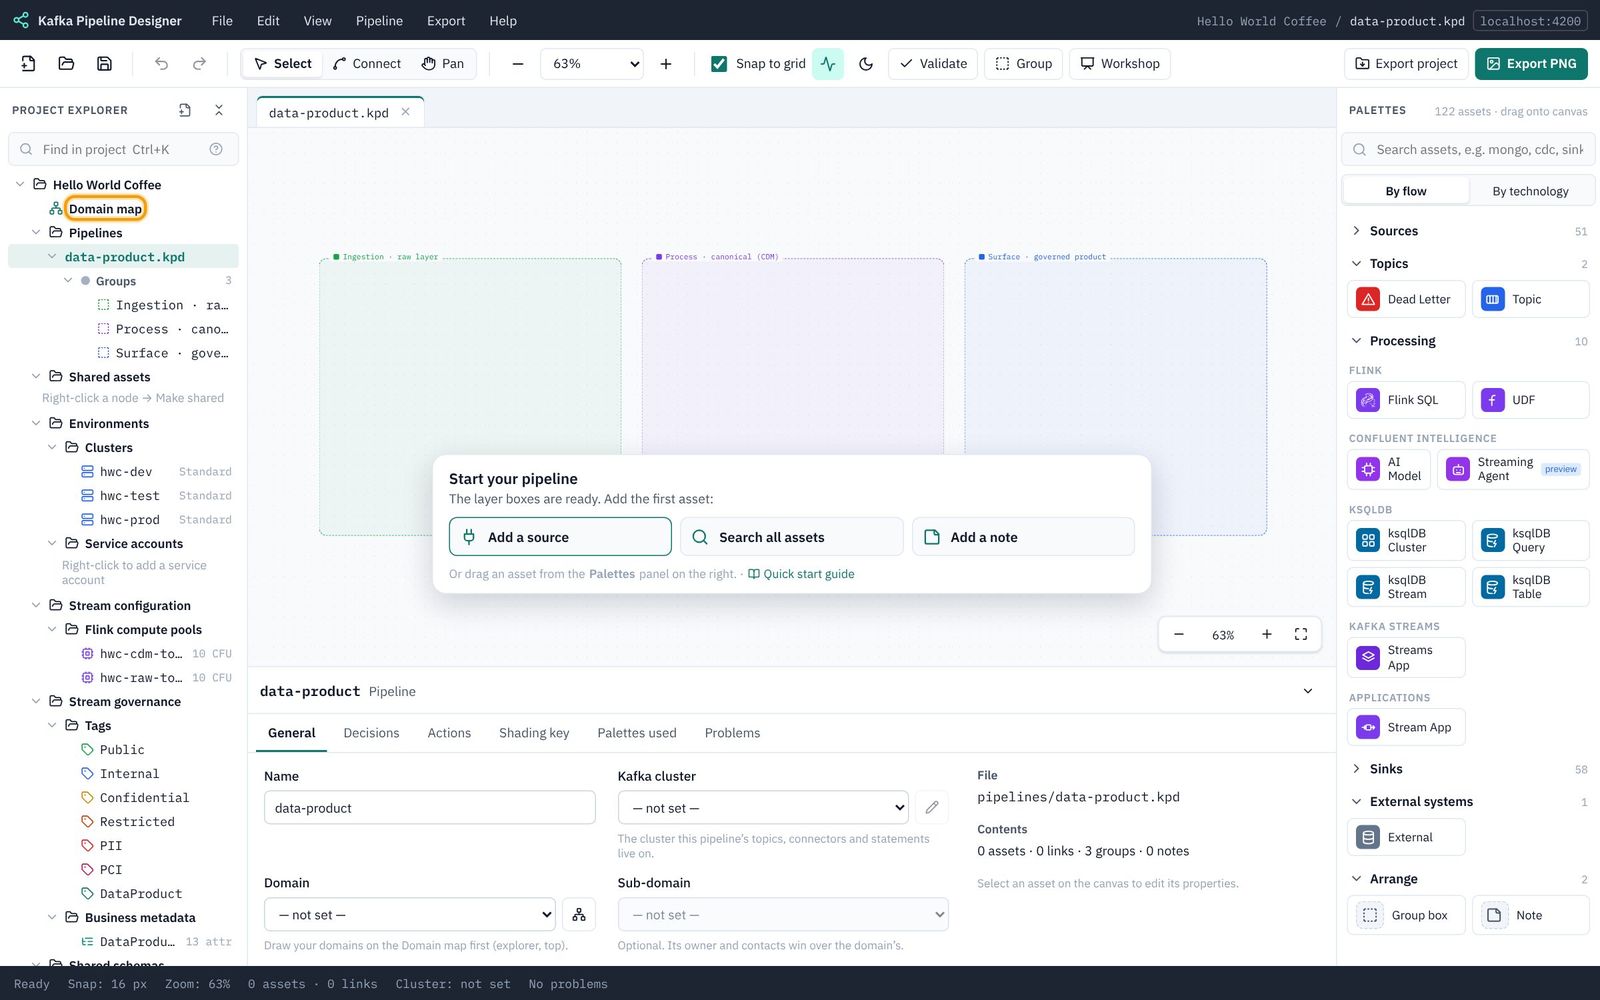
- A Domain map tab opens with a Draw your domains card. Click Add a domain.
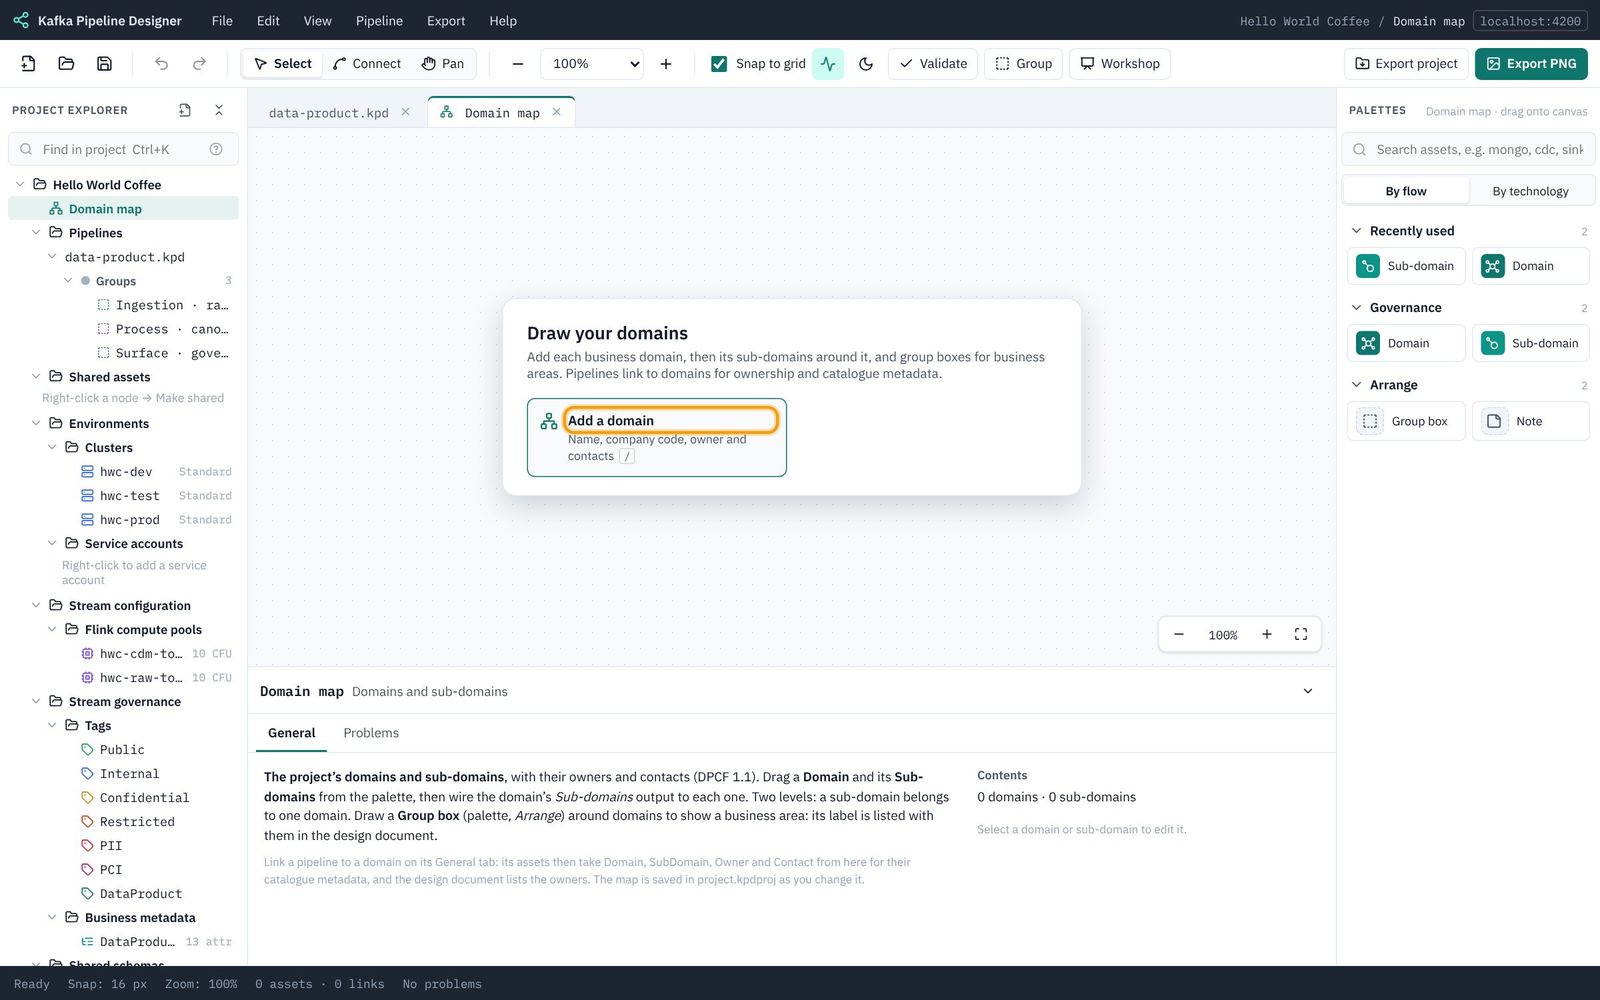
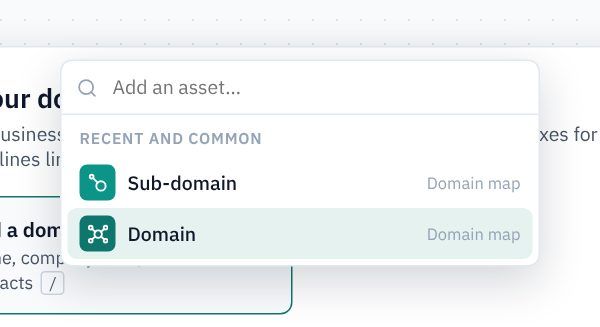
- In the list that appears, choose Domain.
Describe the Sales domain
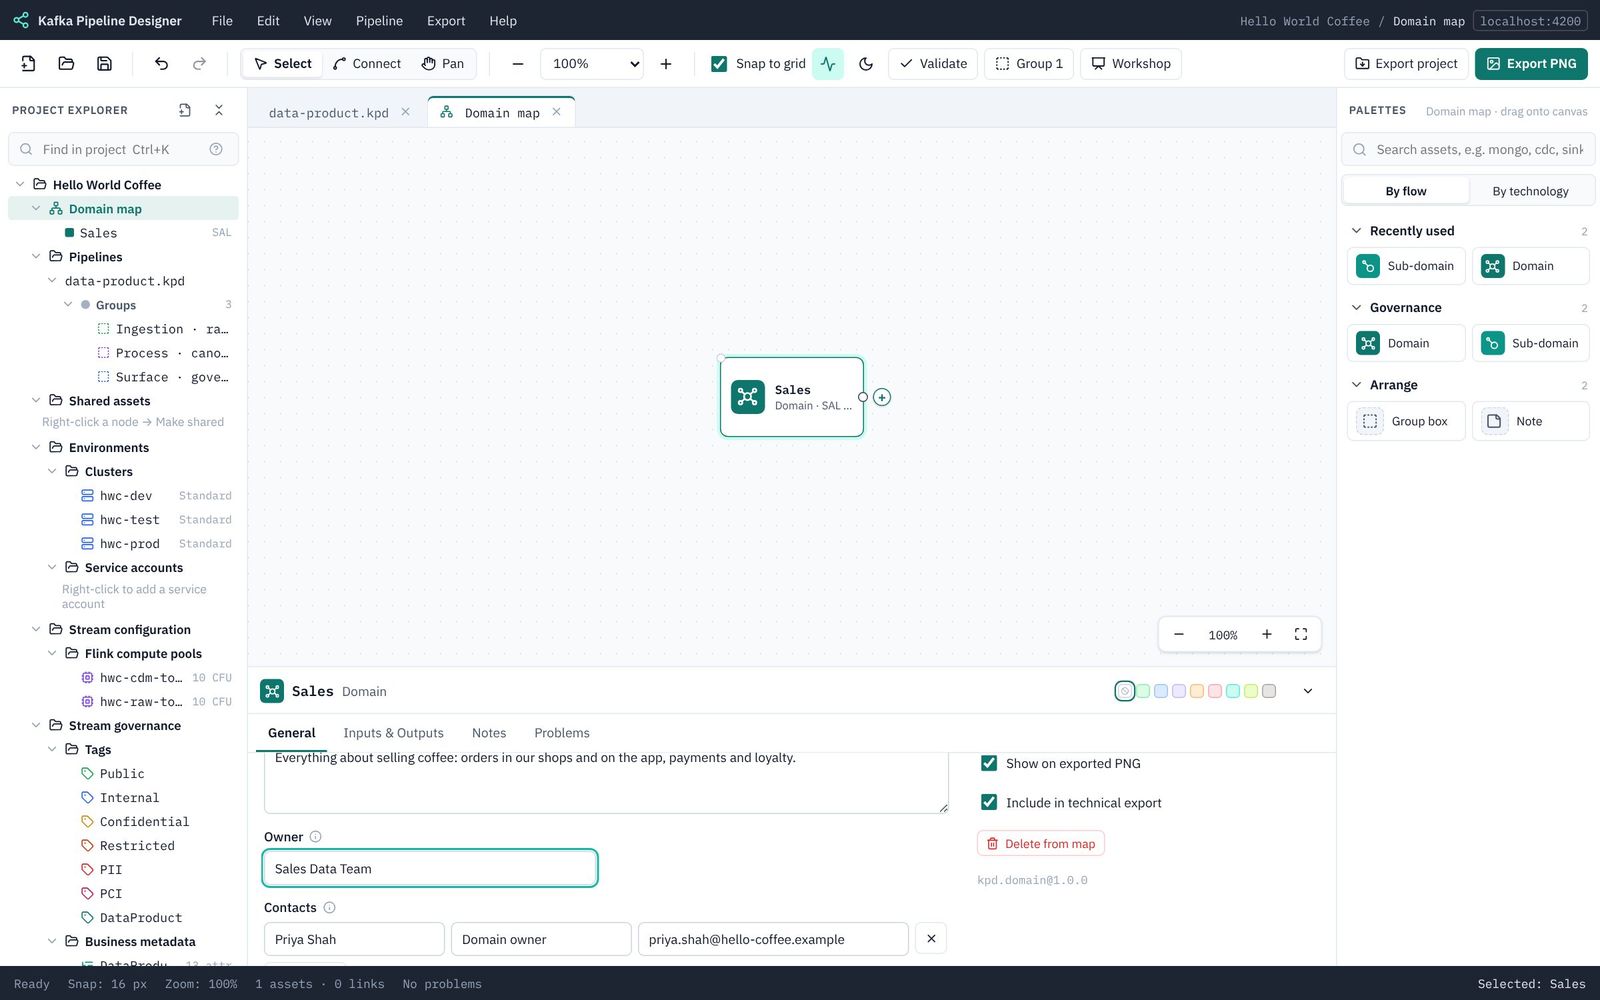
A domain appears on the map, selected, with its settings in the properties panel. Fill in:
| Field | Type |
|---|---|
| Name | Sales |
| Code | SAL |
| Description | Everything about selling coffee: orders in our shops and on the app, payments and loyalty. |
| Owner | Sales Data Team |
| Contacts | Click to add a contact, then name Priya Shah, role Domain owner, contact priya.shah@hello-coffee.example |
Add the Store orders sub-domain
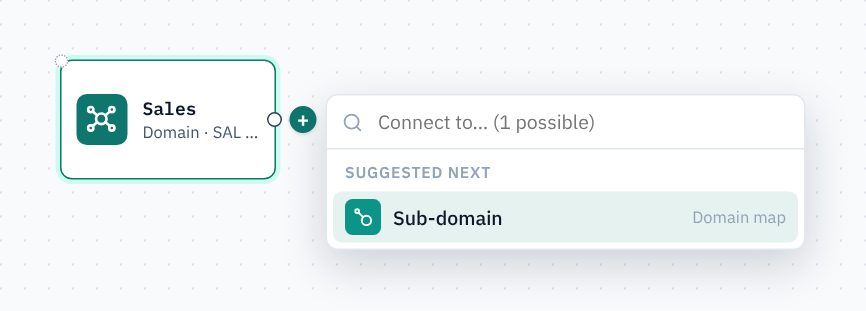
- With Sales selected, a + appears on its right-hand edge. Click it.
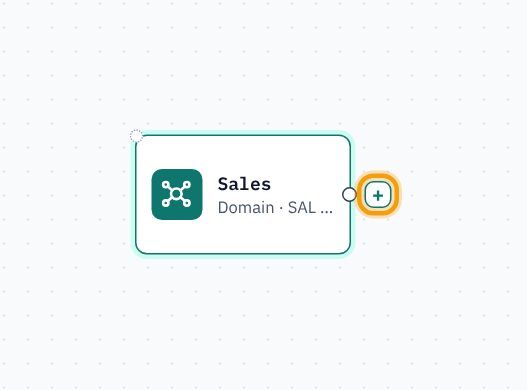
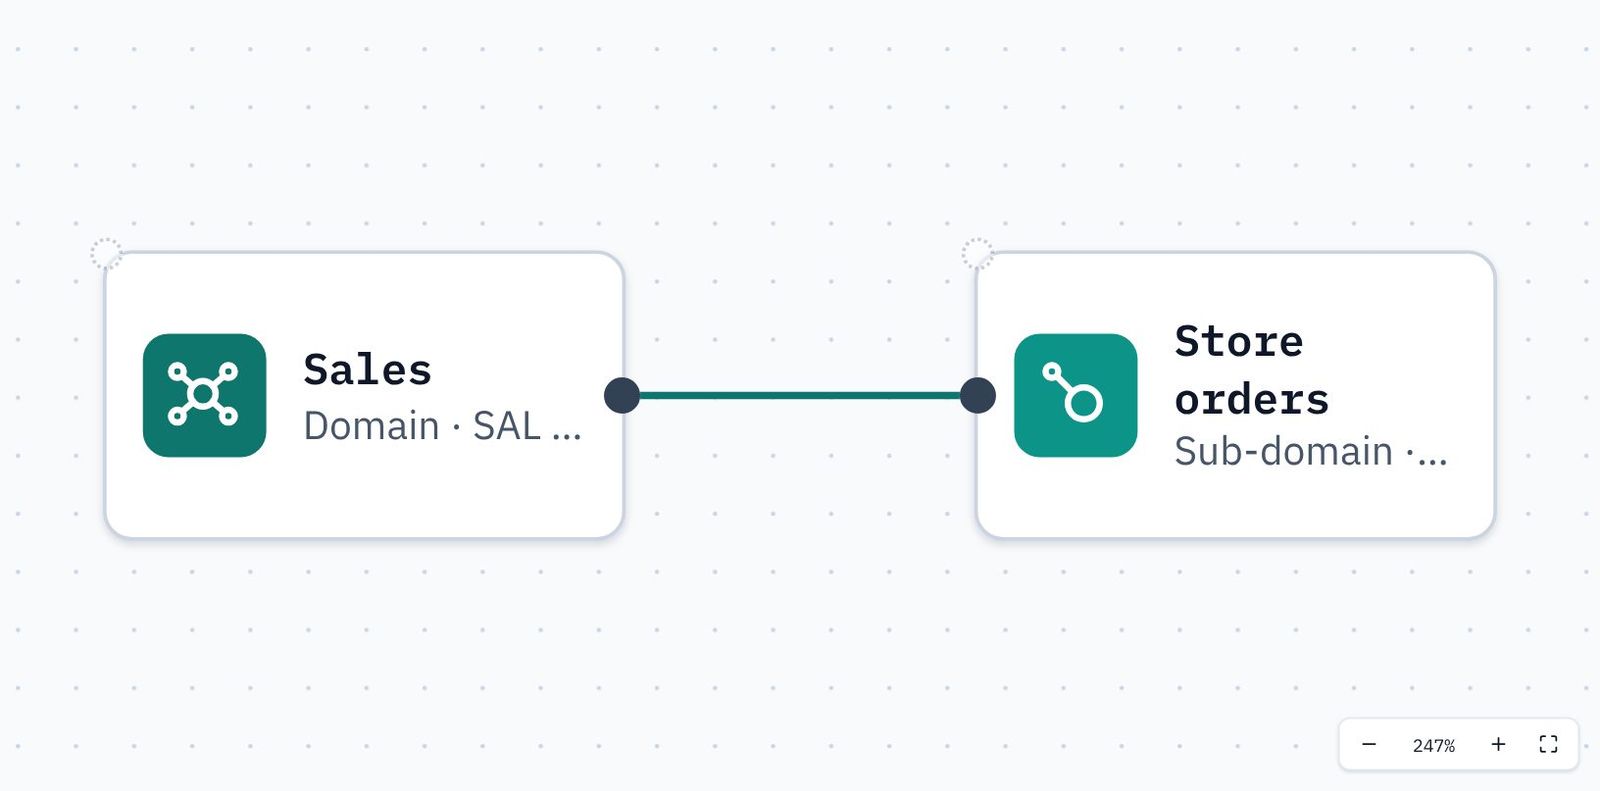
- KPD offers only what can connect there: Sub-domain. Choose it. The sub-domain appears to the right, already wired to Sales.
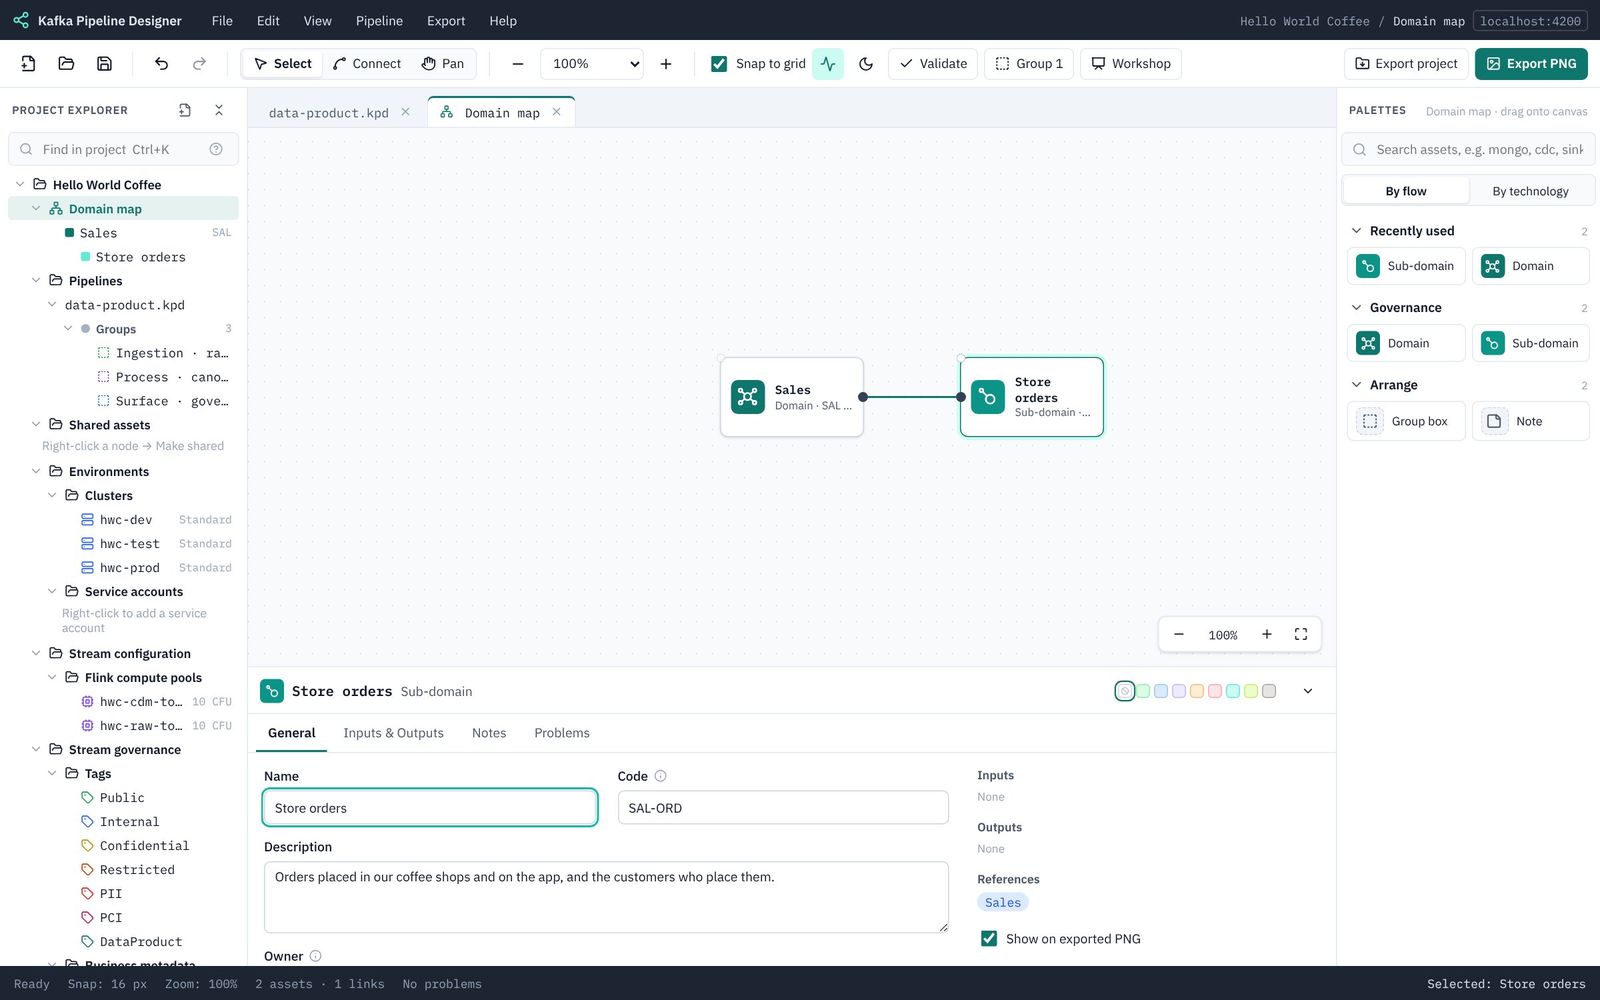
- Fill in the sub-domain:
Field Type Name Store ordersCode SAL-ORDDescription Orders placed in our coffee shops and on the app, and the customers who place them.Owner Store Orders TeamContacts Tom Reed,Product owner,store-orders@hello-coffee.example
Link the pipeline to the domain
- Click the data-product.kpd tab above the canvas to go back to the pipeline.
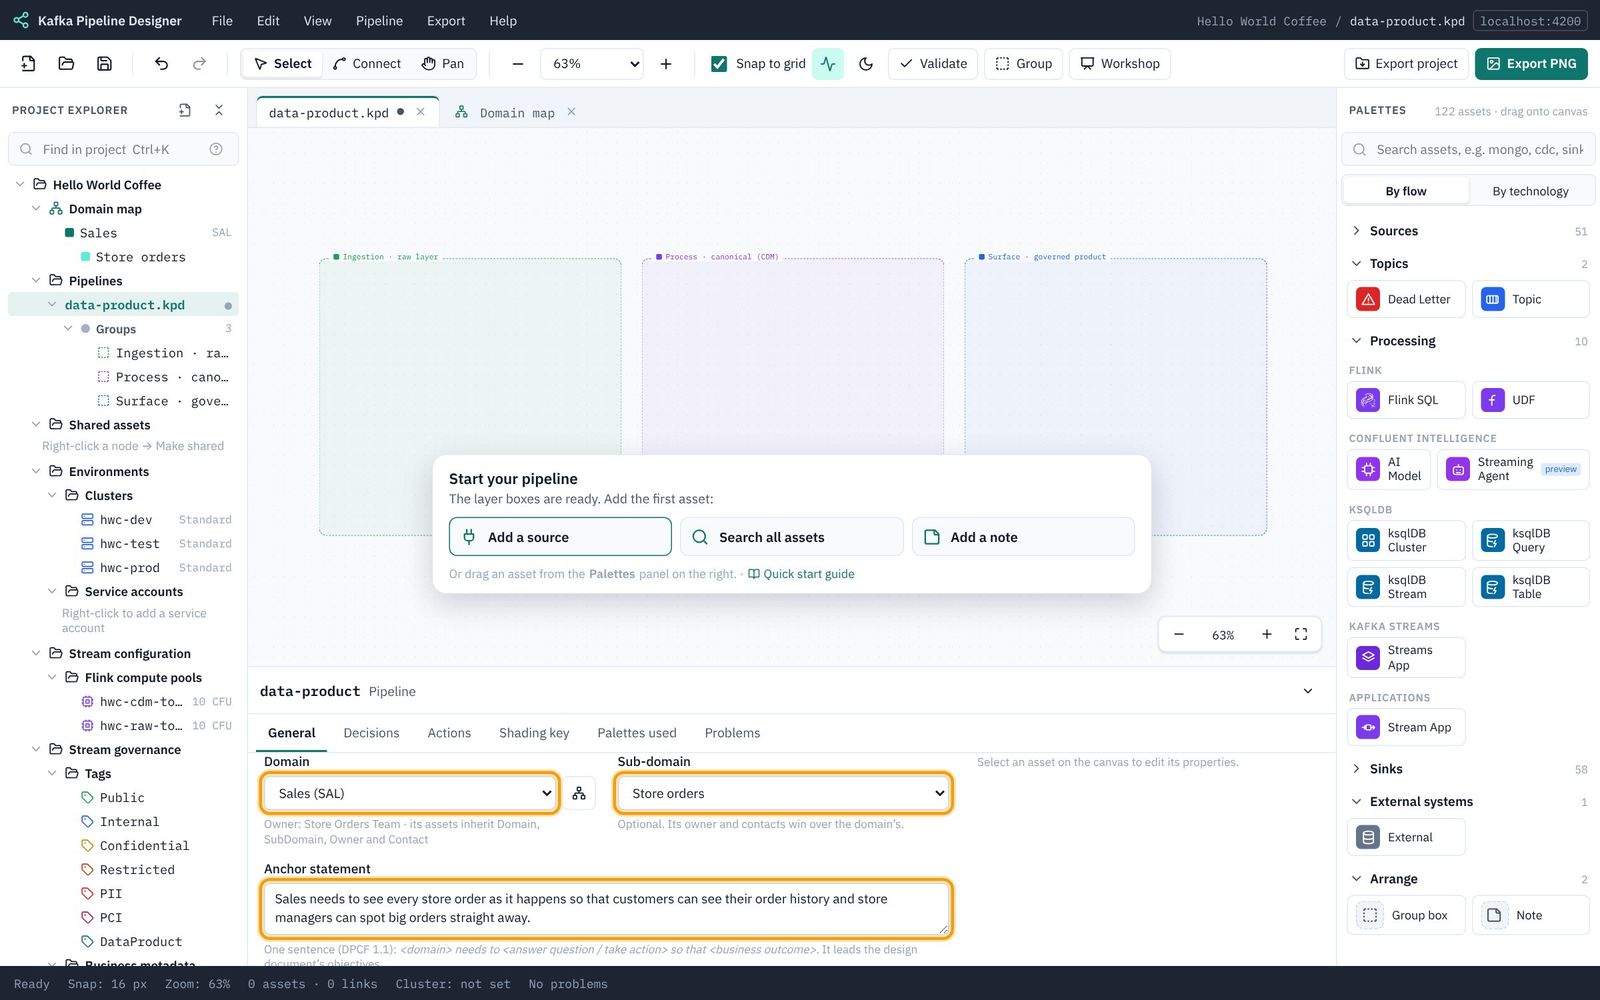
- Click an empty part of the canvas so nothing is selected. The properties panel shows the pipeline's General tab.
- Domain: choose Sales (SAL). Sub-domain: choose Store orders.
- Anchor statement: one sentence saying why the pipeline exists, in the DPCF form <domain> needs to <answer a question / take action> so that <business outcome>. Type:
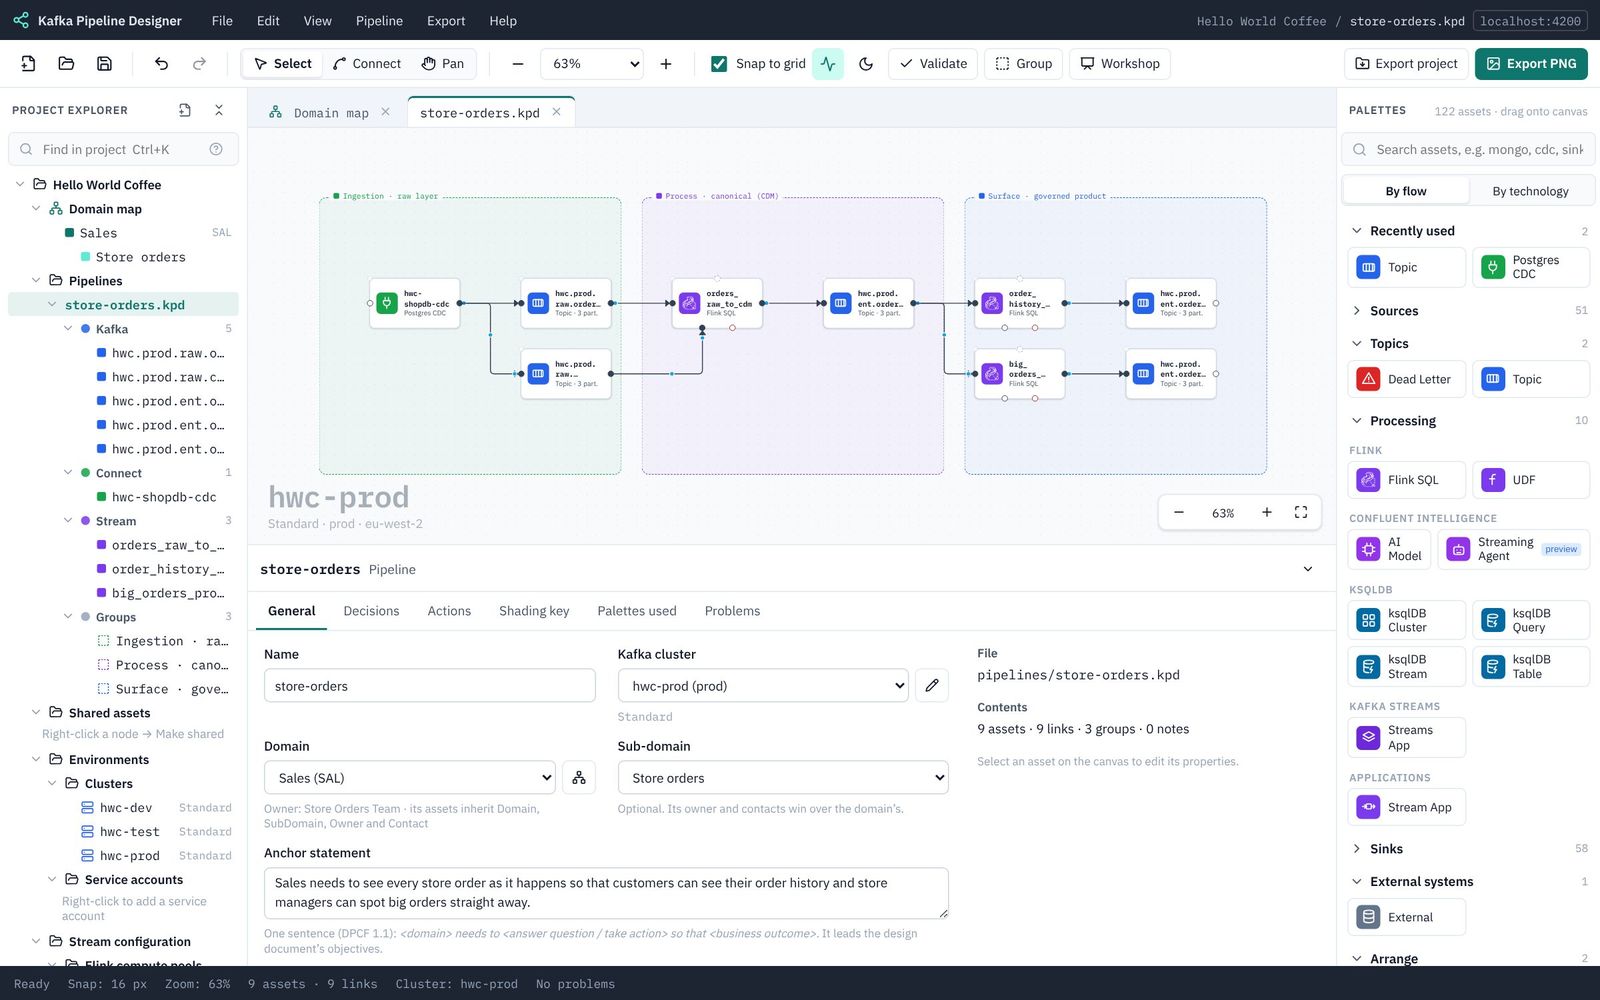
Sales needs to see every store order as it happens so that customers can see their order history and store managers can spot big orders straight away.
Save with Ctrl/⌘+S. Next: 3. Set up dev, test and prod.
3. Set up dev, test and prod
Describe the three clusters and the two Flink compute pools, and put the pipeline on production.
A normal setup has three environments: dev to build and try things, test to check a release, and prod for real use. You created a cluster for each in Part 1; now you describe them, look at the compute pools, and say which cluster the pipeline runs on.
Describe each cluster
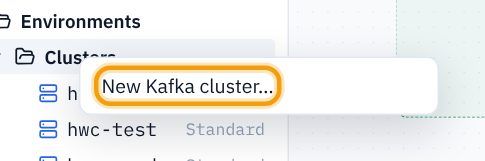
- In the explorer, open Environments → Clusters. The three clusters are listed with their type.
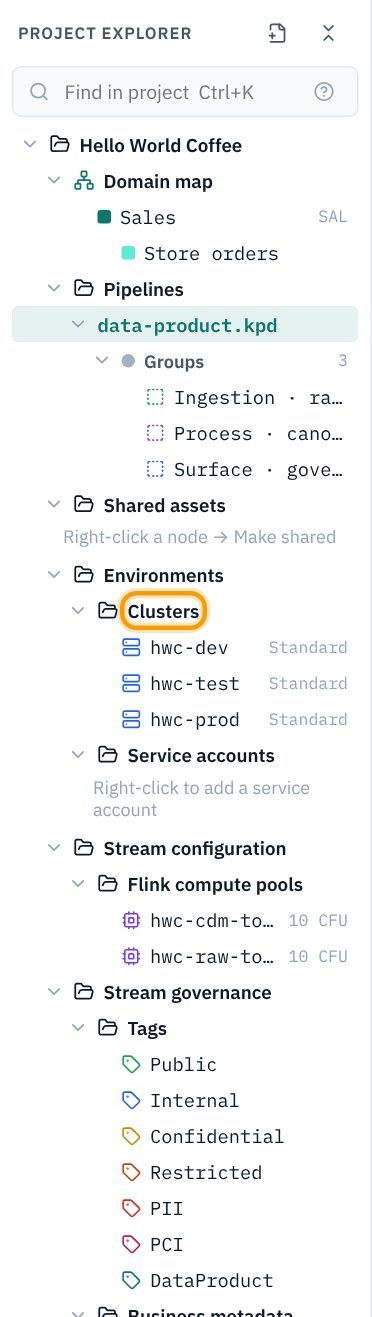
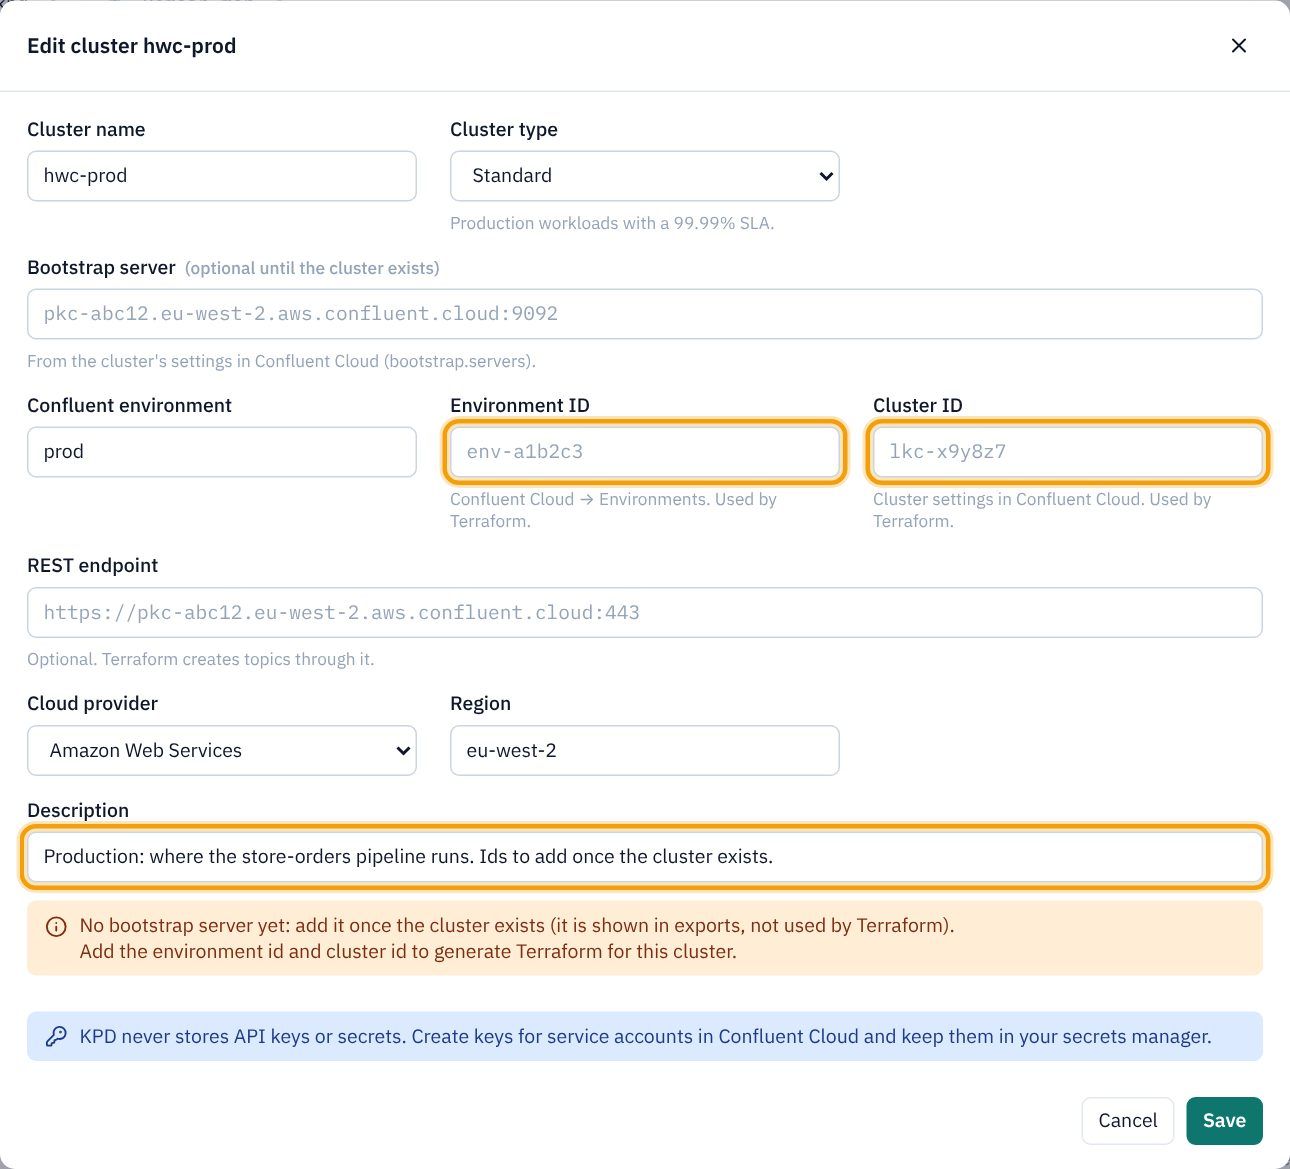
- Click hwc-prod. The Edit cluster dialog opens.
- Look at the fields: Bootstrap server, Environment ID (
env-…) and Cluster ID (lkc-…) come from Confluent Cloud once the cluster exists. Leave them empty for this tutorial: KPD reminds you about them (as information, not errors) and Terraform marks them as TODOs. - Description: type
Production: where the store-orders pipeline runs. Ids to add once the cluster exists.and click Save.
- Do the same for hwc-dev (
Development: for building and trying things out. Ids to add once the cluster exists.) and hwc-test (Test: for testing a release before production.).
Check the compute pools
Flink statements run in a compute pool, measured in CFUs (Confluent Flink Units). Each statement needs at least one, so a 10 CFU pool holds up to ten statements. Using one pool per stage keeps a busy stage from starving the other.
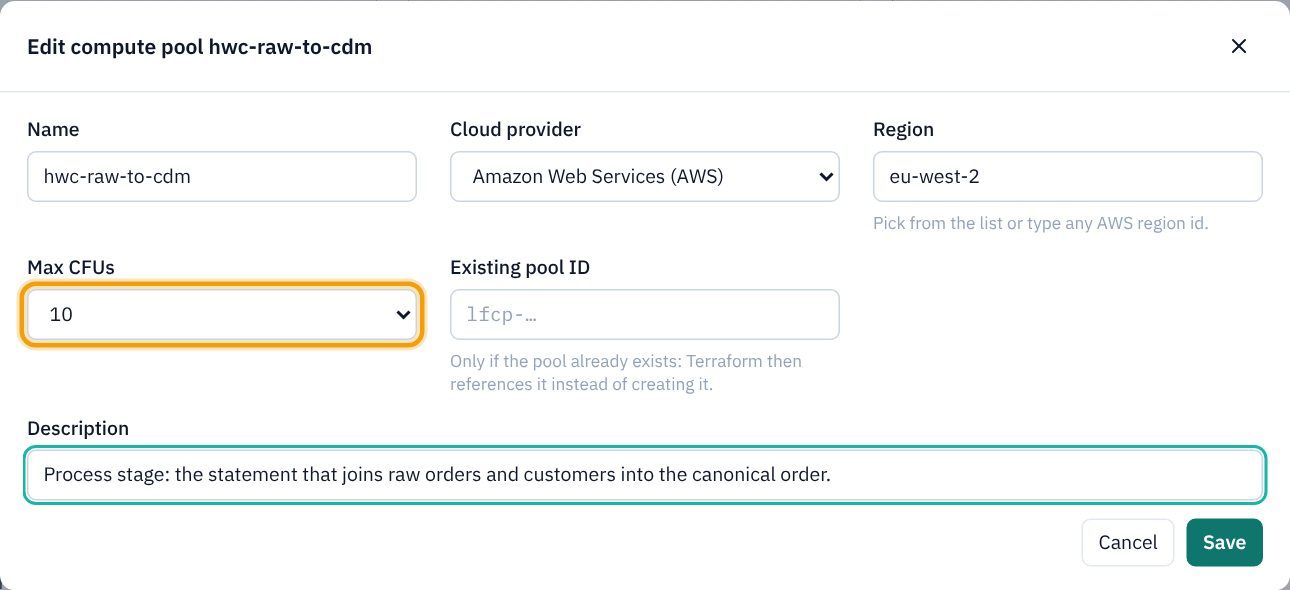
- Under Stream configuration → Flink compute pools, click hwc-raw-to-cdm.
- Check Max CFUs is 10. Leave Existing pool ID empty (fill it only if the pool already exists, and Terraform will use it instead of creating one).
- Description:
Process stage: the statement that joins raw orders and customers into the canonical order.Click Save. - Click hwc-cdm-to-surface and give it the description
Surface stage: the two data product statements.
Put the pipeline on production
- Click an empty part of the canvas so the pipeline's settings show.
- Kafka cluster: choose hwc-prod (prod). The cluster's name now appears large in the corner of the canvas, so you always know where a pipeline runs.
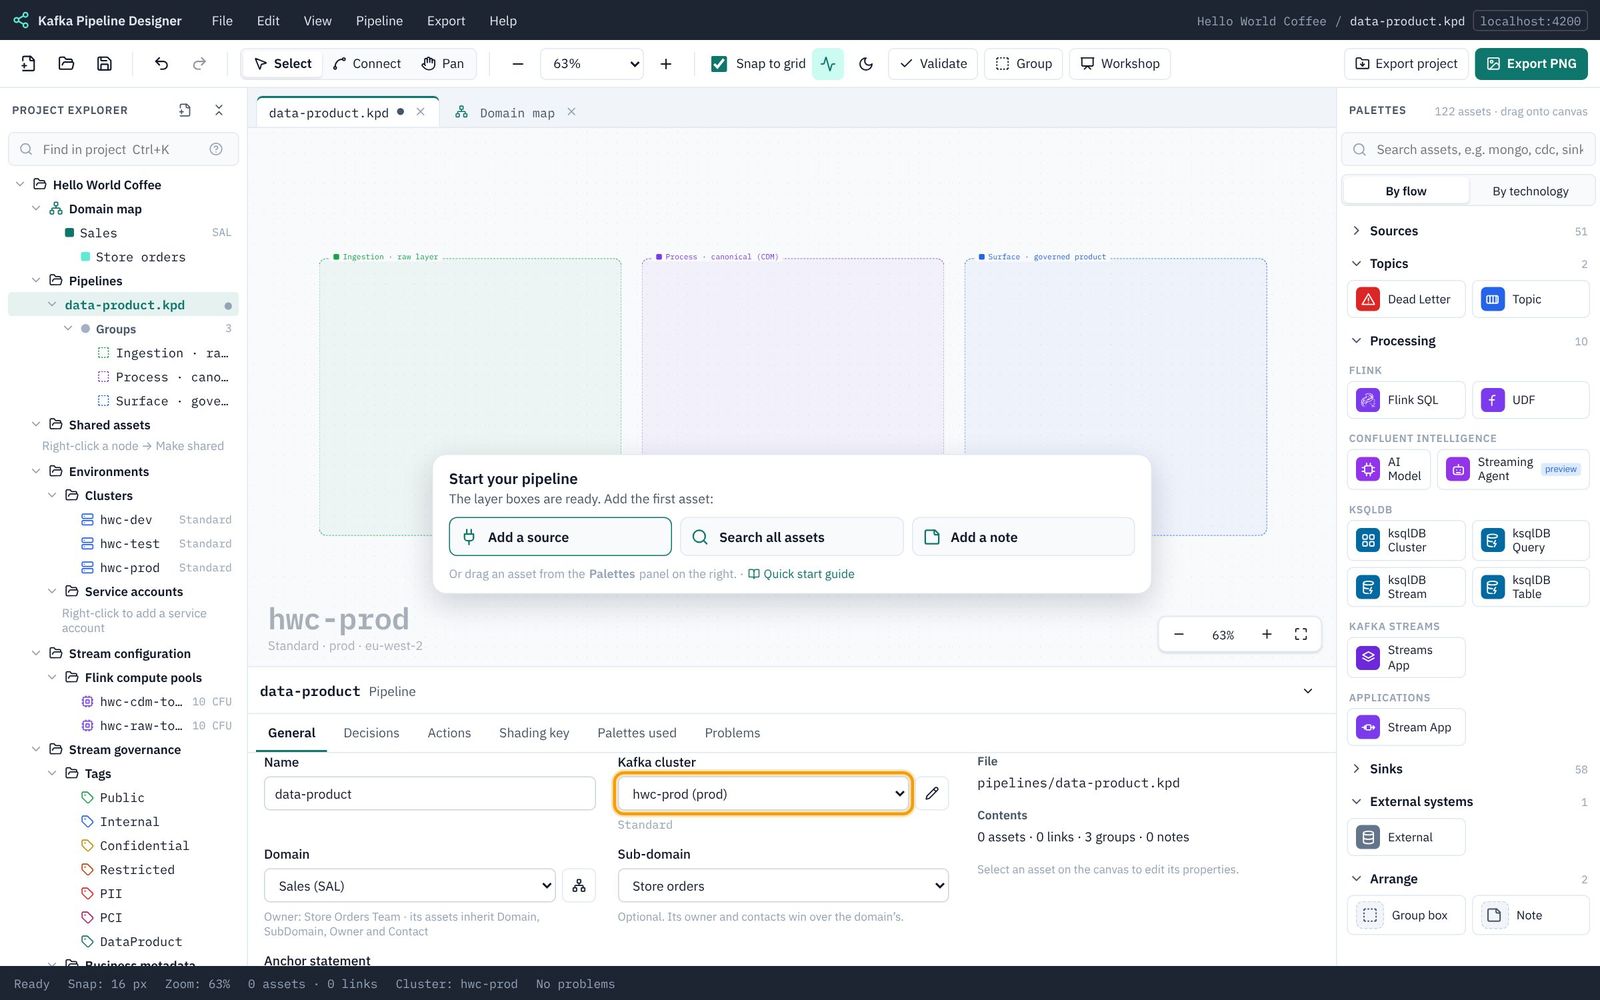
hwc.prod.Save. Next: 4. Build the pipeline.
4. Build the pipeline
Avro schemas, a PostgreSQL CDC source, two raw topics, a Flink join to a canonical topic, and two data products.
This is the longest part: you build the whole pipeline. In order:
- rename the pipeline;
- create five Avro schemas;
- add the CDC source and its two raw topics;
- add the Flink join and the canonical topic;
- add the two data product statements and their topics.
4.1 Rename the pipeline
- In the explorer, right-click data-product.kpd under Pipelines and choose Rename…
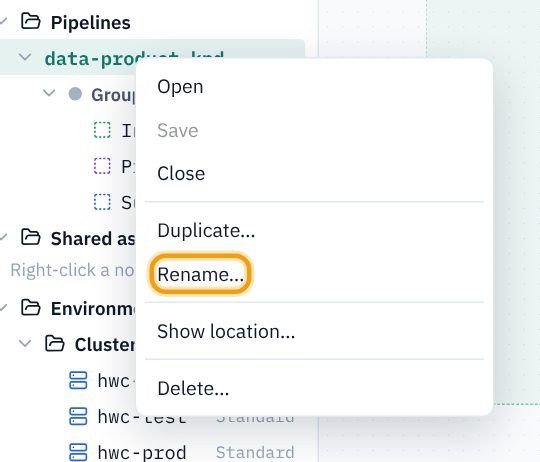
- Type
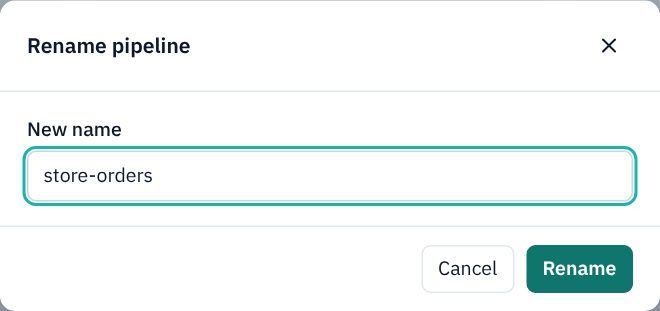
store-ordersand click Rename. The file becomesstore-orders.kpd.
4.2 Create the five Avro schemas
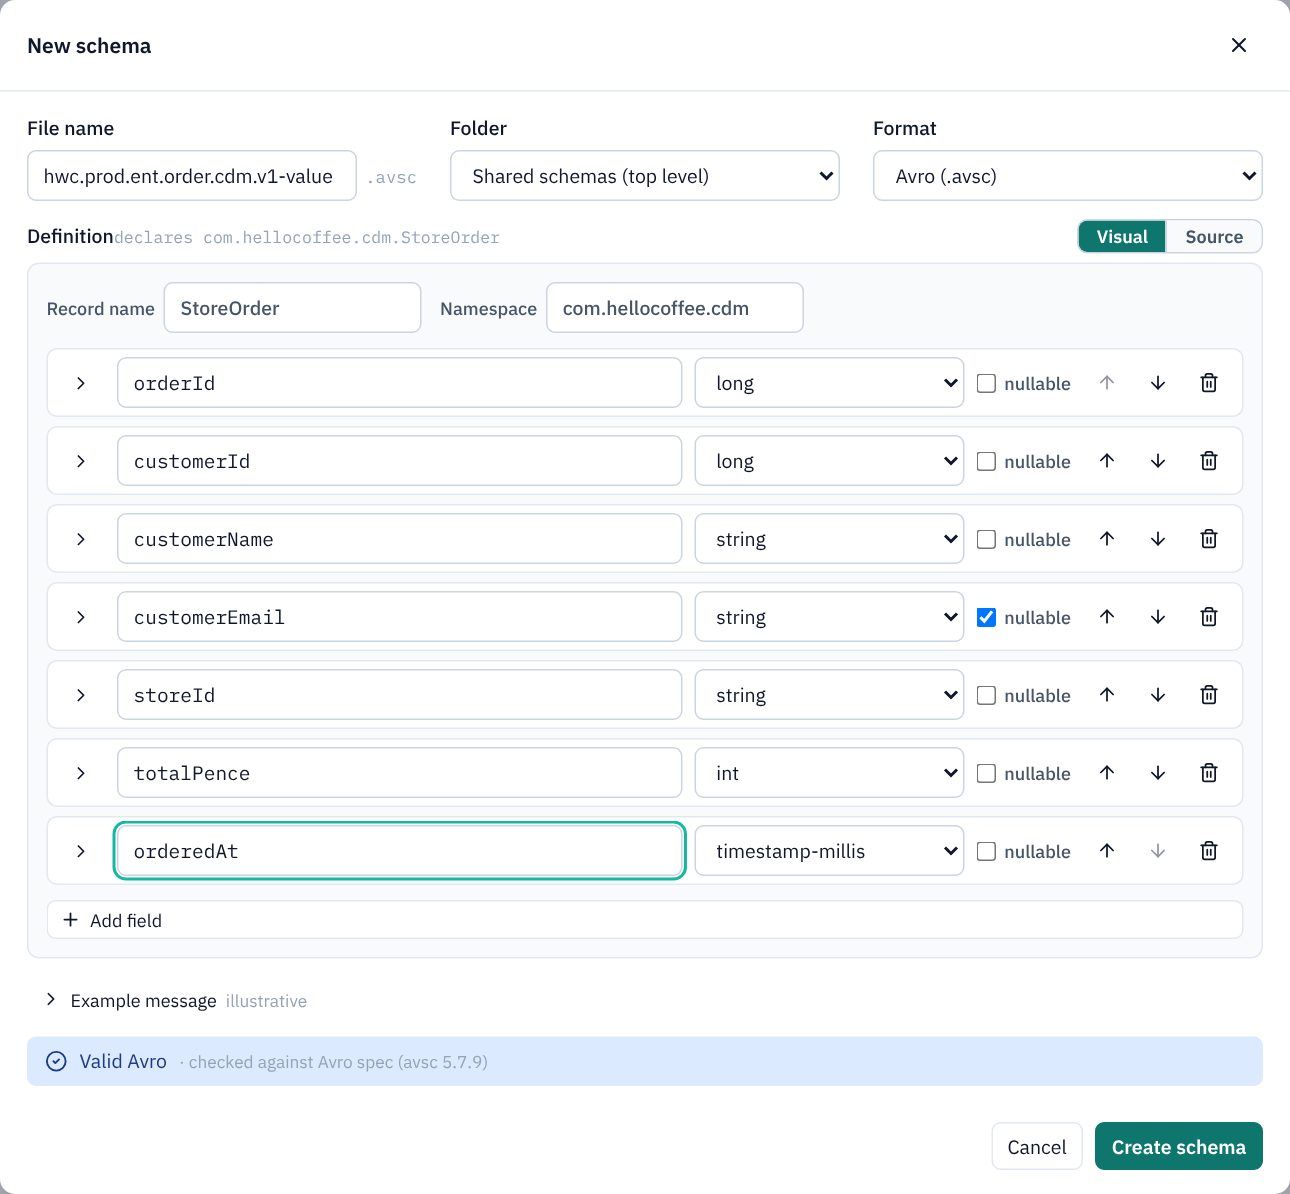
Every topic carries messages of a known shape, described by a schema. KPD has a visual editor for Avro, so you never need to write the JSON by hand. You need five: one for each raw table, one for the canonical order, and one for each data product. Their file names follow the topic names with -value on the end (the Schema Registry subject for a topic's values).
- In the explorer, scroll down to Shared schemas, right-click it and choose New schema…
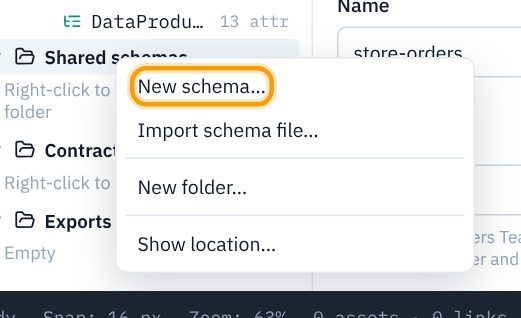
- The New schema dialog opens with an example record. Keep Folder as Shared schemas (top level) and Format as Avro (.avsc).
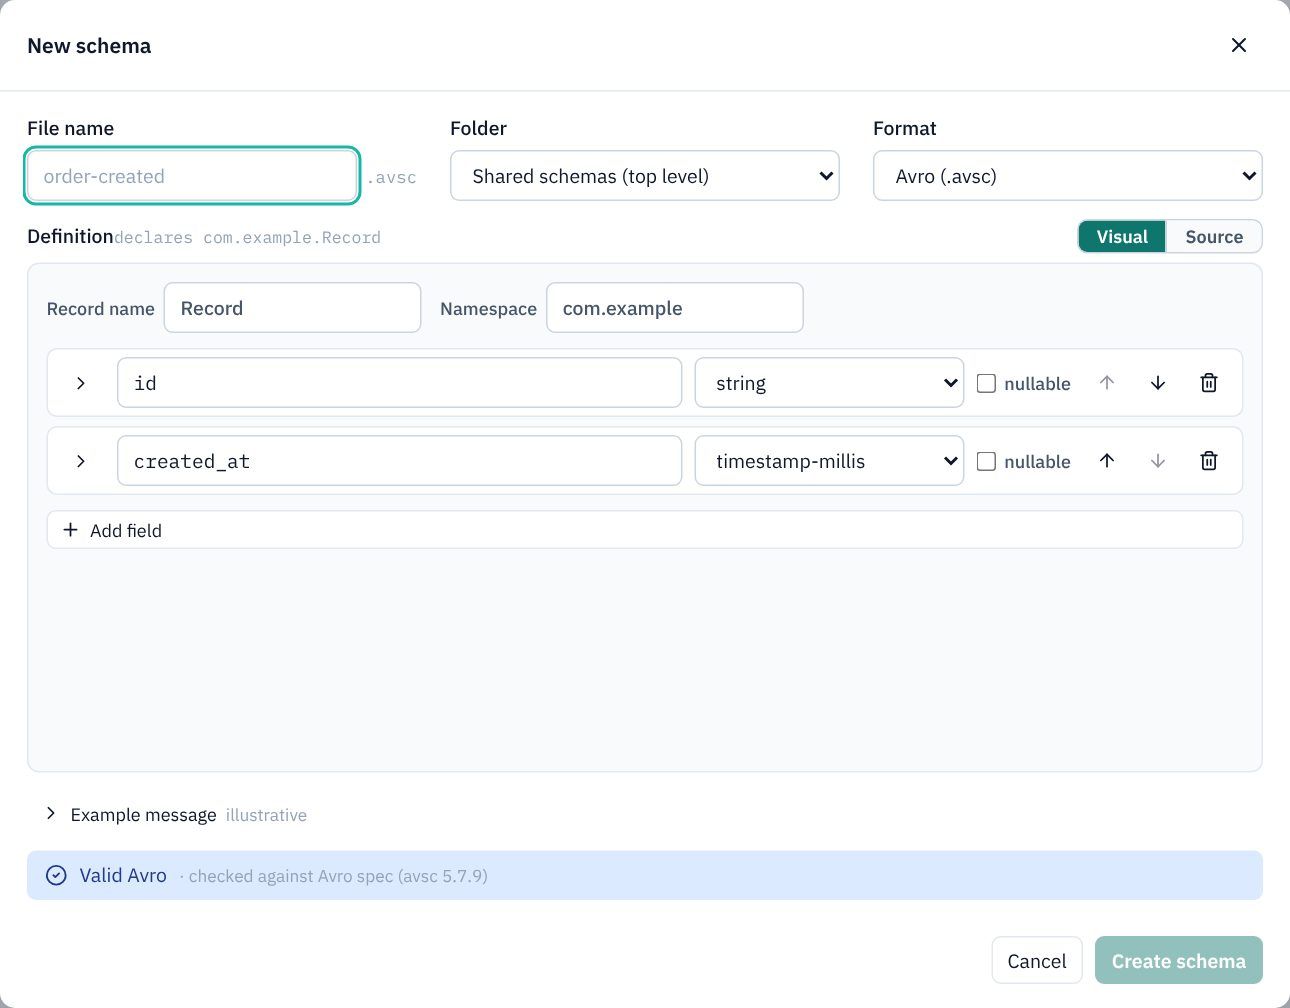
- File name:
hwc.prod.raw.order.shopdb.v1-value - Record name:
Order. Namespace:com.hellocoffee.raw - Change the two example fields and use Add field until you have these five. Type each name, then pick its type from the list (timestamp-millis is in the list too):
Field Type order_idlong customer_idlong store_idstring total_penceint ordered_attimestamp-millis
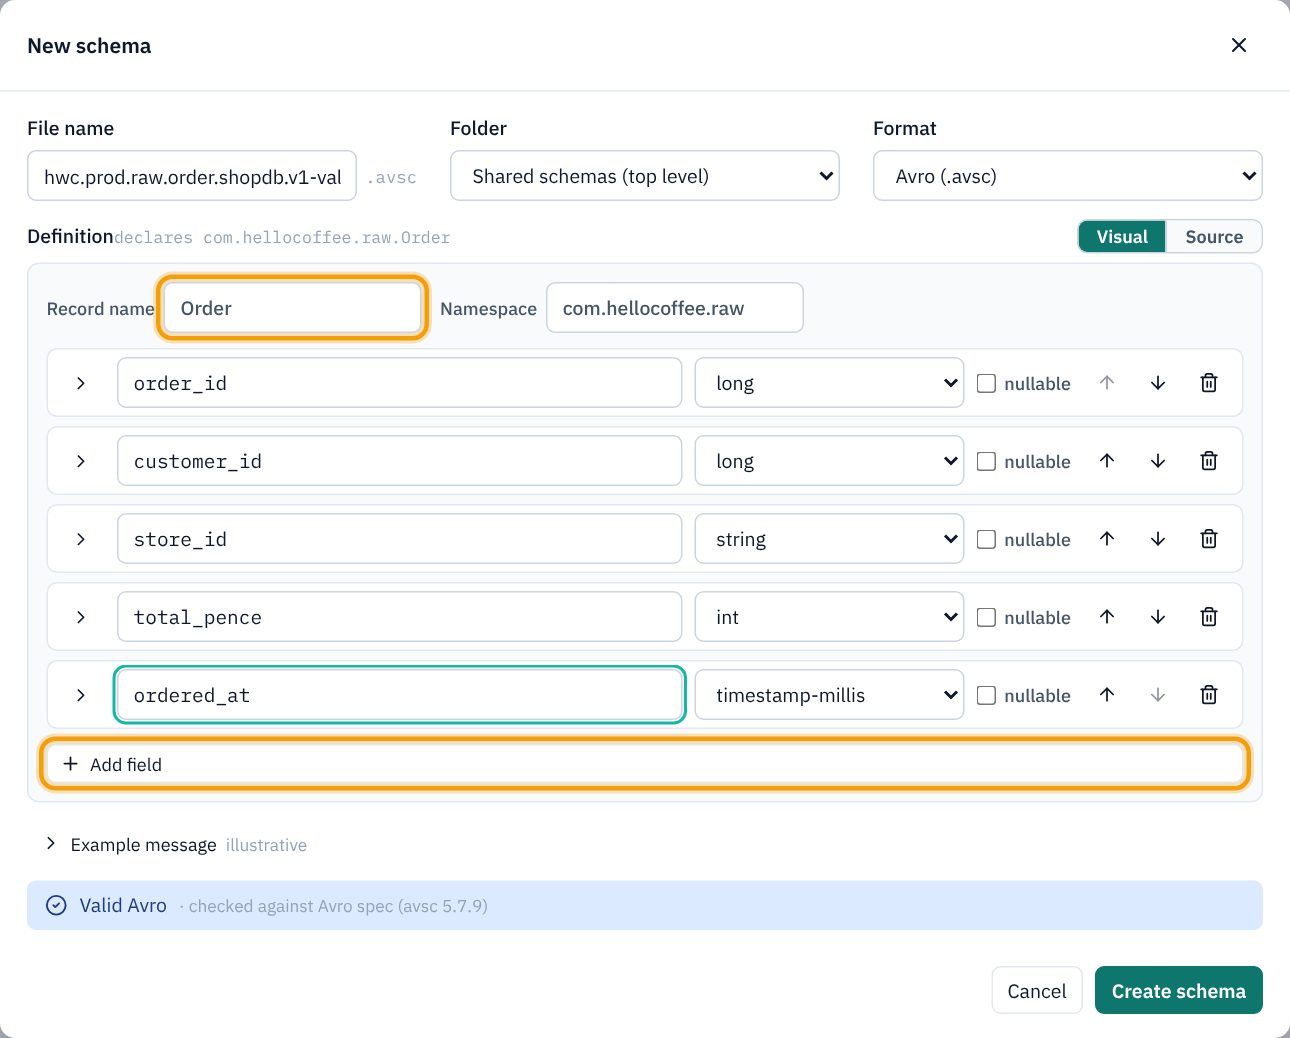
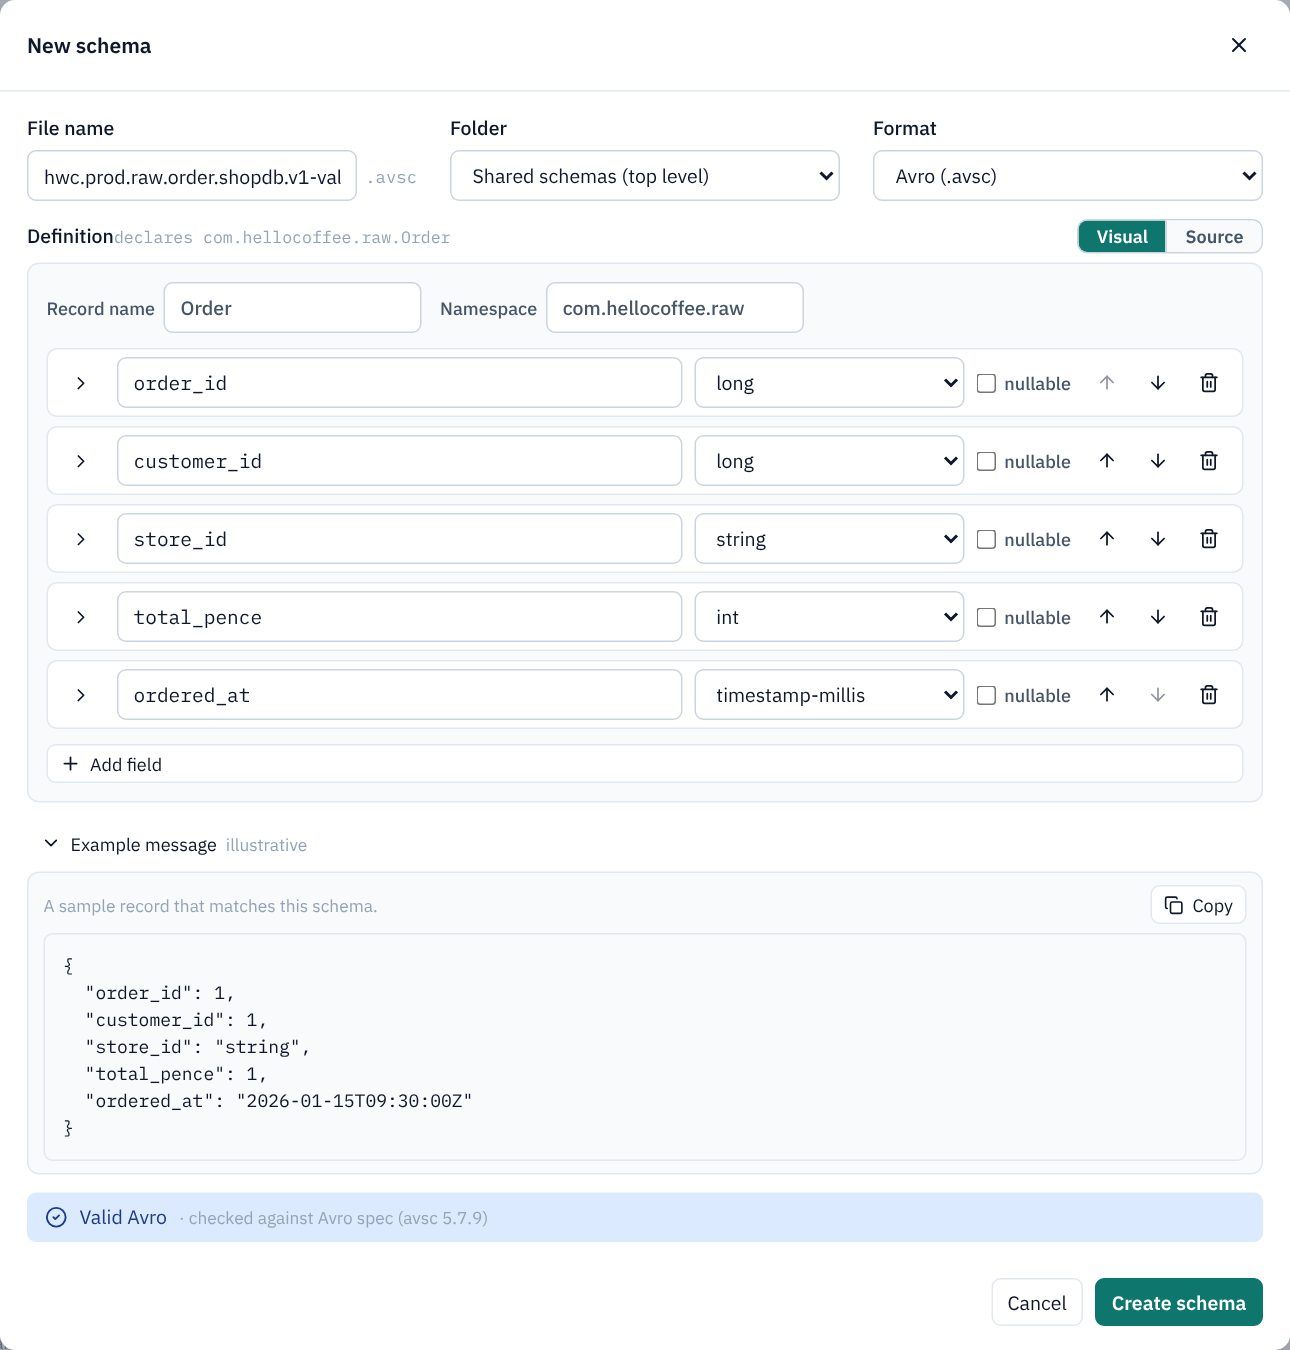
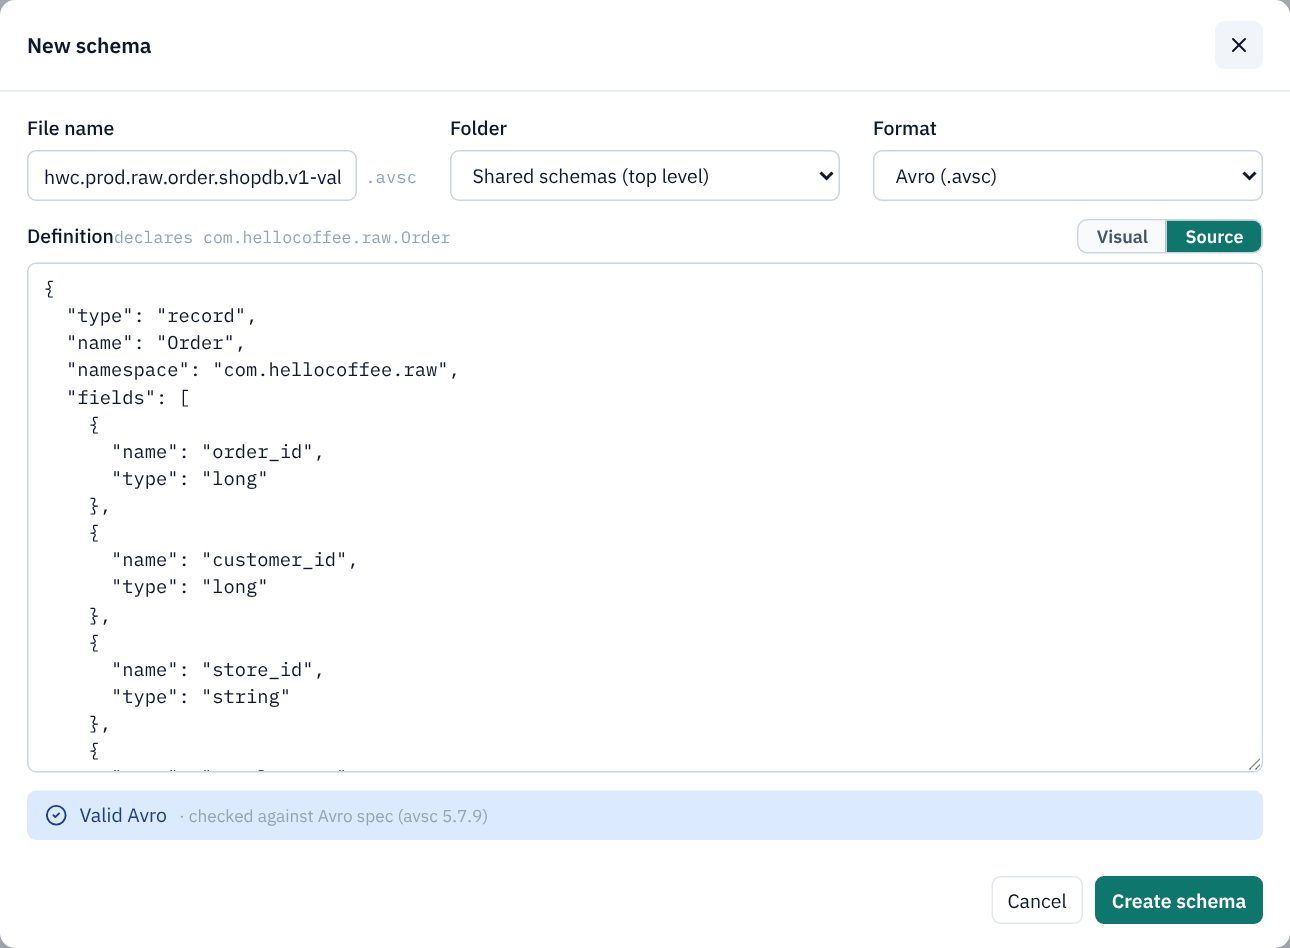
Two handy extras while you are here. Open Example message to see a sample record that matches the schema. Click Source to see the Avro JSON KPD writes for you. The blue Valid Avro bar means the schema is checked against the Avro specification as you type.
- Click Create schema.
- Repeat for the other four schemas:
File name Record / namespace Fields hwc.prod.raw.customer.shopdb.v1-valueCustomer/com.hellocoffee.rawcustomer_idlong,namestring,emailstring (tick nullable)hwc.prod.ent.order.cdm.v1-valueStoreOrder/com.hellocoffee.cdmorderIdlong,customerIdlong,customerNamestring,customerEmailstring (nullable),storeIdstring,totalPenceint,orderedAttimestamp-millishwc.prod.ent.order.history.v1-valueOrderHistory/com.hellocoffee.productorderIdlong,customerIdlong,customerNamestring,storeIdstring,totalPenceint,orderedAttimestamp-millishwc.prod.ent.order.big-orders.v1-valueBigOrder/com.hellocoffee.productorderIdlong,storeIdstring,totalPenceint,orderedAttimestamp-millis
order_id), exactly as captured. The canonical layer uses the business's names (orderId) once, so every data product built on it agrees. That is the DPCF raw → canonical → product pattern.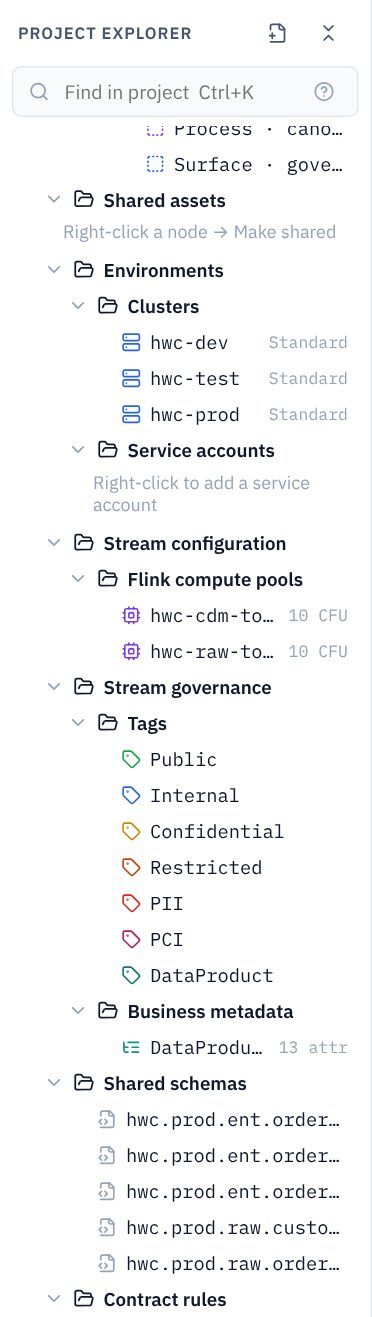
4.3 Add the CDC source
CDC (change data capture) reads the database's own change log, so every insert and update is captured once, in order, without querying the tables.
- Make sure the store-orders.kpd tab is showing. On the Start your pipeline card, click Add a source. (Start from a system would draw the shop database itself first, which is a good way into a workshop; here we go straight to the connector.)
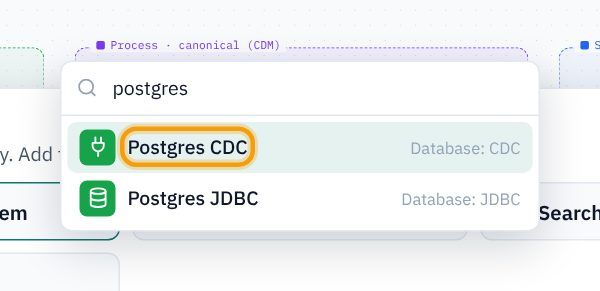
- Type
postgresand choose Postgres CDC (its full name is PostgreSQL CDC Source V2).
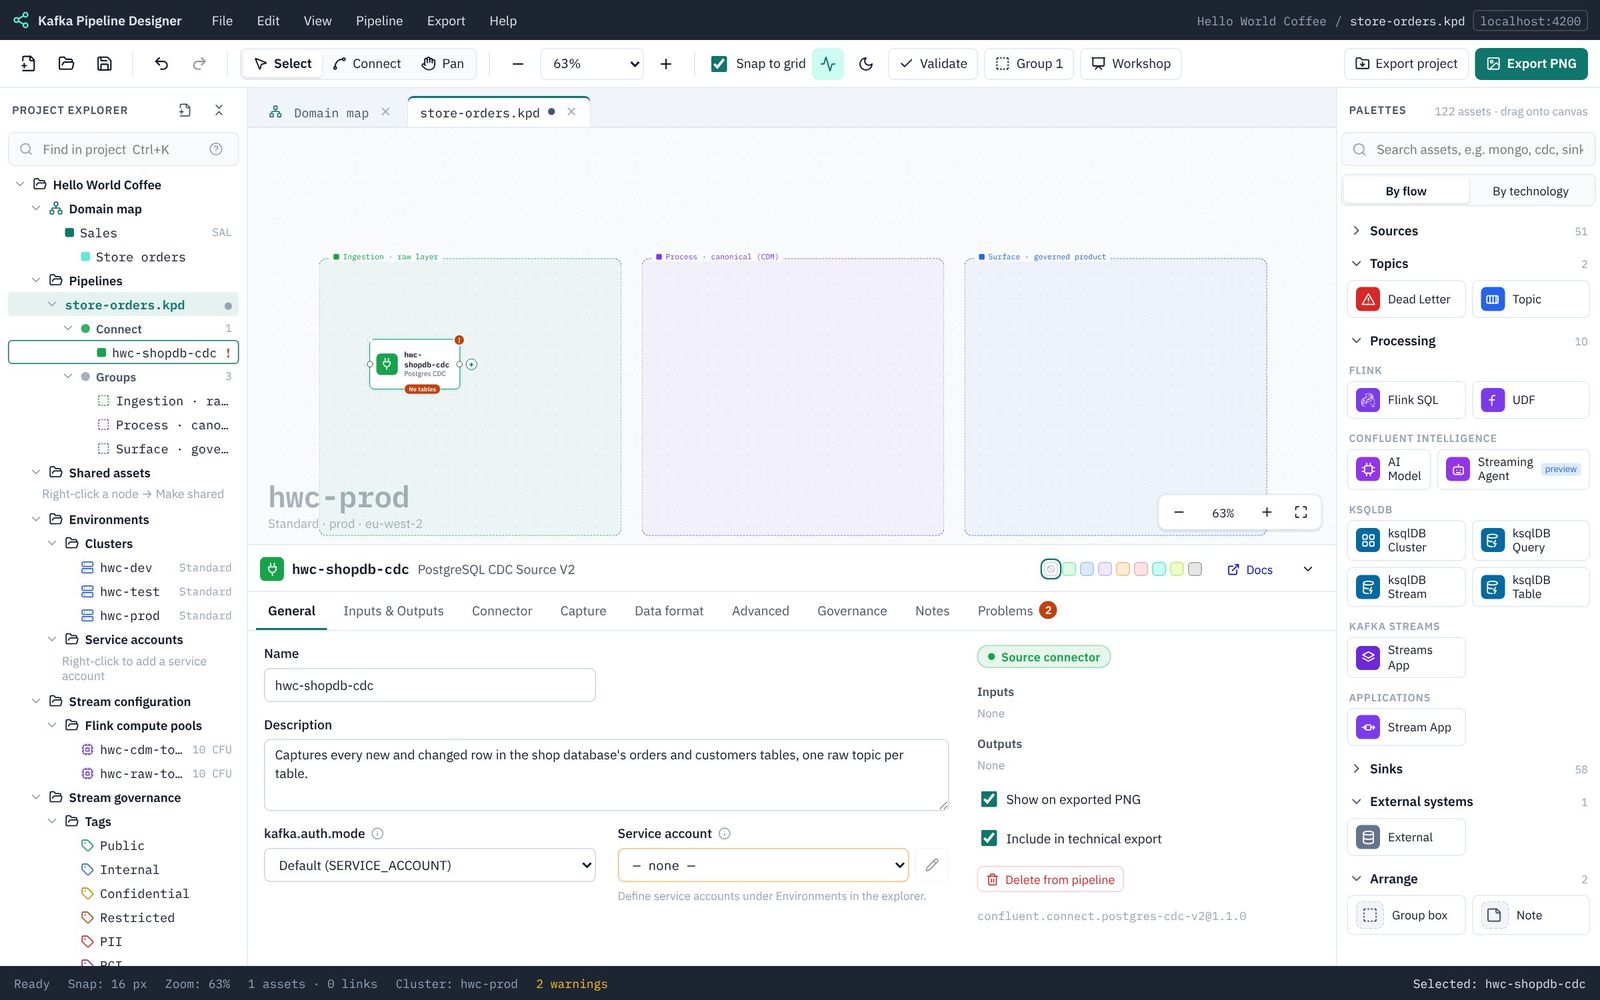
- The connector appears on the canvas. If it isn't inside the green Ingestion box, drag it there: sources belong in the ingestion layer.
- On its General tab: Name
hwc-shopdb-cdc; DescriptionCaptures every new and changed row in the shop database's orders and customers tables, one raw topic per table.(Leave Service account for Part 6.)
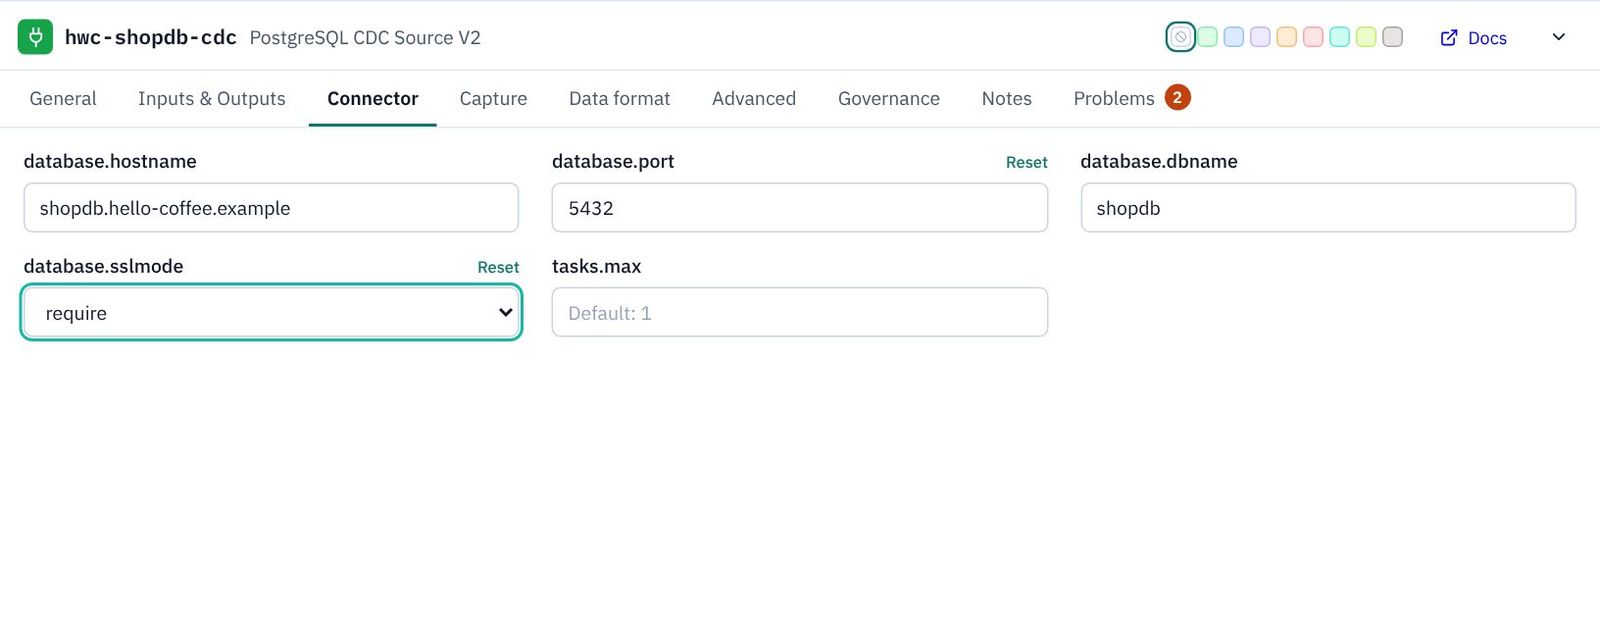
- Connector tab: database.hostname
shopdb.hello-coffee.example, database.port5432, database.dbnameshopdb, database.sslmode require. (No password: that is a secret, supplied when deploying.)
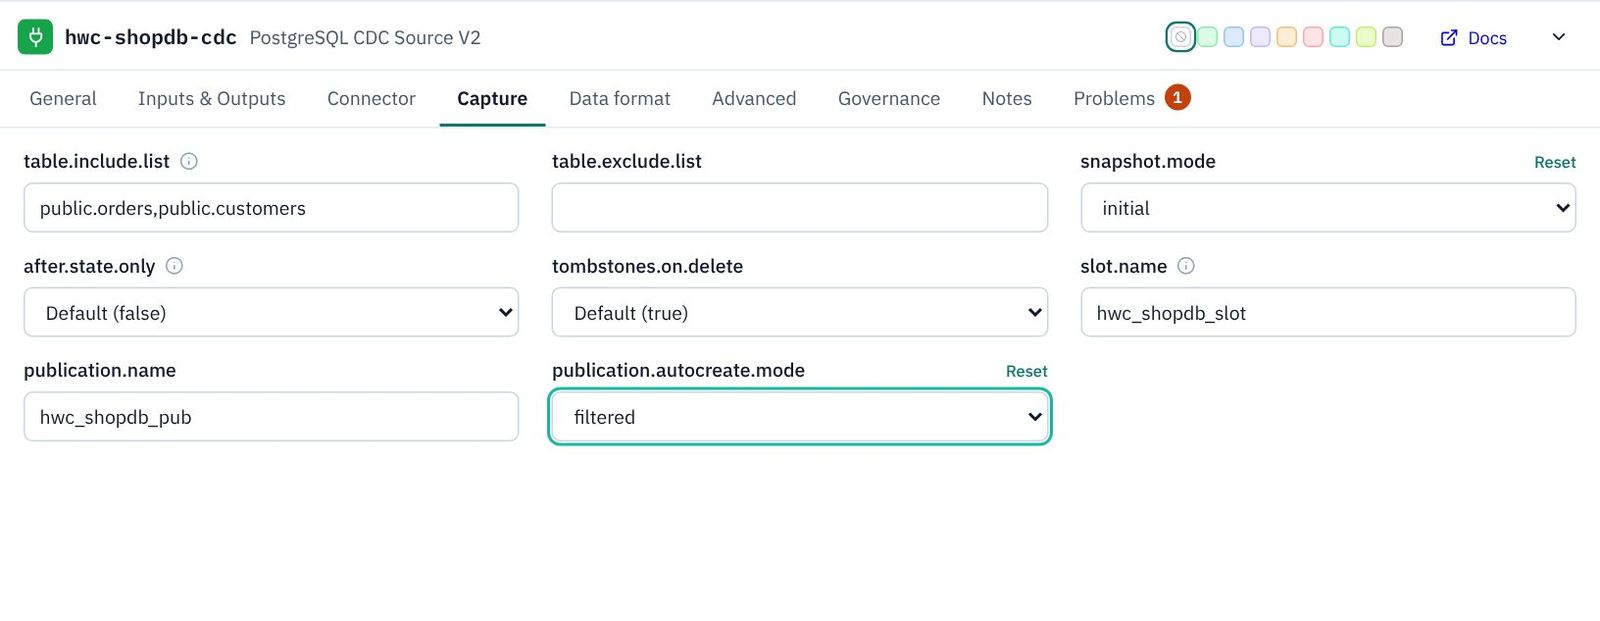
- Capture tab: table.include.list
public.orders,public.customers; snapshot.mode initial (copy the existing rows first, then stream changes); slot.namehwc_shopdb_slot; publication.namehwc_shopdb_pub; publication.autocreate.mode filtered (the publication covers just these two tables).
- Data format tab: output.data.format AVRO, output.key.format STRING, topic.prefix
hwc.prod.raw.shopdb.
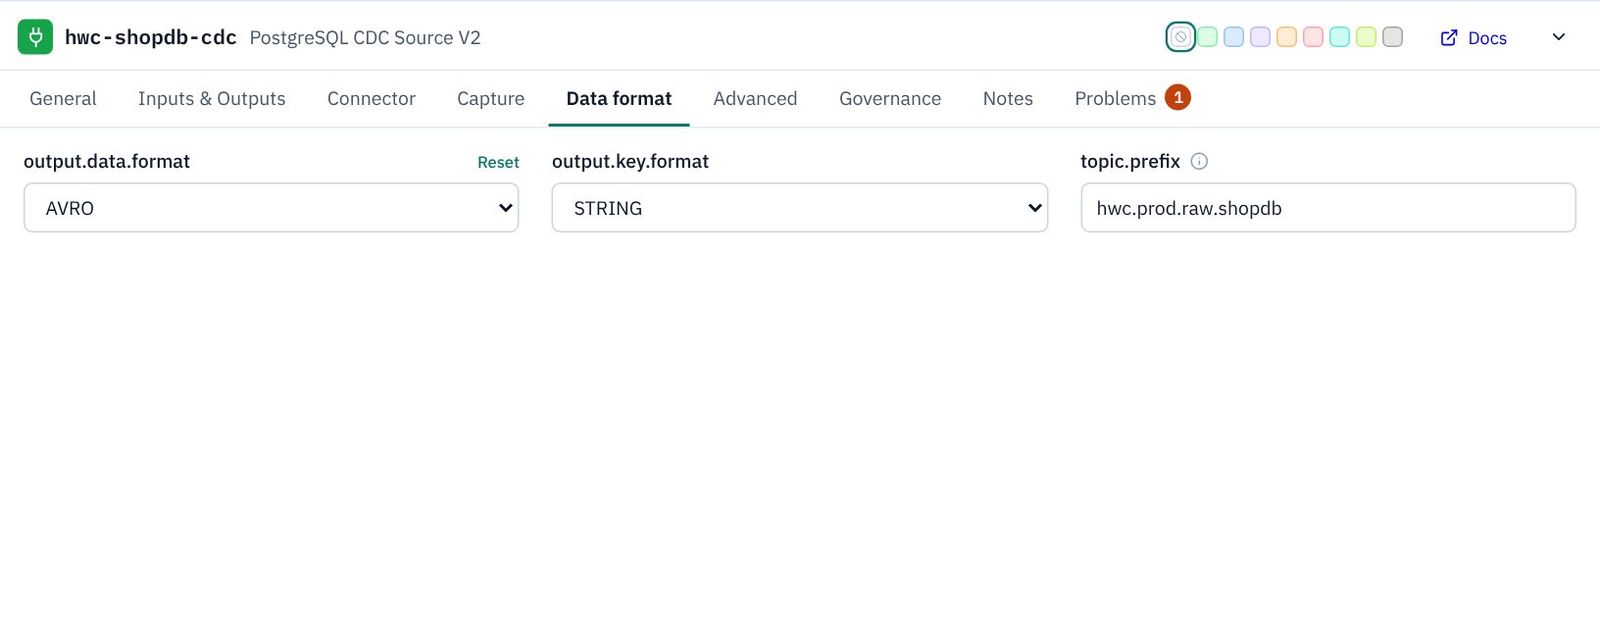
topic.prefix, then the schema and table. With our prefix, public.orders would land in hwc.prod.raw.shopdb.public.orders. KPD works these names out and checks the topics you wire against them. Our DPCF standard wants names like hwc.prod.raw.order.shopdb.v1 instead, so the next step adds a transform that renames them. (Without it, KPD would offer to Add topics with the connector's own names. See CDC sources and their topics.)- Advanced tab: in SMT chain, type
RegexRouterand press Enter. RegexRouter is the single message transform that renames each topic to our DPCF name.
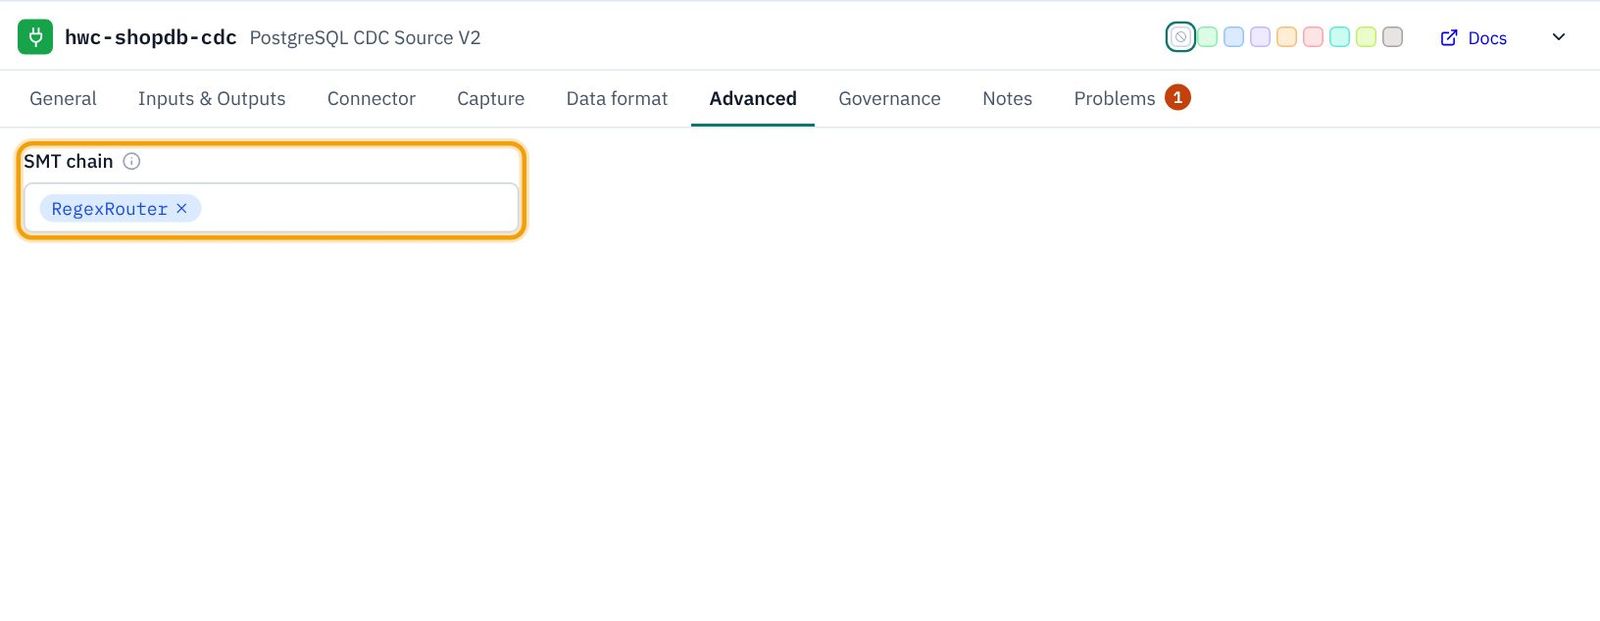
Because a transform renames the topics, KPD can't predict the names any more, so it checks only that there is one topic per captured table. (The transform's own settings, the pattern and the replacement, are added to the Terraform by hand.)
4.4 Add the two raw topics
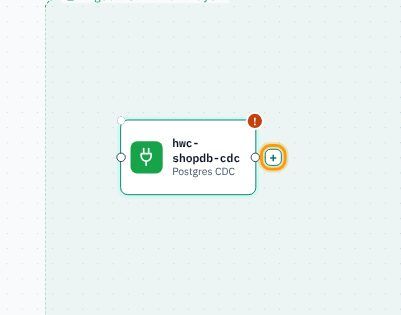
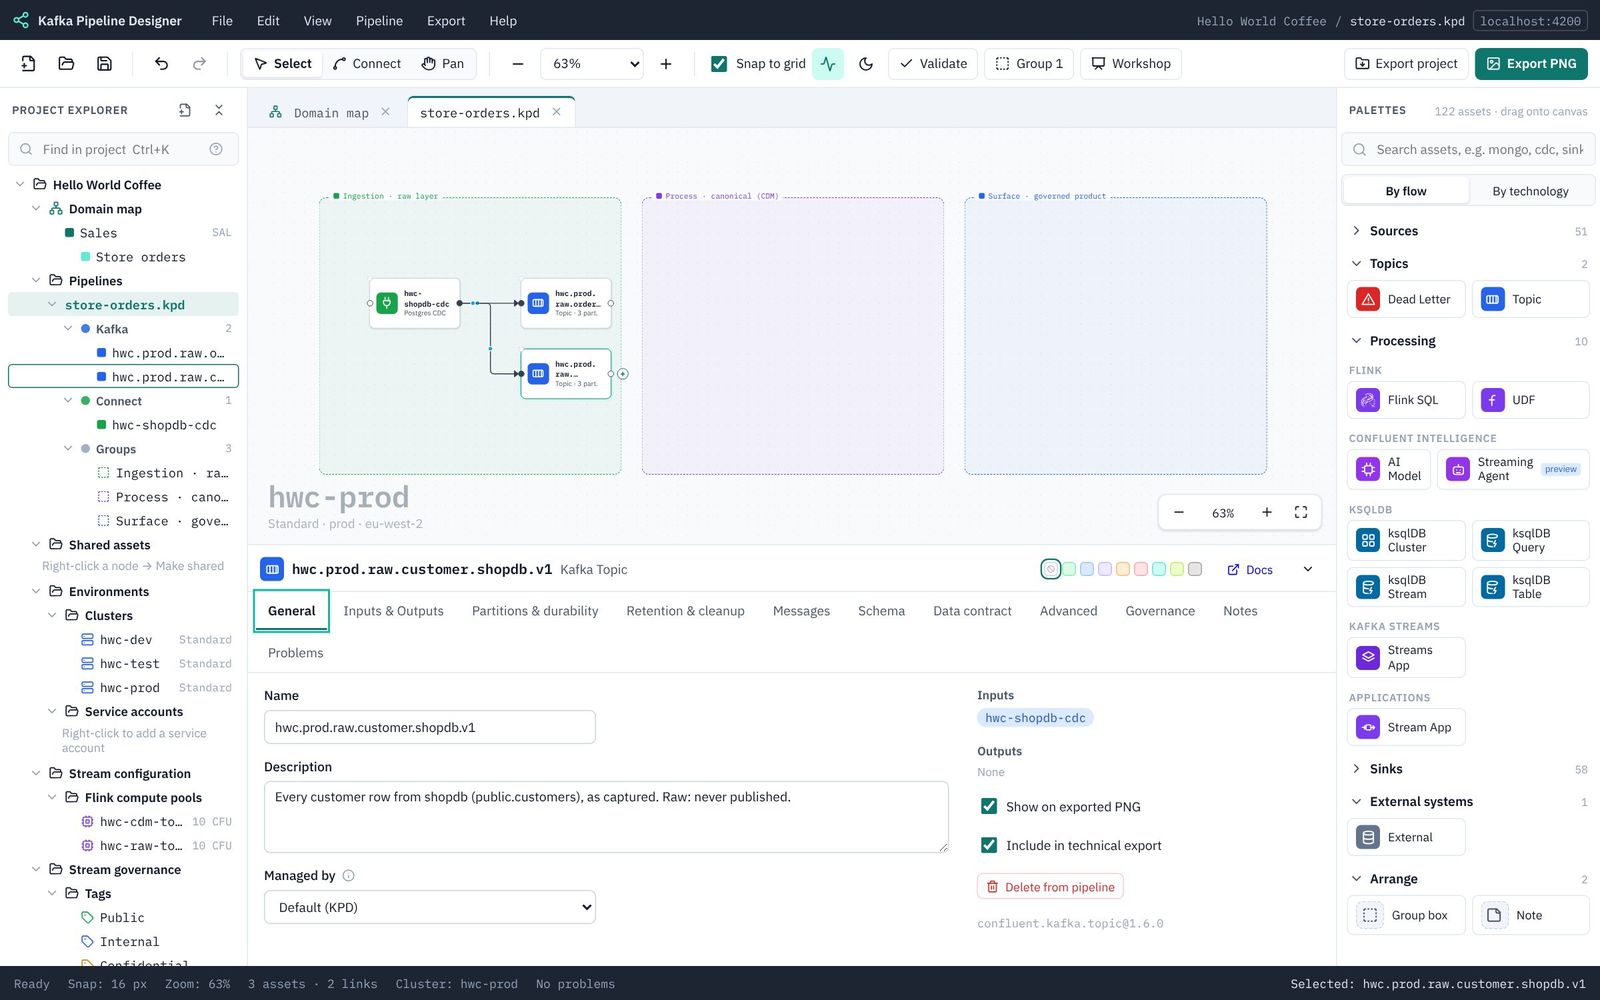
- With the connector selected, click the + on its right-hand edge (its Records output).
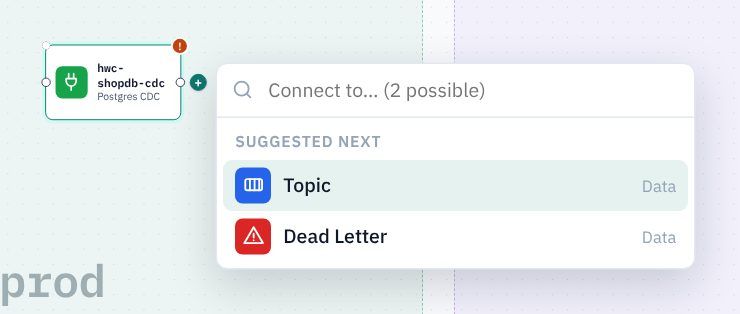
- Choose Topic. A topic appears, already connected.
- On the topic's General tab: Name
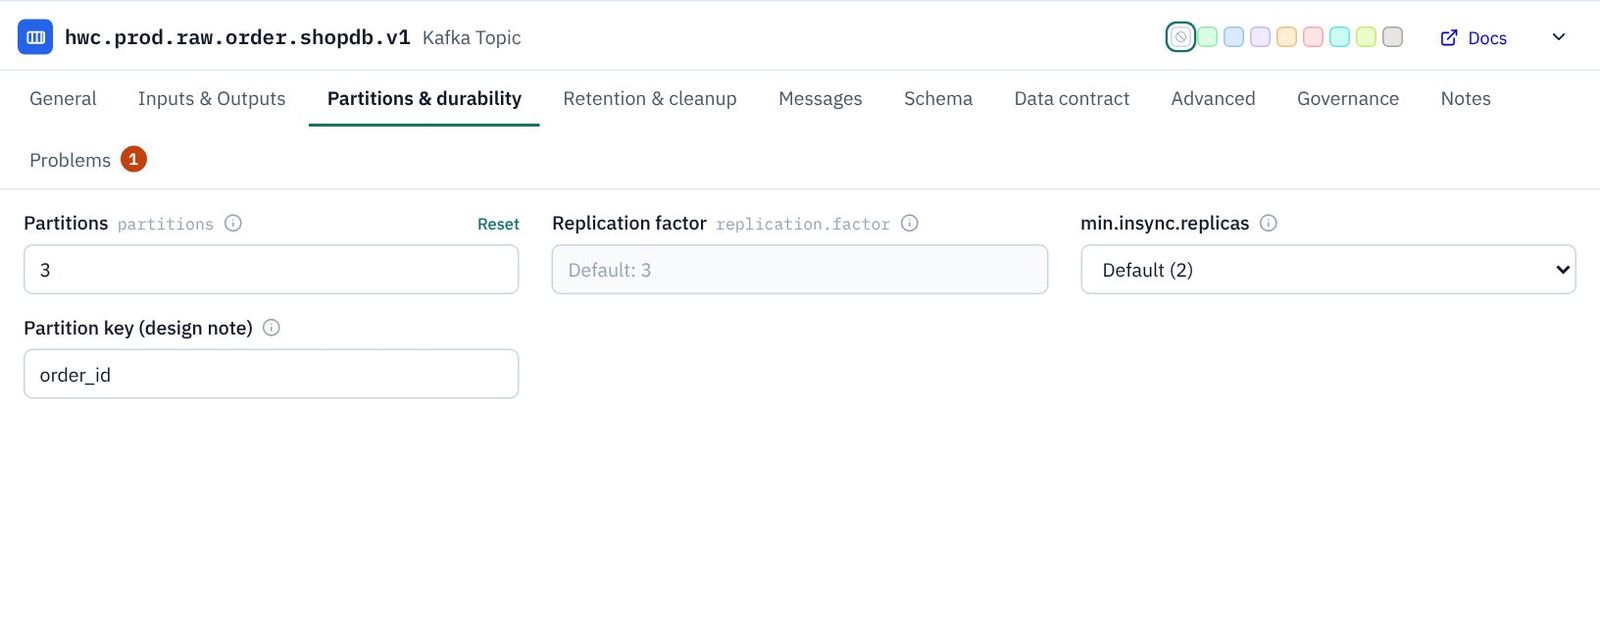
hwc.prod.raw.order.shopdb.v1; DescriptionEvery order row from shopdb (public.orders), as captured. Raw: never published. - Partitions & durability tab: Partitions
3; Partition keyorder_id(a design note: which field keeps one order's changes in order).
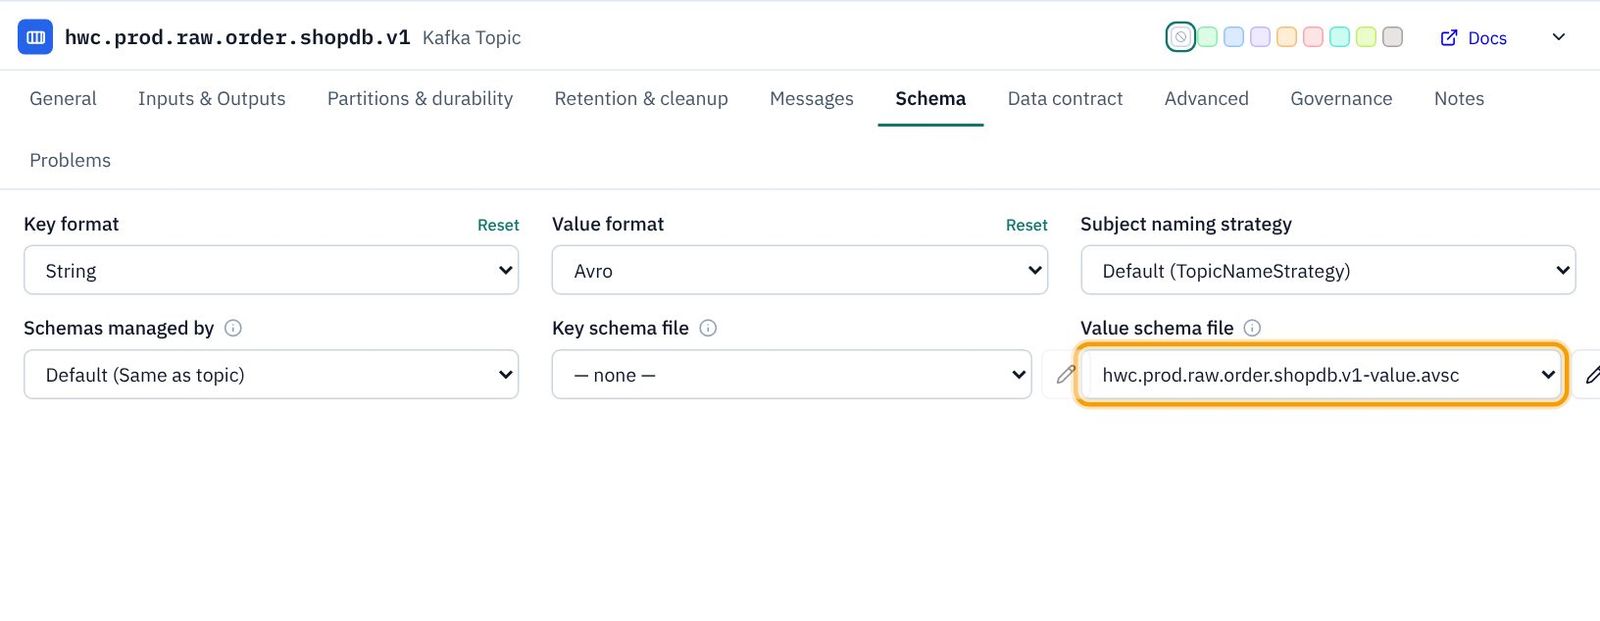
- Schema tab: Key format String; Value schema file
hwc.prod.raw.order.shopdb.v1-value.avsc.
- Select the connector again, click its + again and add a second Topic: name
hwc.prod.raw.customer.shopdb.v1, descriptionEvery customer row from shopdb (public.customers), as captured. Raw: never published., 3 partitions, partition keycustomer_id, key format String, value schemahwc.prod.raw.customer.shopdb.v1-value.avsc.
4.5 Join orders to customers in Flink
- Select the order raw topic and click its +. Choose Flink SQL. The statement is placed in the purple Process box.
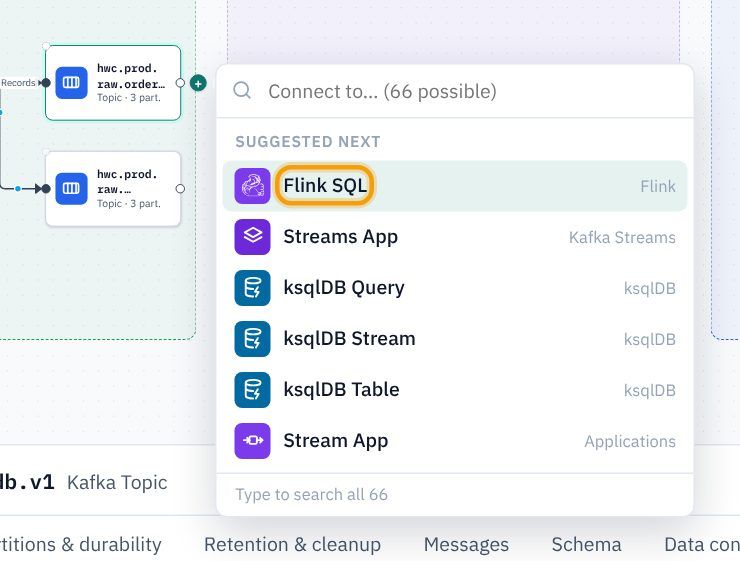
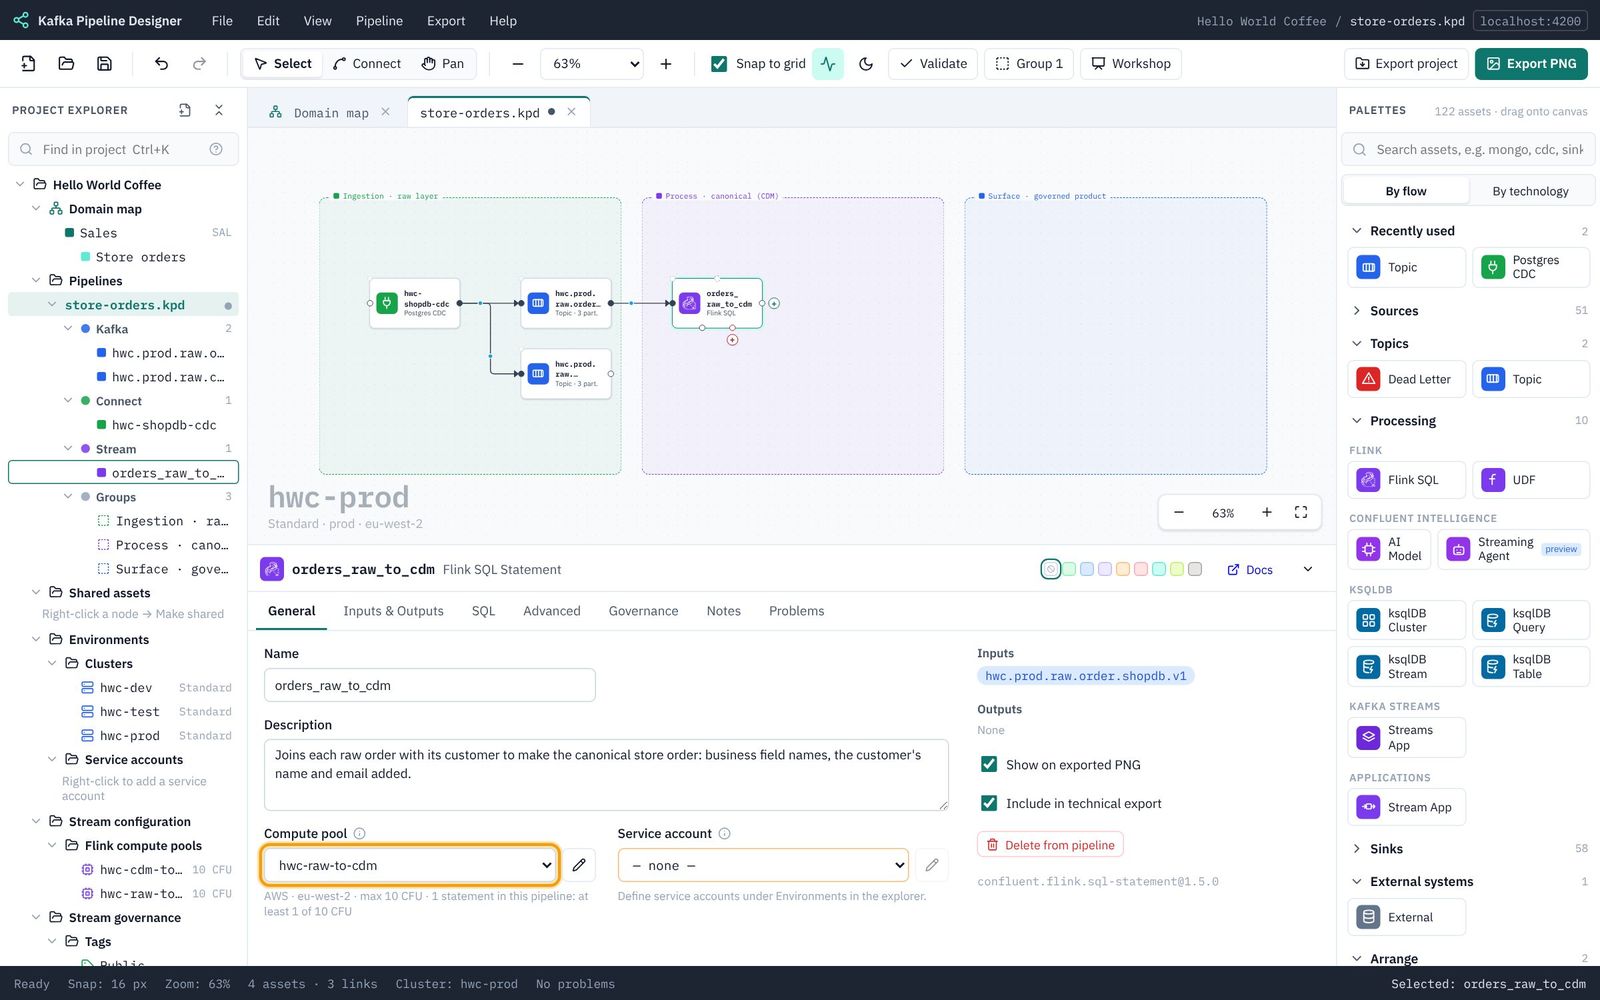
- On the statement's General tab: Name
orders_raw_to_cdm; DescriptionJoins each raw order with its customer to make the canonical store order: business field names, the customer's name and email added.; Compute pool hwc-raw-to-cdm.
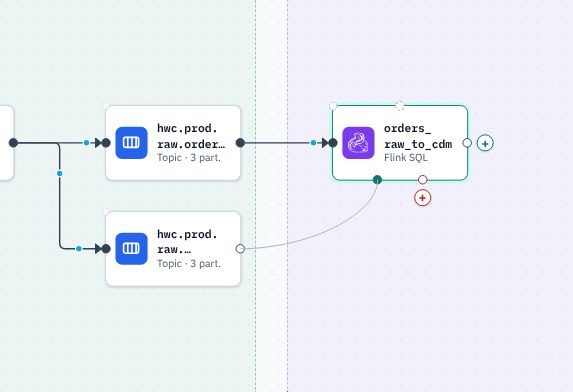
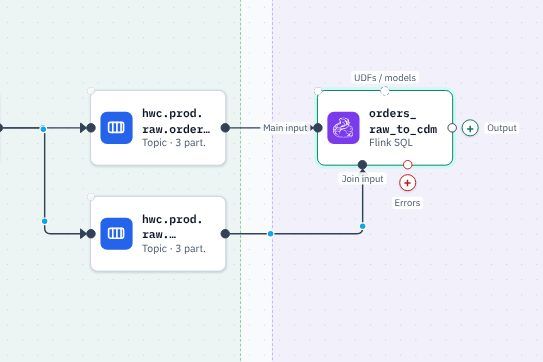
- Now wire the customer topic in as the join. A Flink statement has a Main input on its left and a Join input on its bottom edge. Drag from the customer topic's right-hand dot (its output) to the dot on the bottom of the statement. A line follows the mouse while you drag.
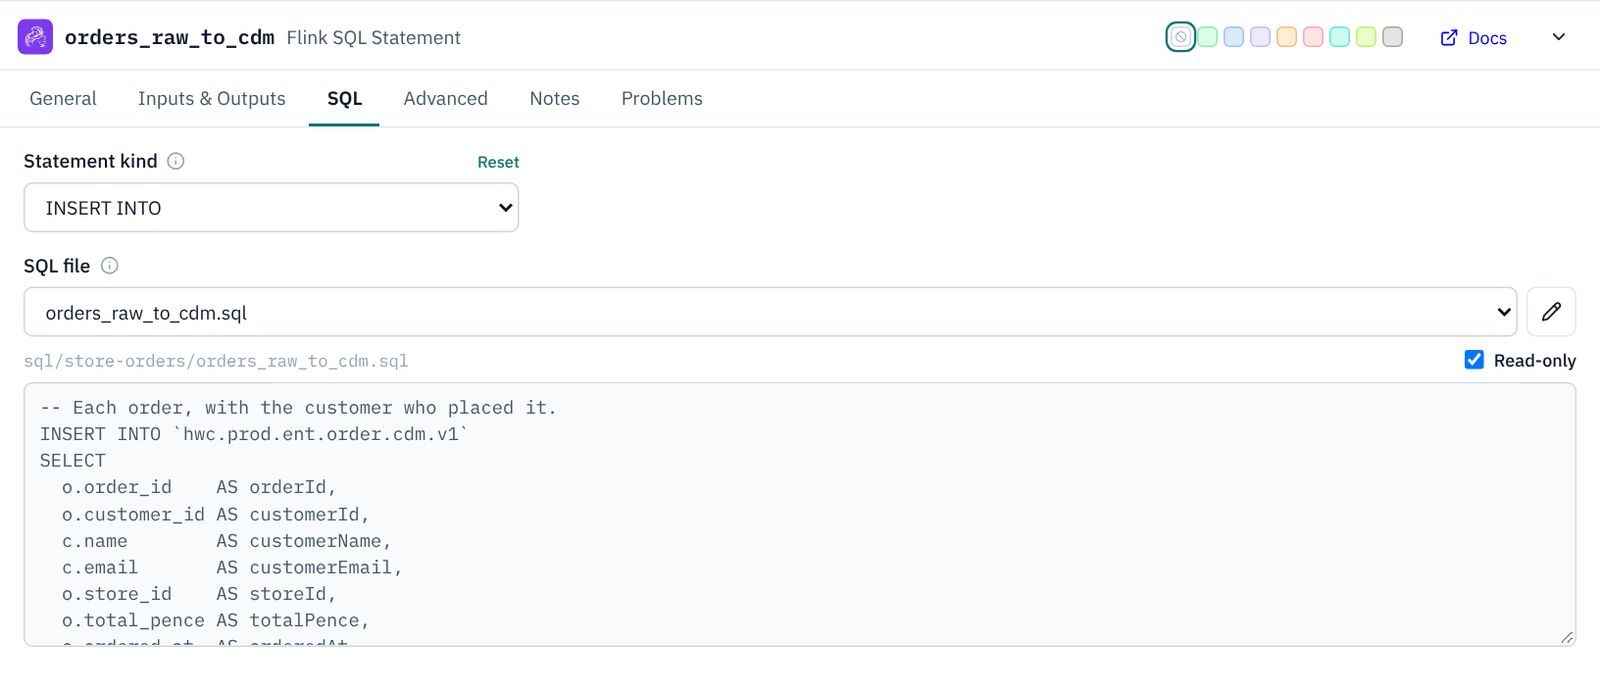
- SQL tab: Statement kind INSERT INTO. Keep the SQL in a file of its own, so it can be reviewed like any other code: under SQL file choose + New SQL file…. The dialog suggests the name
orders_raw_to_cdmin a newstore-ordersfolder; keep both, replace the starter text with this, and click Create SQL file:
The SQL tab now shows the file, Read-only so it isn’t changed by accident. To change it later, untick Read-only and edit it there, or open it from Stream configuration → SQL in the explorer.-- Each order, with the customer who placed it. INSERT INTO `hwc.prod.ent.order.cdm.v1` SELECT o.order_id AS orderId, o.customer_id AS customerId, c.name AS customerName, c.email AS customerEmail, o.store_id AS storeId, o.total_pence AS totalPence, o.ordered_at AS orderedAt FROM `hwc.prod.raw.order.shopdb.v1` AS o JOIN `hwc.prod.raw.customer.shopdb.v1` AS c ON o.customer_id = c.customer_id;
4.6 Add the canonical topic
- Select
orders_raw_to_cdm, click the + on its Output and choose Topic. - Name
hwc.prod.ent.order.cdm.v1; DescriptionCanonical store orders: every order with its customer, in business field names. The single source for the data products.; 3 partitions, partition keyorderId; key format String; value schemahwc.prod.ent.order.cdm.v1-value.avsc.
4.7 Add the two data products
Each data product is a Flink statement that reads the canonical topic and writes its own topic, in the blue Surface box.
- Select the canonical topic, click its + and choose Flink SQL. Name it
order_history_product, descriptionData product DP-001: every order with who placed it, for the app's order history., compute pool hwc-cdm-to-surface. On SQL, choose + New SQL file… as before, keep the suggested name, and create it with:-- DP-001: each customer's orders, without their email. INSERT INTO `hwc.prod.ent.order.history.v1` SELECT orderId, customerId, customerName, storeId, totalPence, orderedAt FROM `hwc.prod.ent.order.cdm.v1`; - Select
order_history_product, click the + on its Output, choose Topic: namehwc.prod.ent.order.history.v1, descriptionDP-001 Customer order history: every store order with the customer who placed it., 3 partitions keyed byorderId, key String, value schemahwc.prod.ent.order.history.v1-value.avsc. - Select the canonical topic again and add a second Flink SQL:
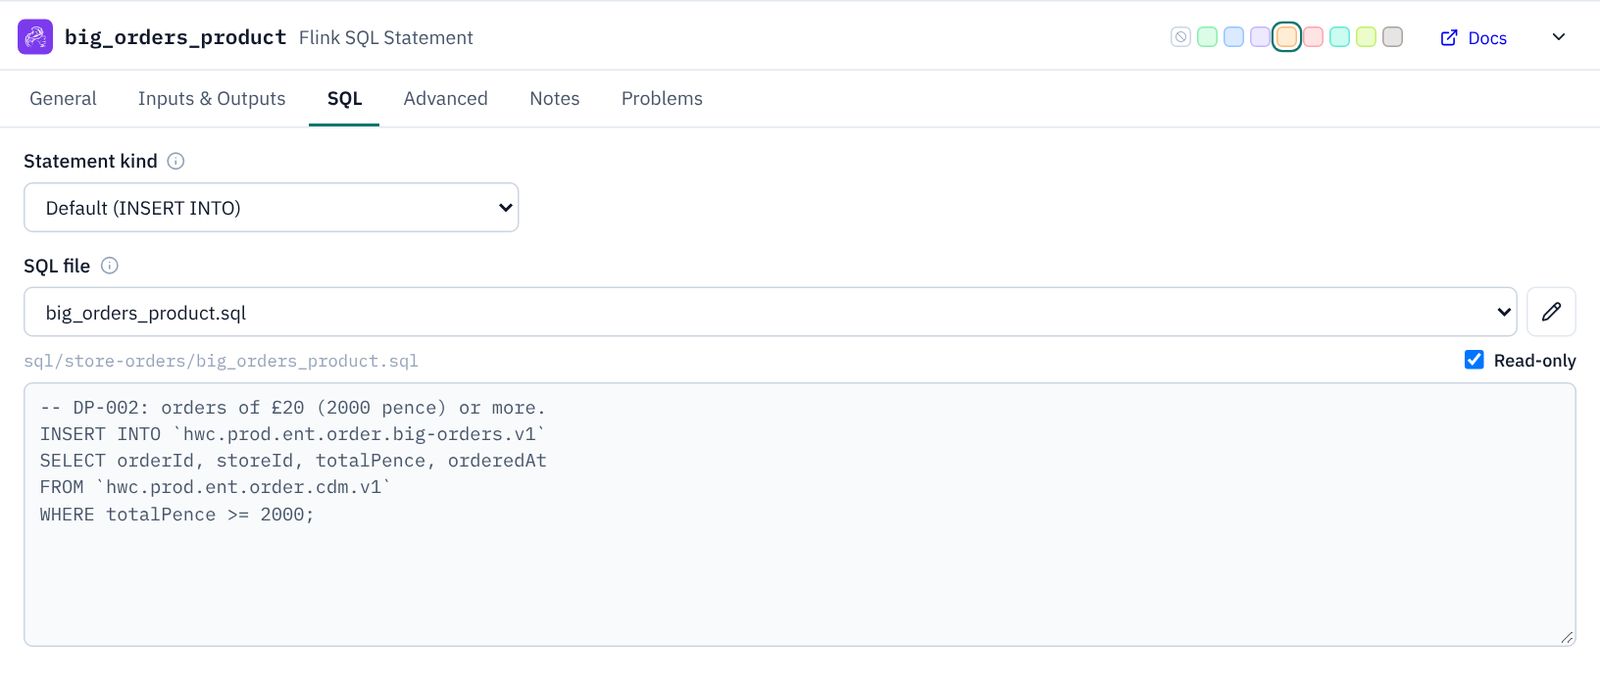
big_orders_product, descriptionData product DP-002: orders of £20 or more, for store managers., pool hwc-cdm-to-surface, and a + New SQL file… with:-- DP-002: orders of £20 (2000 pence) or more. INSERT INTO `hwc.prod.ent.order.big-orders.v1` SELECT orderId, storeId, totalPence, orderedAt FROM `hwc.prod.ent.order.cdm.v1` WHERE totalPence >= 2000; - Give it an output Topic:
hwc.prod.ent.order.big-orders.v1, descriptionDP-002 Big orders: orders of £20 or more, as they happen., 3 partitions keyed byorderId, key String, value schemahwc.prod.ent.order.big-orders.v1-value.avsc.
Save. Next: 5. Governance: tags and the catalogue.
5. Governance: tags and the catalogue
Classification tags on every topic, and catalogue metadata on the two data products.
Tags say how sensitive data is; they become Stream Catalog tags in Confluent Cloud, so people can search for them and policies can act on them. Business metadata describes a data product in the catalogue: what it is, who owns it, how good it is. The DPCF template created both for you.
The tags you have
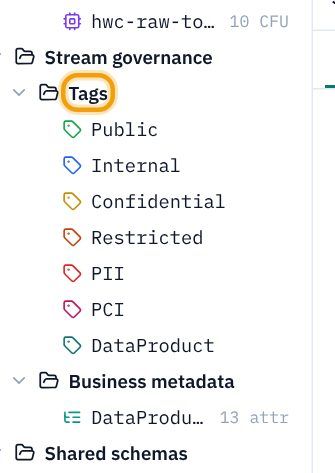
- In the explorer, open Stream governance → Tags. There are four classification tiers (Public, Internal, Confidential, Restricted), two overlays for special data (PII personal data, PCI card data) and DataProduct for published products.
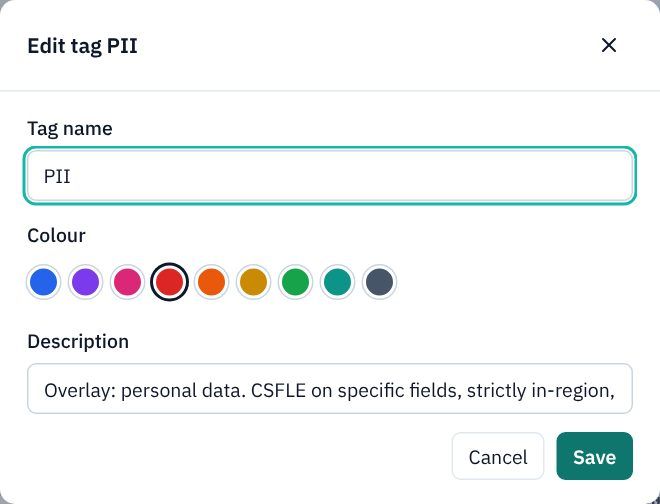
- Click PII to see what a tag holds: a name, a colour and a description. Click Cancel: there is nothing to change.
Tag every topic
- Click the topic
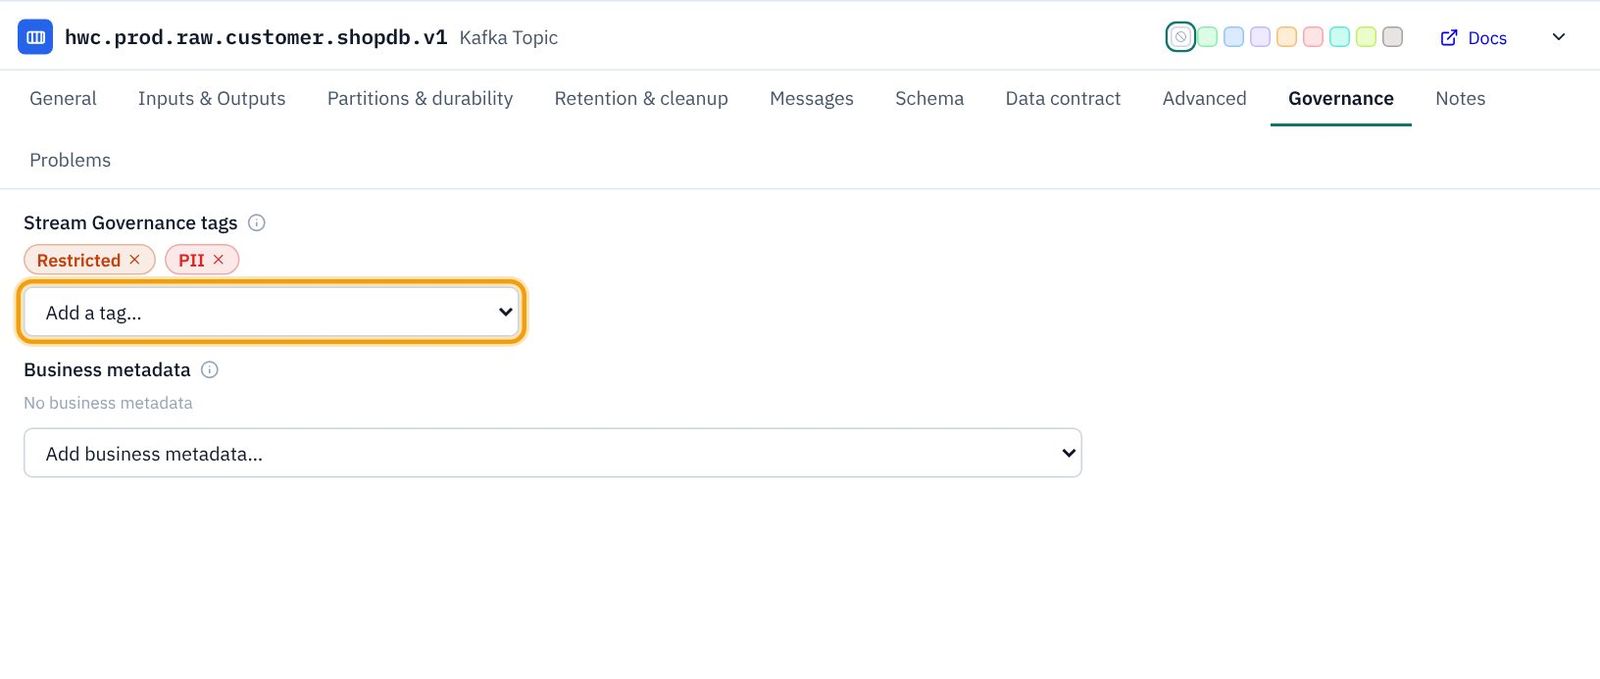
hwc.prod.raw.customer.shopdb.v1and open its Governance tab. - In Add a tag… choose Restricted, then open it again and choose PII. Each becomes a chip; click a chip's × to remove it.
- Tag the other topics the same way:
Topic Tags Why hwc.prod.raw.order.shopdb.v1Restricted Raw data is never published. hwc.prod.raw.customer.shopdb.v1Restricted, PII Raw, with personal data. hwc.prod.ent.order.cdm.v1Confidential, PII Cleaned, but still has names and emails. hwc.prod.ent.order.history.v1Confidential, PII, DataProduct A product, with customer names. hwc.prod.ent.order.big-orders.v1Internal, DataProduct A product with no personal data.
Catalogue the two data products
- Click
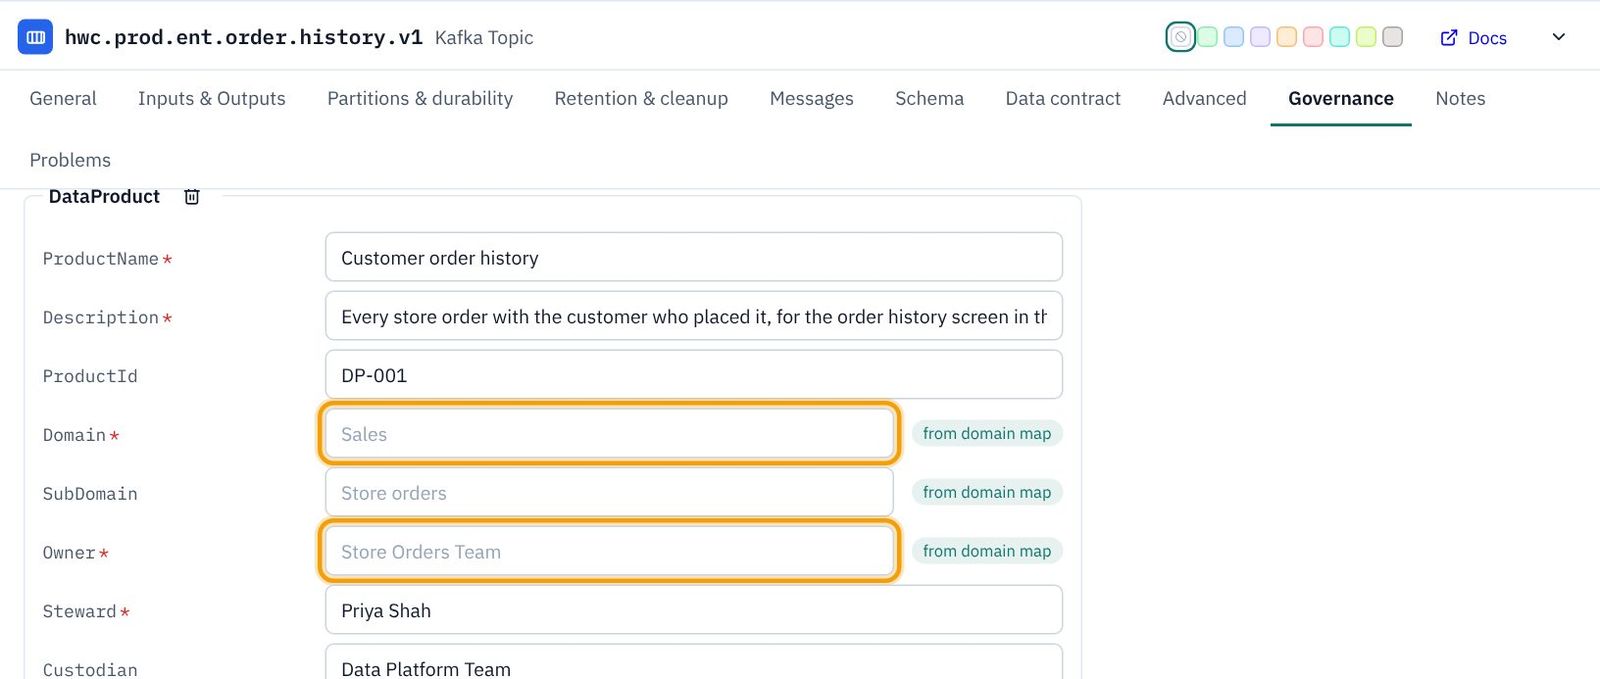
hwc.prod.ent.order.history.v1and open Governance. - In Add business metadata… choose DataProduct. Its attributes appear (a red * marks the required ones).
- Fill in:
Attribute Customer order history Big orders ProductName Customer order historyBig ordersDescription Every store order with the customer who placed it, for the order history screen in the app.Orders of £20 or more, as they happen, so store managers can thank big customers and plan stock.ProductId DP-001DP-002Steward Priya ShahPriya ShahCustodian Data Platform TeamData Platform TeamClassification Confidential, PIIInternalTier BronzeBronzeLifecycleState CandidateCandidateContractSummary Schema hwc.prod.ent.order.history.v1-value. Each order within a minute of being placed.Schema hwc.prod.ent.order.big-orders.v1-value. Each big order within a minute of being placed.
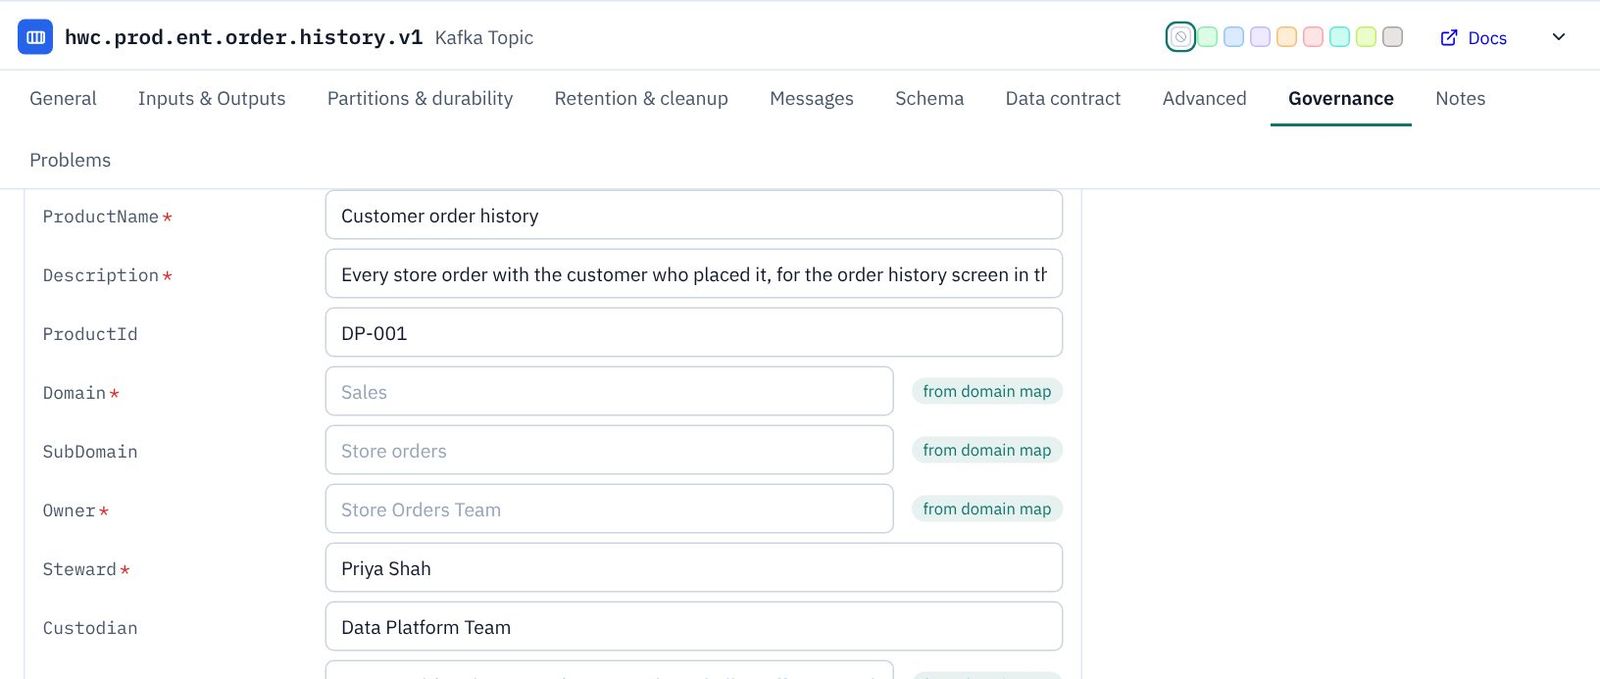
- Notice Domain, SubDomain, Owner and Contact: you don't type them. They show from domain map, because the pipeline is linked to Sales / Store orders (Part 2). Change the domain map and every product follows.
- Do the same on
hwc.prod.ent.order.big-orders.v1with the Big orders column.
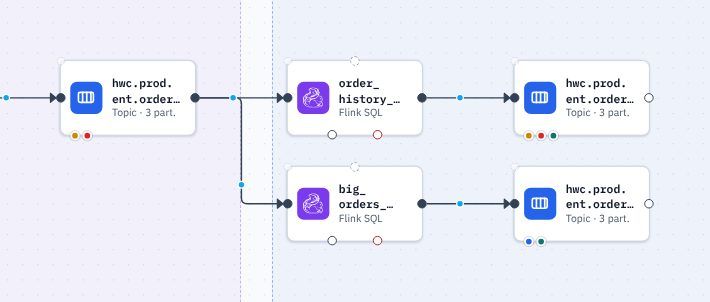
Back on the canvas, the coloured dots under each topic are its tags, so you can see the classification at a glance.
Save. Next: 6. Service accounts and role bindings.
6. Service accounts and role bindings
One account for the connector and one for Flink, each with just the access it needs.
In Confluent Cloud, connectors and Flink statements run as a service account, and the account's role bindings say what it may read and write. Least privilege means each account gets only what its job needs. KPD records the bindings you choose and writes them into Terraform; it never adds any by itself.
An account for the connector
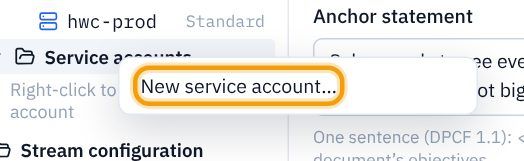
- In the explorer, right-click Environments → Service accounts and choose New service account…
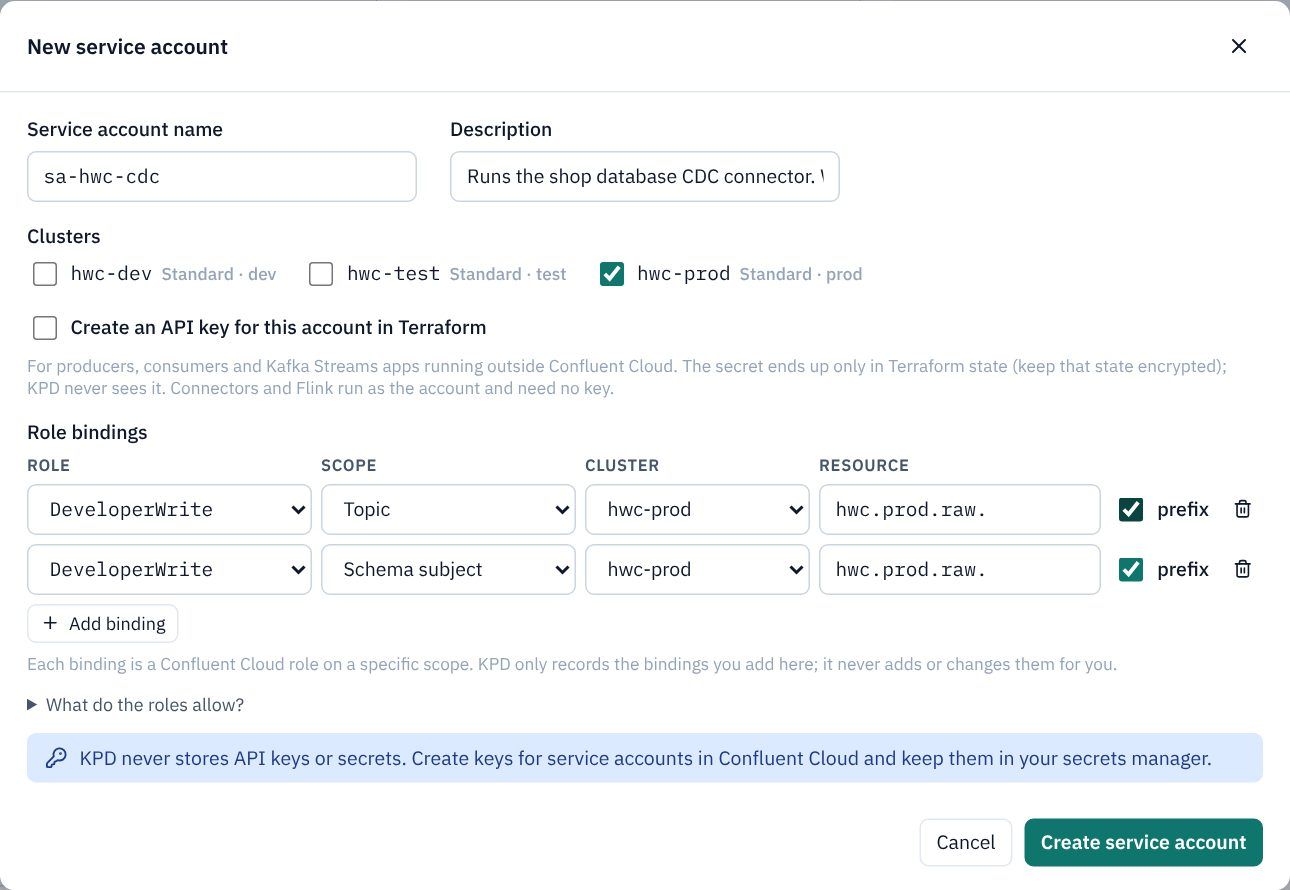
- Service account name
sa-hwc-cdc; DescriptionRuns the shop database CDC connector. Writes the raw topics and their schemas only. - Under Clusters, tick hwc-prod.
- Click Add binding twice and fill the rows:
Prefix means "every topic (or subject) whose name starts with this", so the connector can write any raw topic and its schema, and nothing else.
Role Scope Cluster Resource Prefix DeveloperWrite Topic hwc-prod hwc.prod.raw.ticked DeveloperWrite Schema subject hwc-prod hwc.prod.raw.ticked - Leave Create an API key unticked: connectors and Flink run as the account and need no key. Click Create service account.
An account for Flink
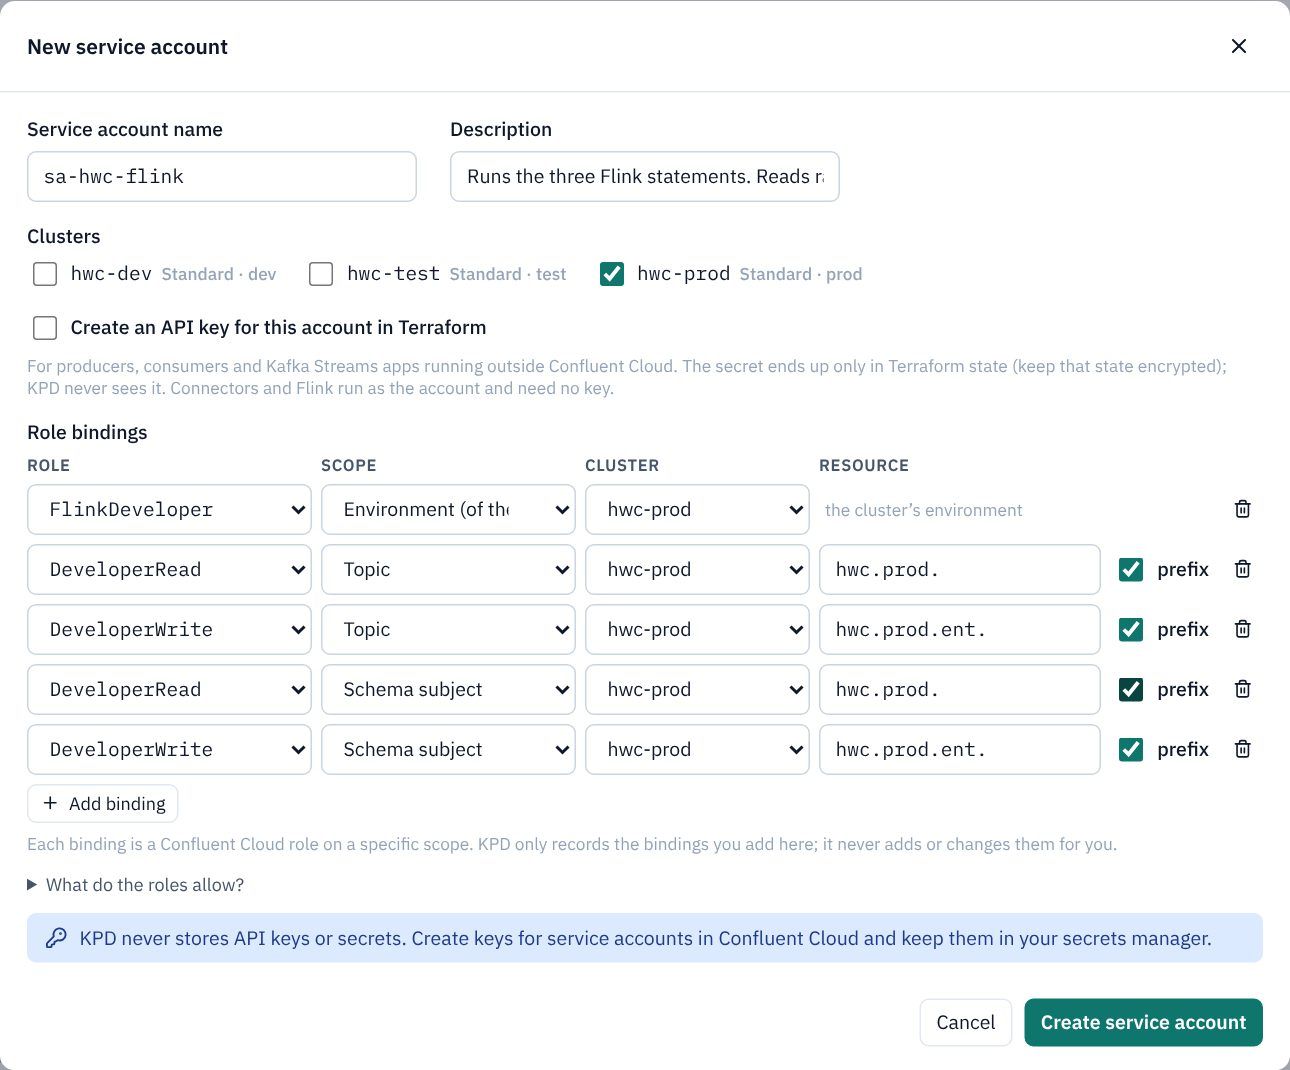
- Create a second account:
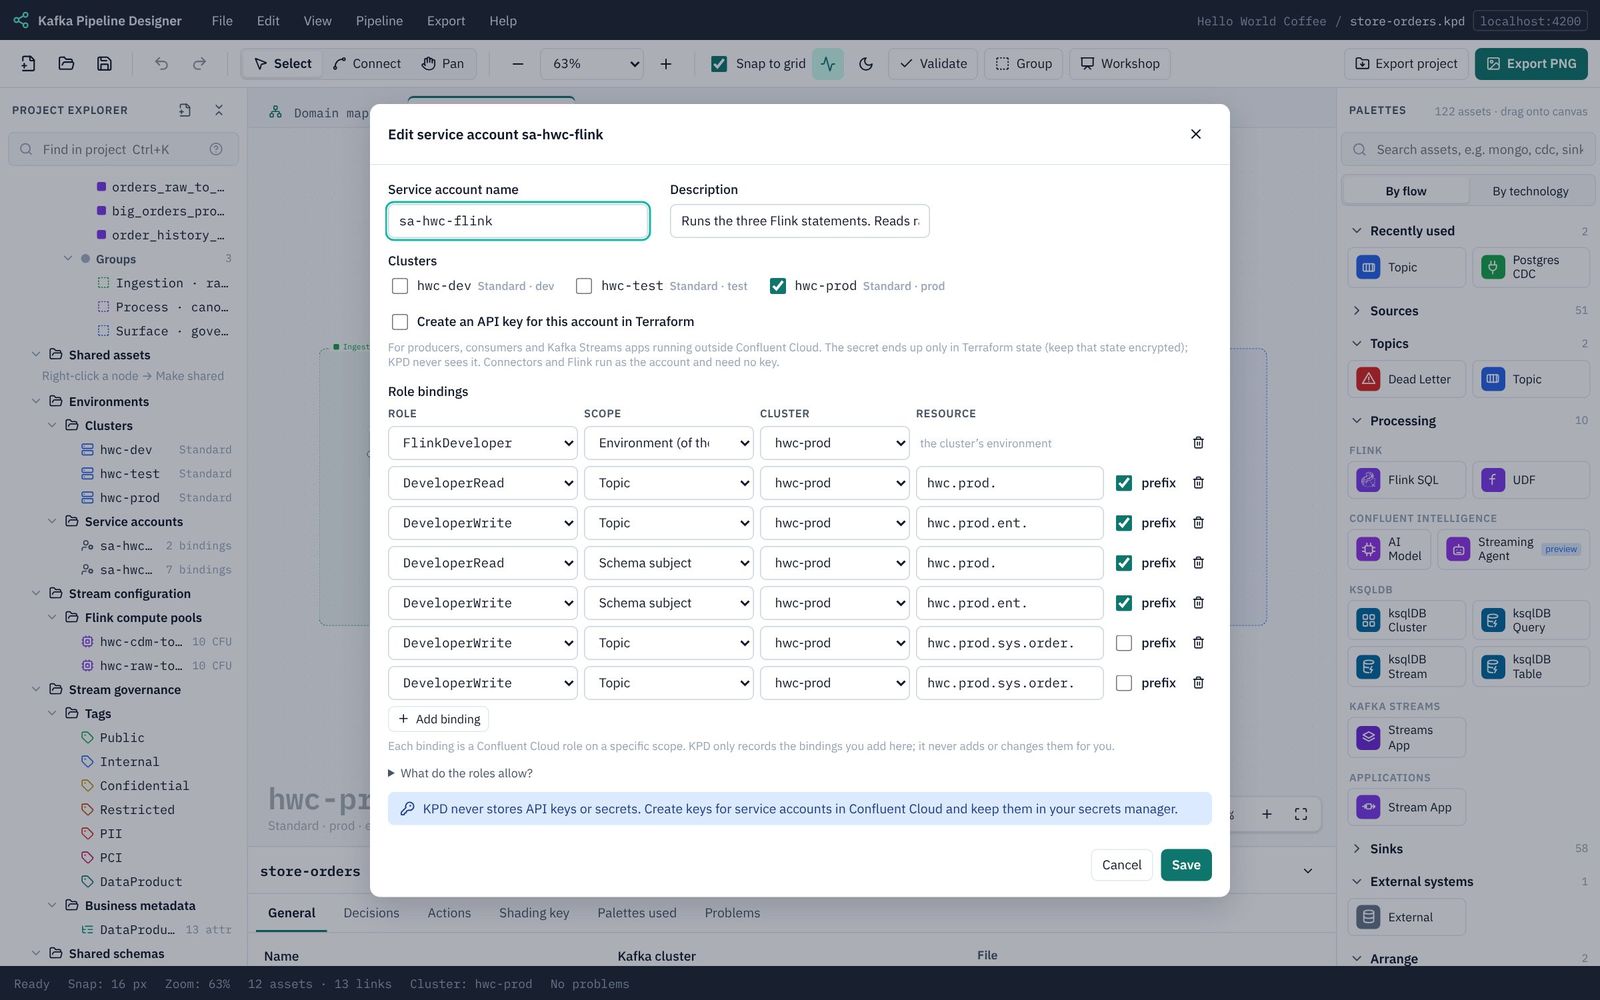
sa-hwc-flink, descriptionRuns the three Flink statements. Reads raw and canonical topics, writes canonical and product topics., cluster hwc-prod, and these bindings:Role Scope Resource Prefix Why FlinkDeveloper Environment (of the cluster) (the cluster's environment) Run statements in the environment's pools. DeveloperRead Topic hwc.prod.ticked Read raw and canonical topics. DeveloperWrite Topic hwc.prod.ent.ticked Write canonical and product topics. DeveloperRead Schema subject hwc.prod.ticked Read their schemas. DeveloperWrite Schema subject hwc.prod.ent.ticked Register product schemas.
Say which asset runs as which account
- Click the connector
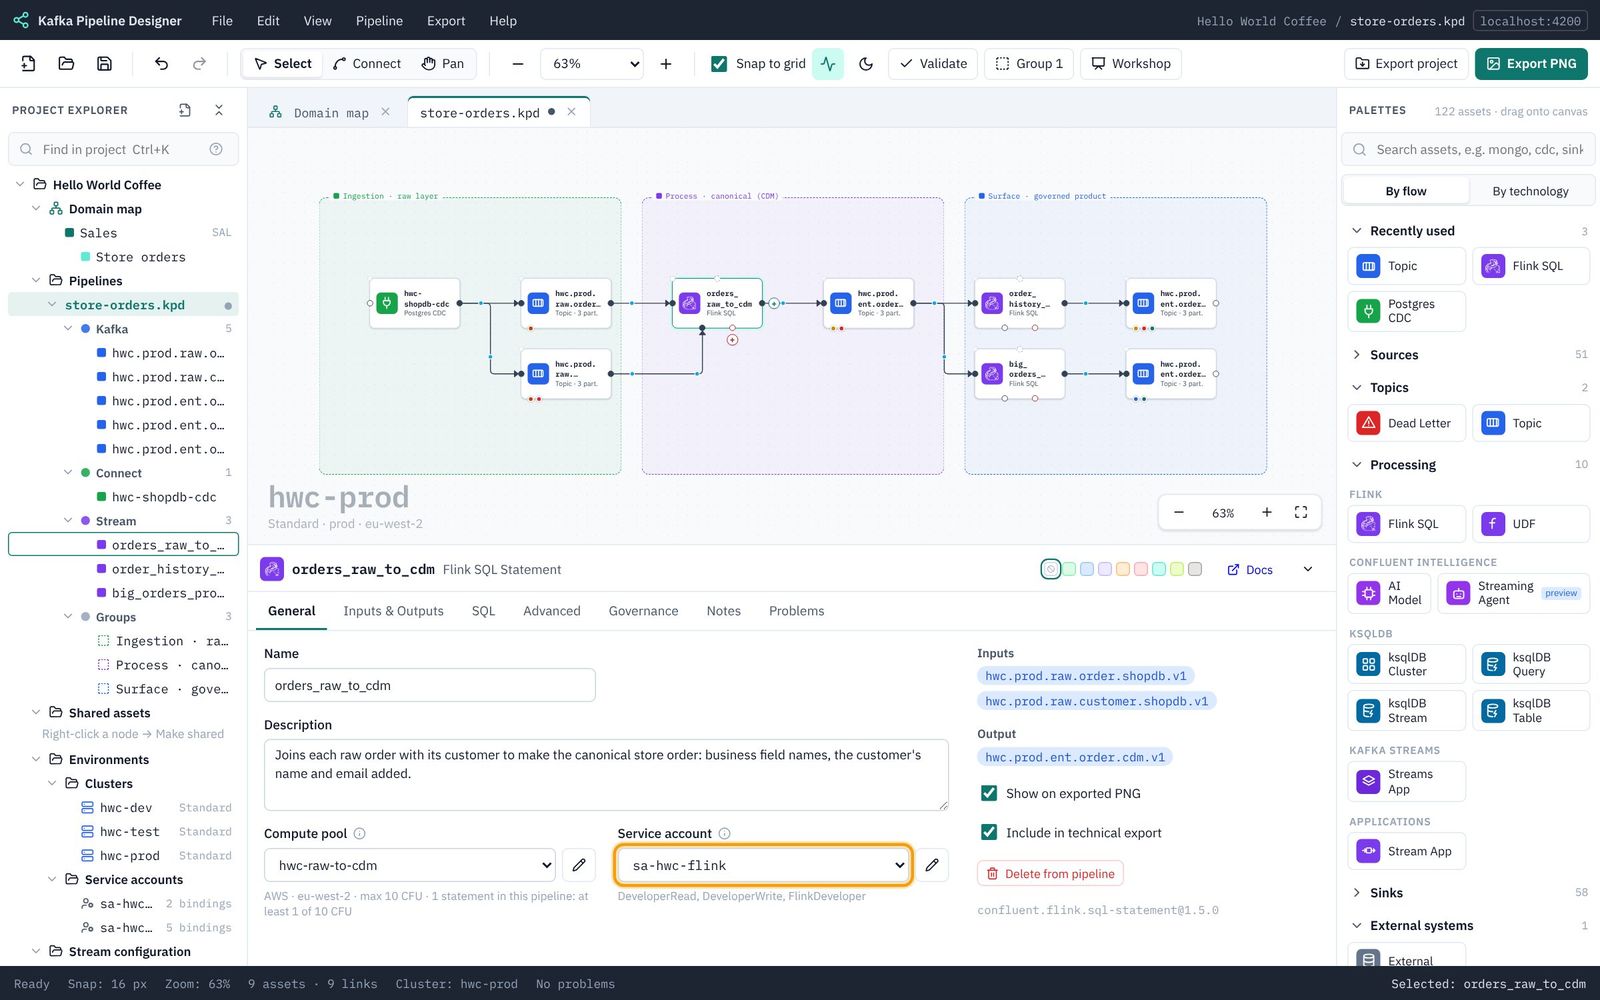
hwc-shopdb-cdc. On General, set Service account to sa-hwc-cdc. - Click each of the three Flink statements and set Service account to sa-hwc-flink. The hint under it lists the roles the account has.
Save. Next: 7. Data quality and dead letter topics.
7. Data quality and dead letter topics
Two contract rules on the canonical topic, three dead letter topics, and a clean Validate.
Data contract rules check each message as it is written to a topic. A message that fails can be sent to a dead letter topic (DLQ) instead of stopping the pipeline. Flink statements have their own Errors output for records they can't process. By the end of this part every failure has somewhere to go, and the project validates.
Two rules for the canonical orders
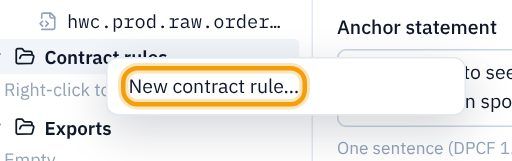
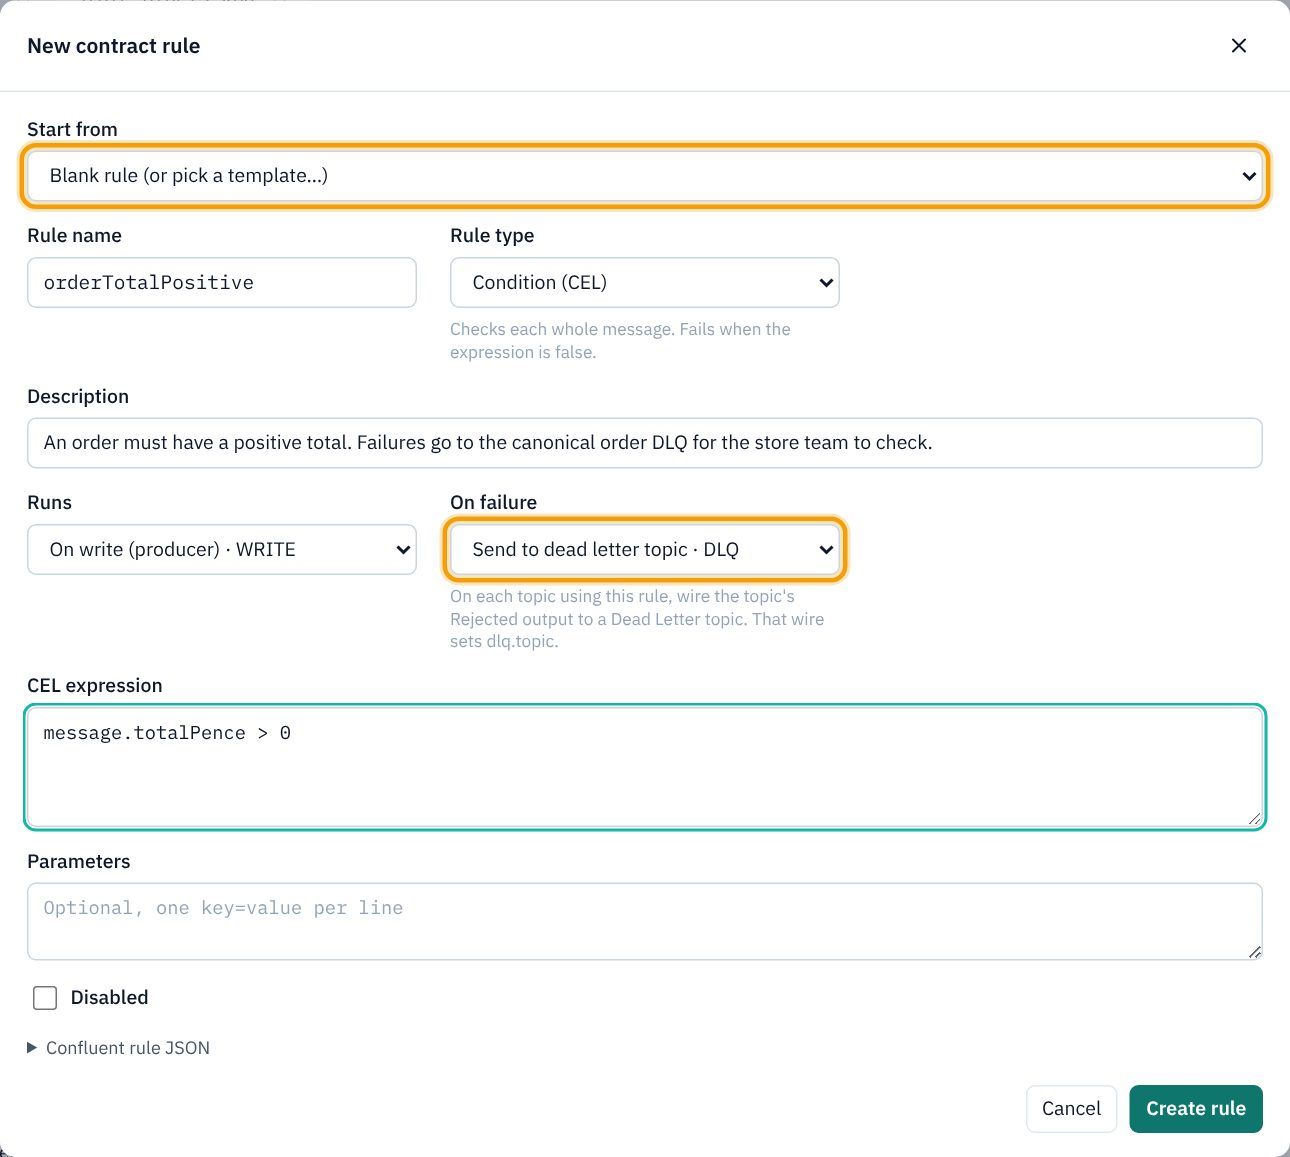
- In the explorer, right-click Contract rules and choose New contract rule…
- Leave Start from as a blank rule (the list has ready-made templates to try another time). Fill in:
- Rule name
orderTotalPositive; Rule type Condition (CEL): it checks each whole message and fails when the expression is false. - Description
An order must have a positive total. Failures go to the canonical order DLQ for the store team to check. - Runs On write (producer) · WRITE; On failure Send to dead letter topic · DLQ.
- CEL expression
message.totalPence > 0
- Rule name
- Click Create rule.
- Create a second rule the same way:
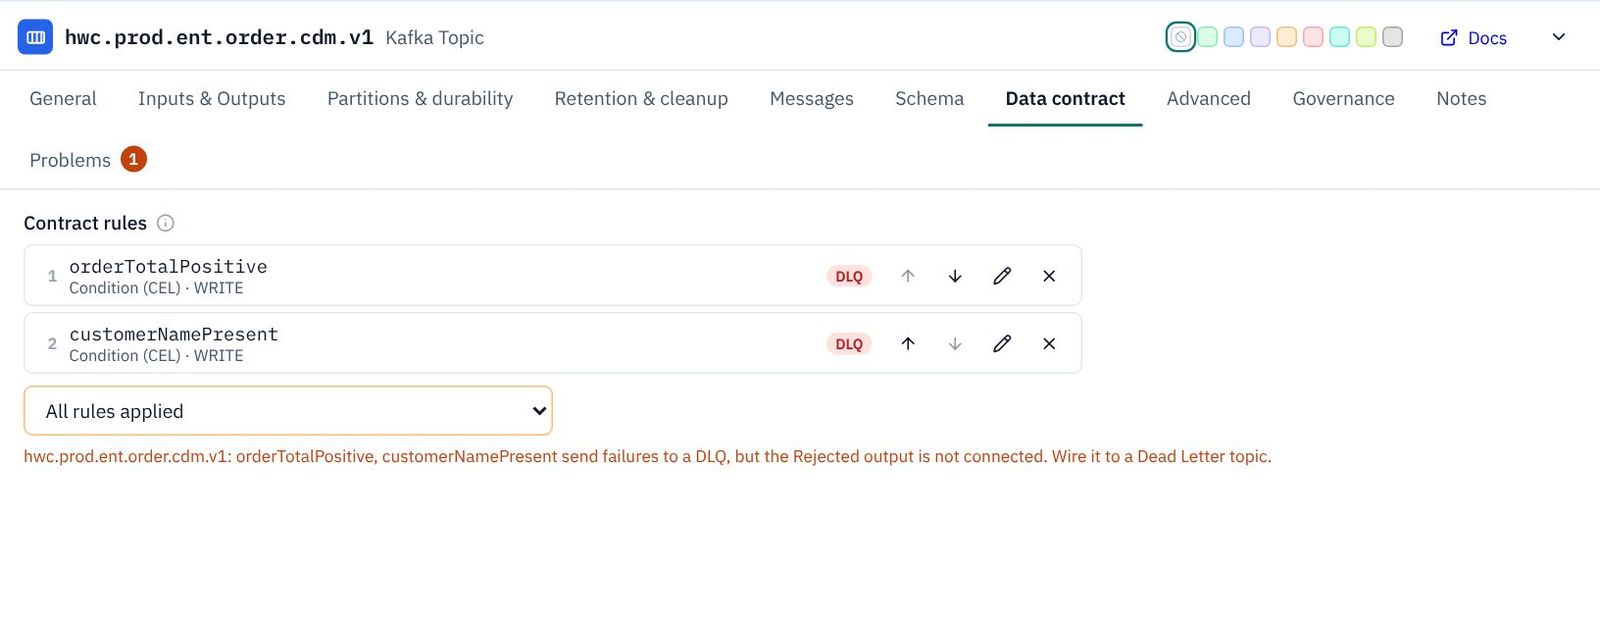
customerNamePresent, Condition (CEL), descriptionEvery order must name its customer (the join found them). Failures go to the canonical order DLQ., WRITE, DLQ, expressionsize(message.customerName) > 0. - Click the canonical topic
hwc.prod.ent.order.cdm.v1, open Data contract, and in Add a rule… choose orderTotalPositive, then customerNamePresent. They run in the order listed.
Send rejected orders to a dead letter topic
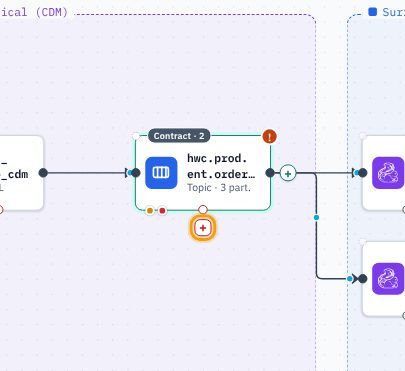
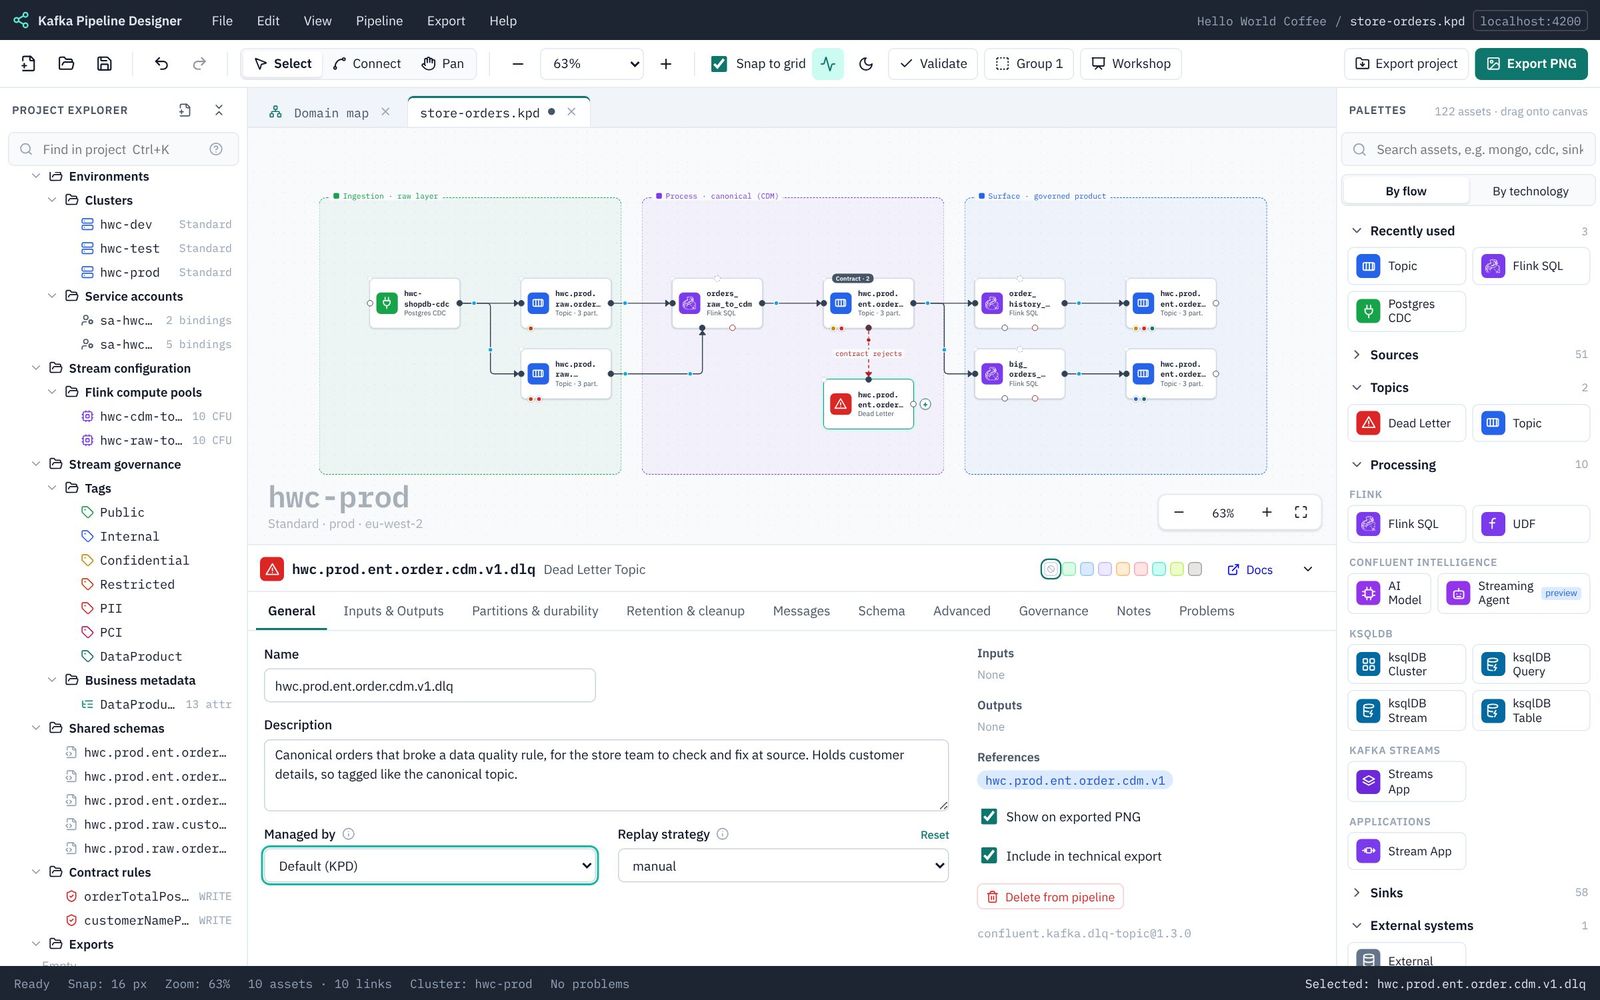
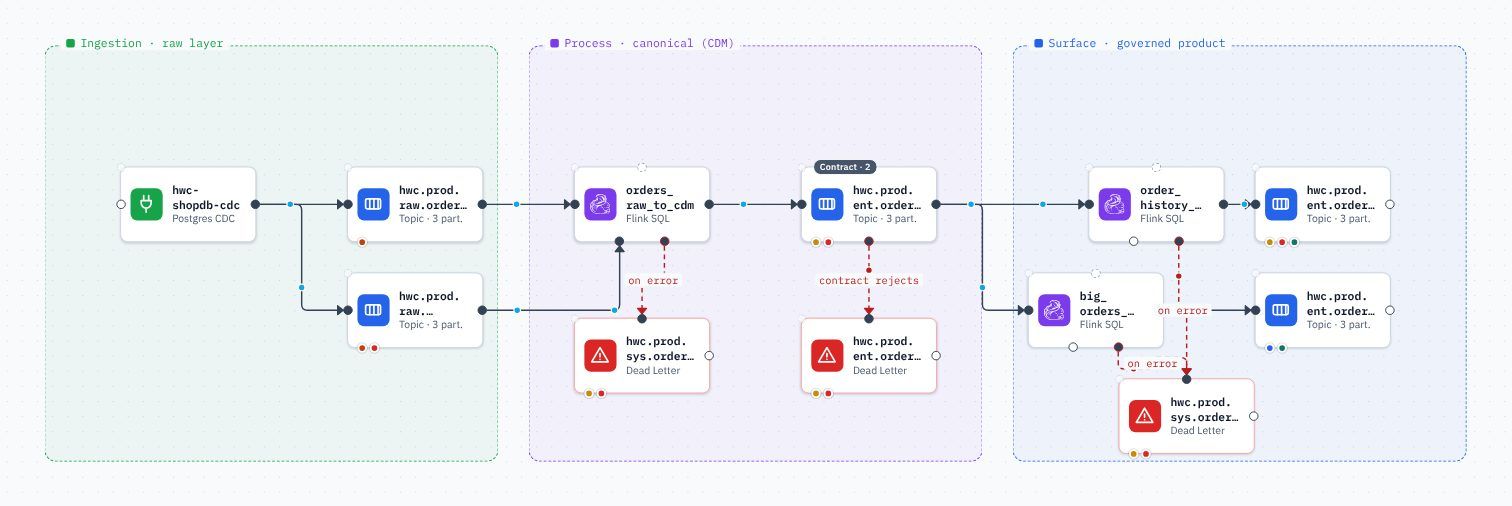
- Once the topic has a rule that sends failures to a DLQ, it grows a Rejected output on its bottom edge (and a Contract · 2 badge). The orange ! is KPD reminding you the rejects have nowhere to go yet. Click the red + under the topic.
- Choose Dead Letter.
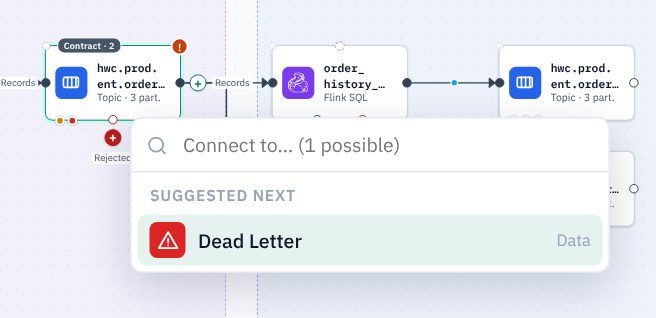
- On the dead letter topic's General tab: Name
hwc.prod.ent.order.cdm.v1.dlq(the canonical topic's name plus.dlq); DescriptionCanonical orders that broke a data quality rule, for the store team to check and fix at source. Holds customer details, so tagged like the canonical topic.; Replay strategy manual (someone fixes and resends them by hand). - Governance tab: tag it Confidential and PII. A DLQ holds the same data as its source, so it needs the same protection.
Catch Flink errors too
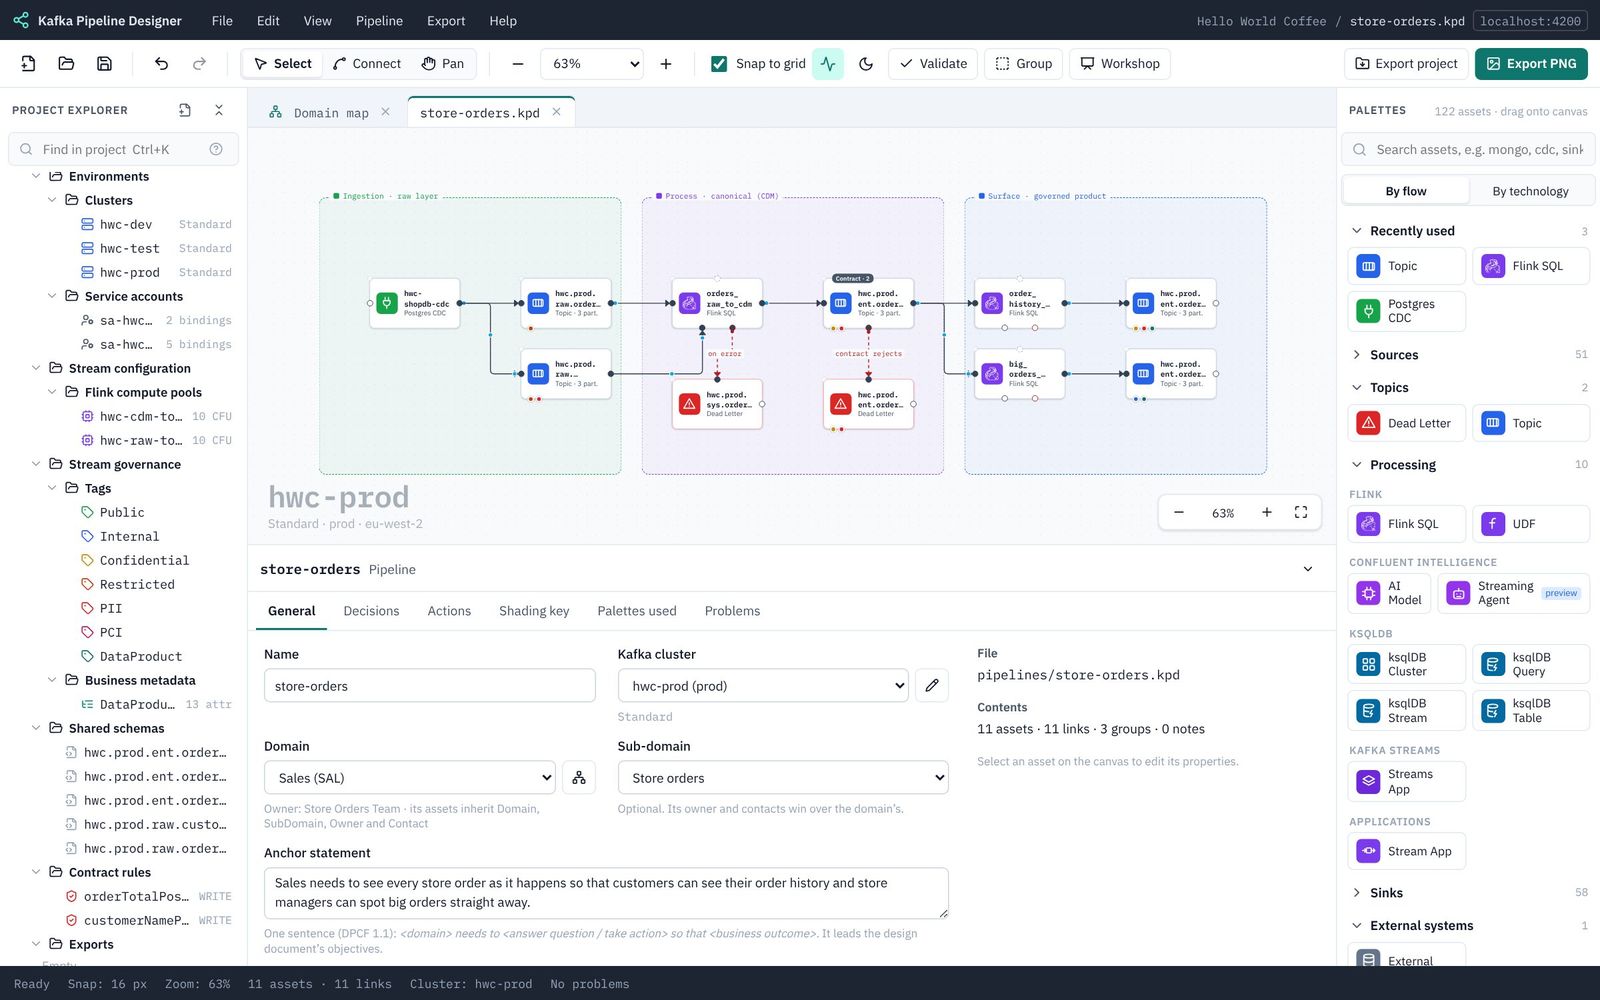
- Click
orders_raw_to_cdm. Its Errors output is the red + on its bottom edge. Click it and choose Dead Letter. - Name it
hwc.prod.sys.order.to-cdm.v1.dlq(sys, because it is a system topic), descriptionRecords orders_raw_to_cdm could not process (for example a value that would not convert), for the data team to inspect., replay manual, tags Confidential and PII.
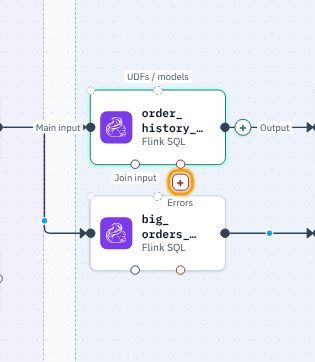
- Now the two data product statements. Click
order_history_productand click the red + on its Errors output.
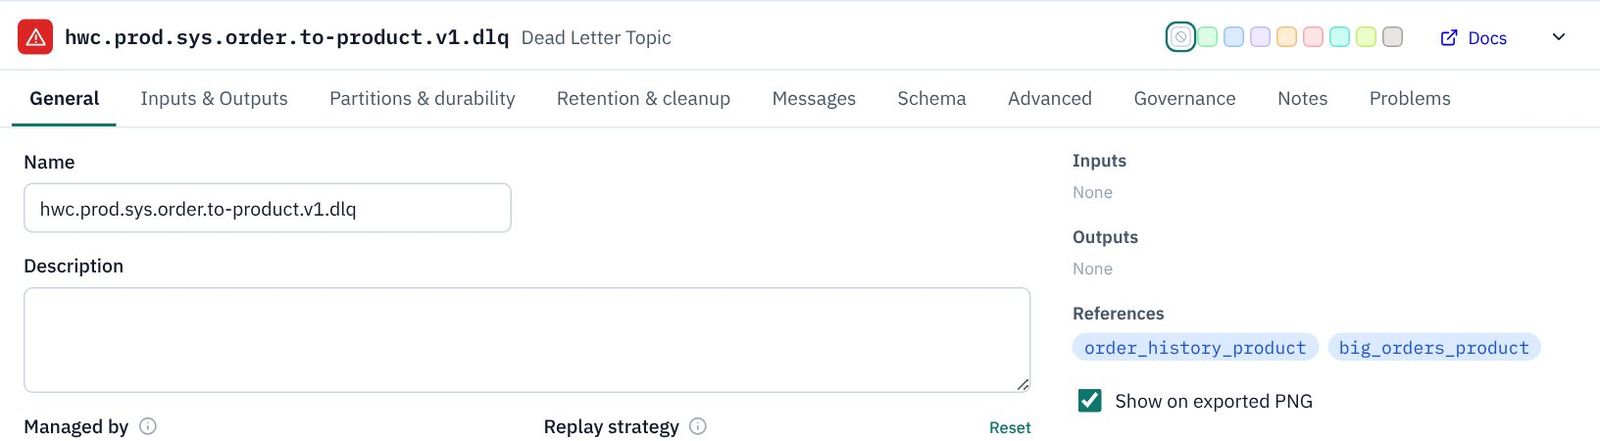
- Choose Dead Letter:
hwc.prod.sys.order.to-product.v1.dlq, descriptionRecords the two data product statements could not process, for the data team to inspect., replay manual, tags Confidential and PII.
- One DLQ can serve both product statements. Drag from the Errors dot under
big_orders_productto the input dot on top of the new dead letter topic. - Tidy up: drag the new DLQ into the bottom of the blue Surface box, under
big_orders_product. If the line fromorder_history_productruns throughbig_orders_product, dragorder_history_producta little to the right so its line drops straight down beside it.
Validate the project
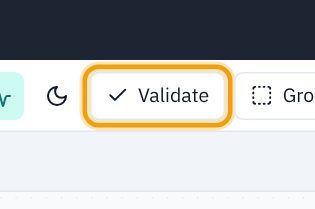
- Click Validate in the toolbar.
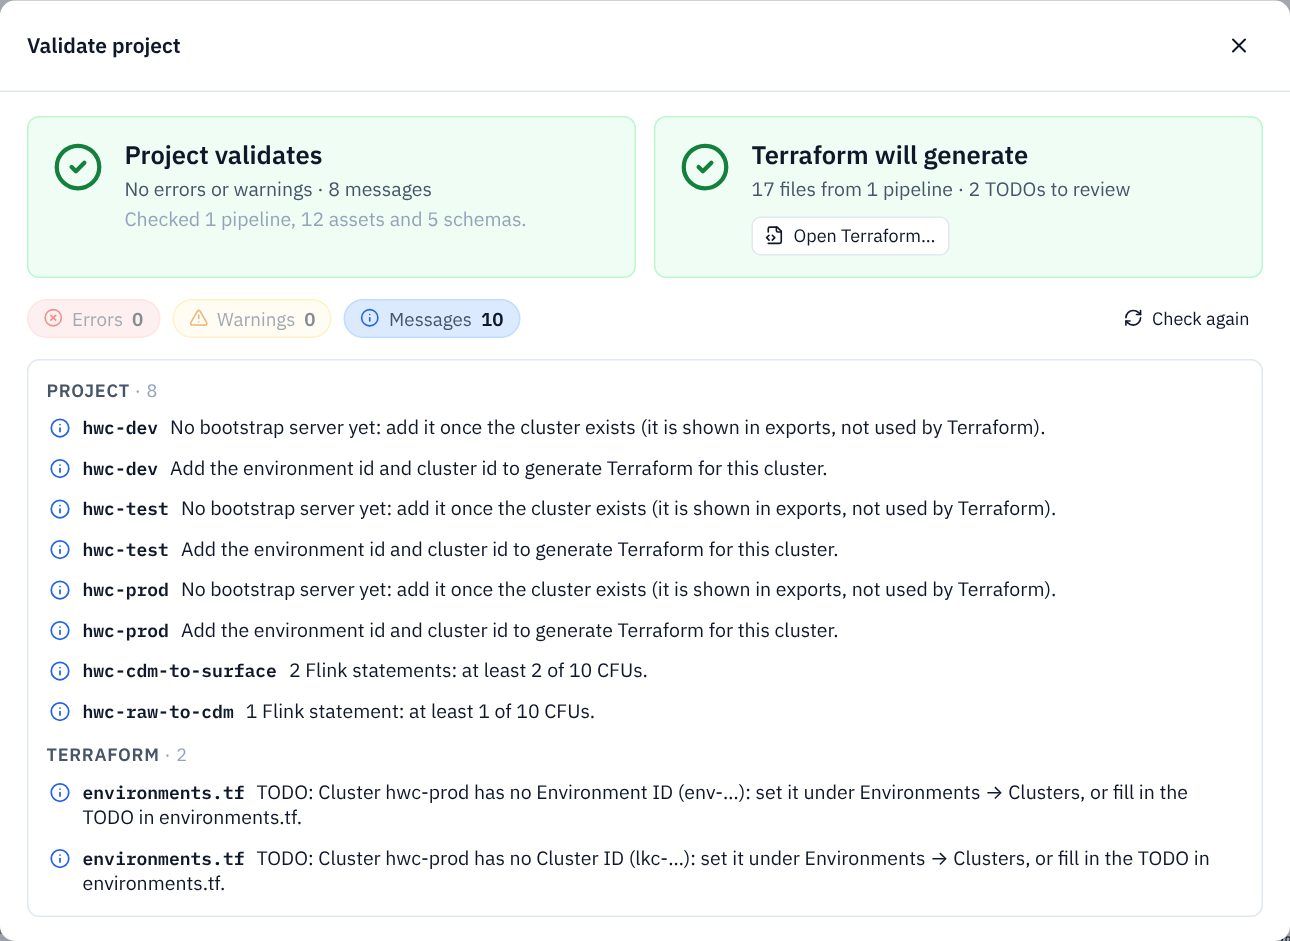
- KPD checks the whole project. You should see Project validates: No errors or warnings, and Terraform will generate.
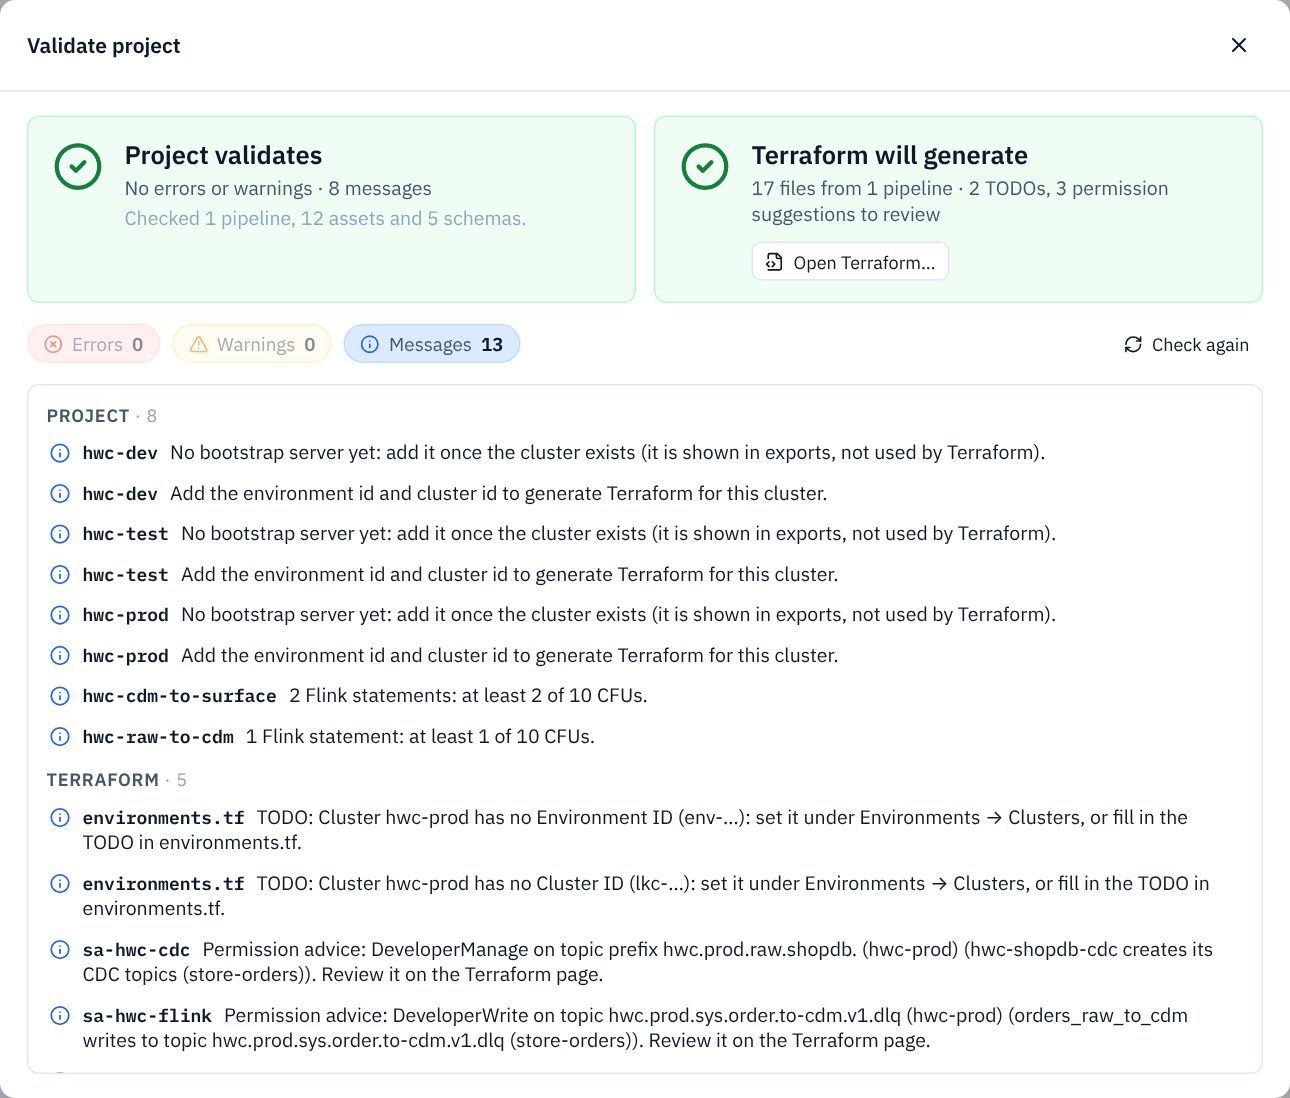
The messages are worth reading. Most say the clusters have no bootstrap server or ids yet: expected, because they don't exist yet. Two say how many CFUs each pool will use. The last ones are permission advice: the connector needs to create its topics (DeveloperManage), and Flink needs to write to the two sys dead letter topics, which its hwc.prod.ent. binding doesn't cover. You will accept that advice in Part 8.
Save. Next: 8. Export the picture, design document and Terraform.
8. Export the picture, design document and Terraform
A PNG of the pipeline, the detailed design (LLD) document, and Terraform with permission advice.
Everything you take out of KPD is on the Export menu. Each export is downloaded by your browser and also saved in the project's exports/ folder, so it stays with the design.
A picture of the pipeline (PNG)
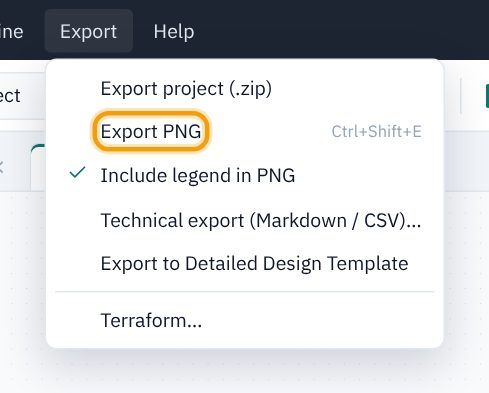
- Choose Export → Export PNG (or Ctrl/⌘+Shift+E, or the green Export PNG button top right). Include legend in PNG is ticked by default.
- Your browser downloads
store-orders.png: the pipeline at twice screen resolution, captioned with its cluster, with a legend that explains only the colours and lines it uses. The background is transparent, so it sits well on a slide or in a document.
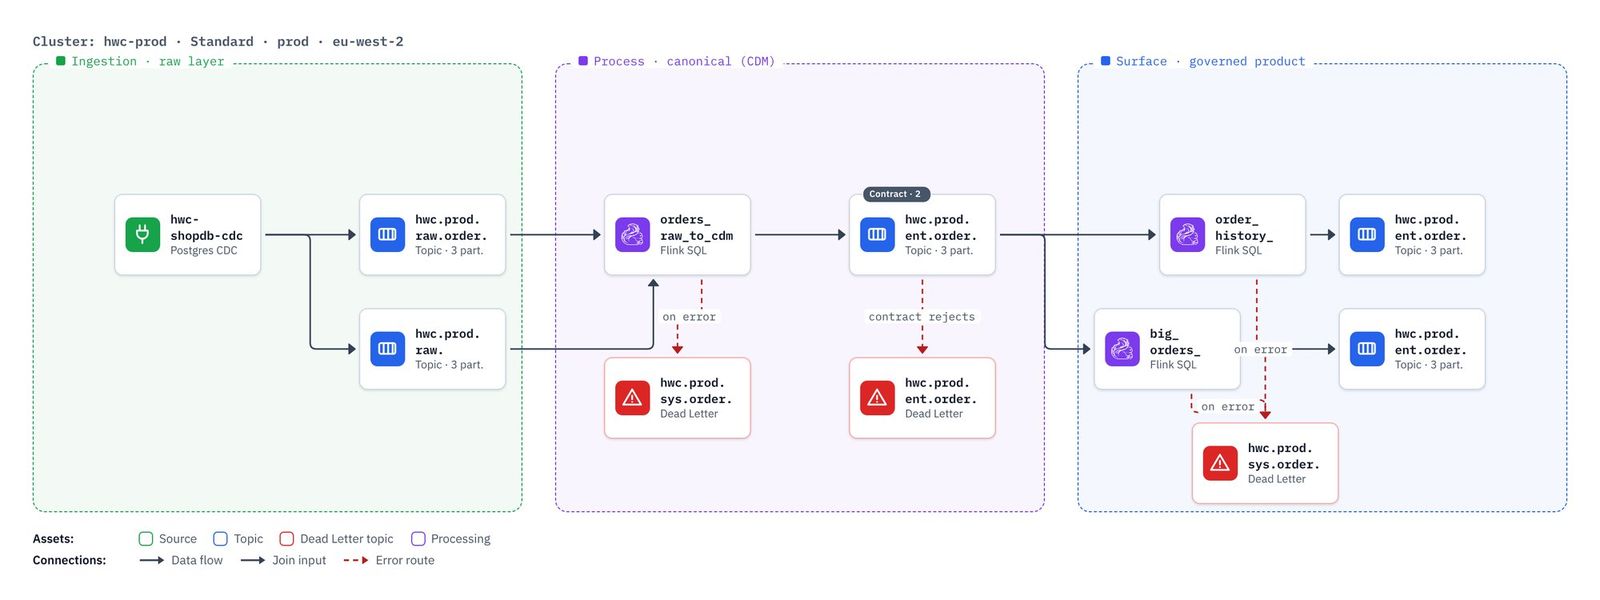
The detailed design document (LLD)
- Choose Export → Export to Detailed Design Template.
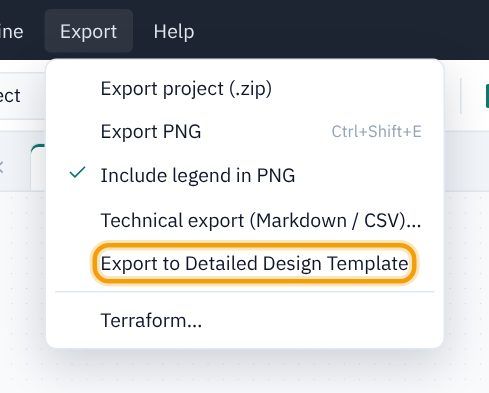
- KPD writes the whole project as a low-level design in Markdown,
hello-world-coffee-detailed-design.md, with the diagrams as PNG files beside it inexports/. Open it in any Markdown editor, or import it into Google Docs or Word (see Detailed design document).
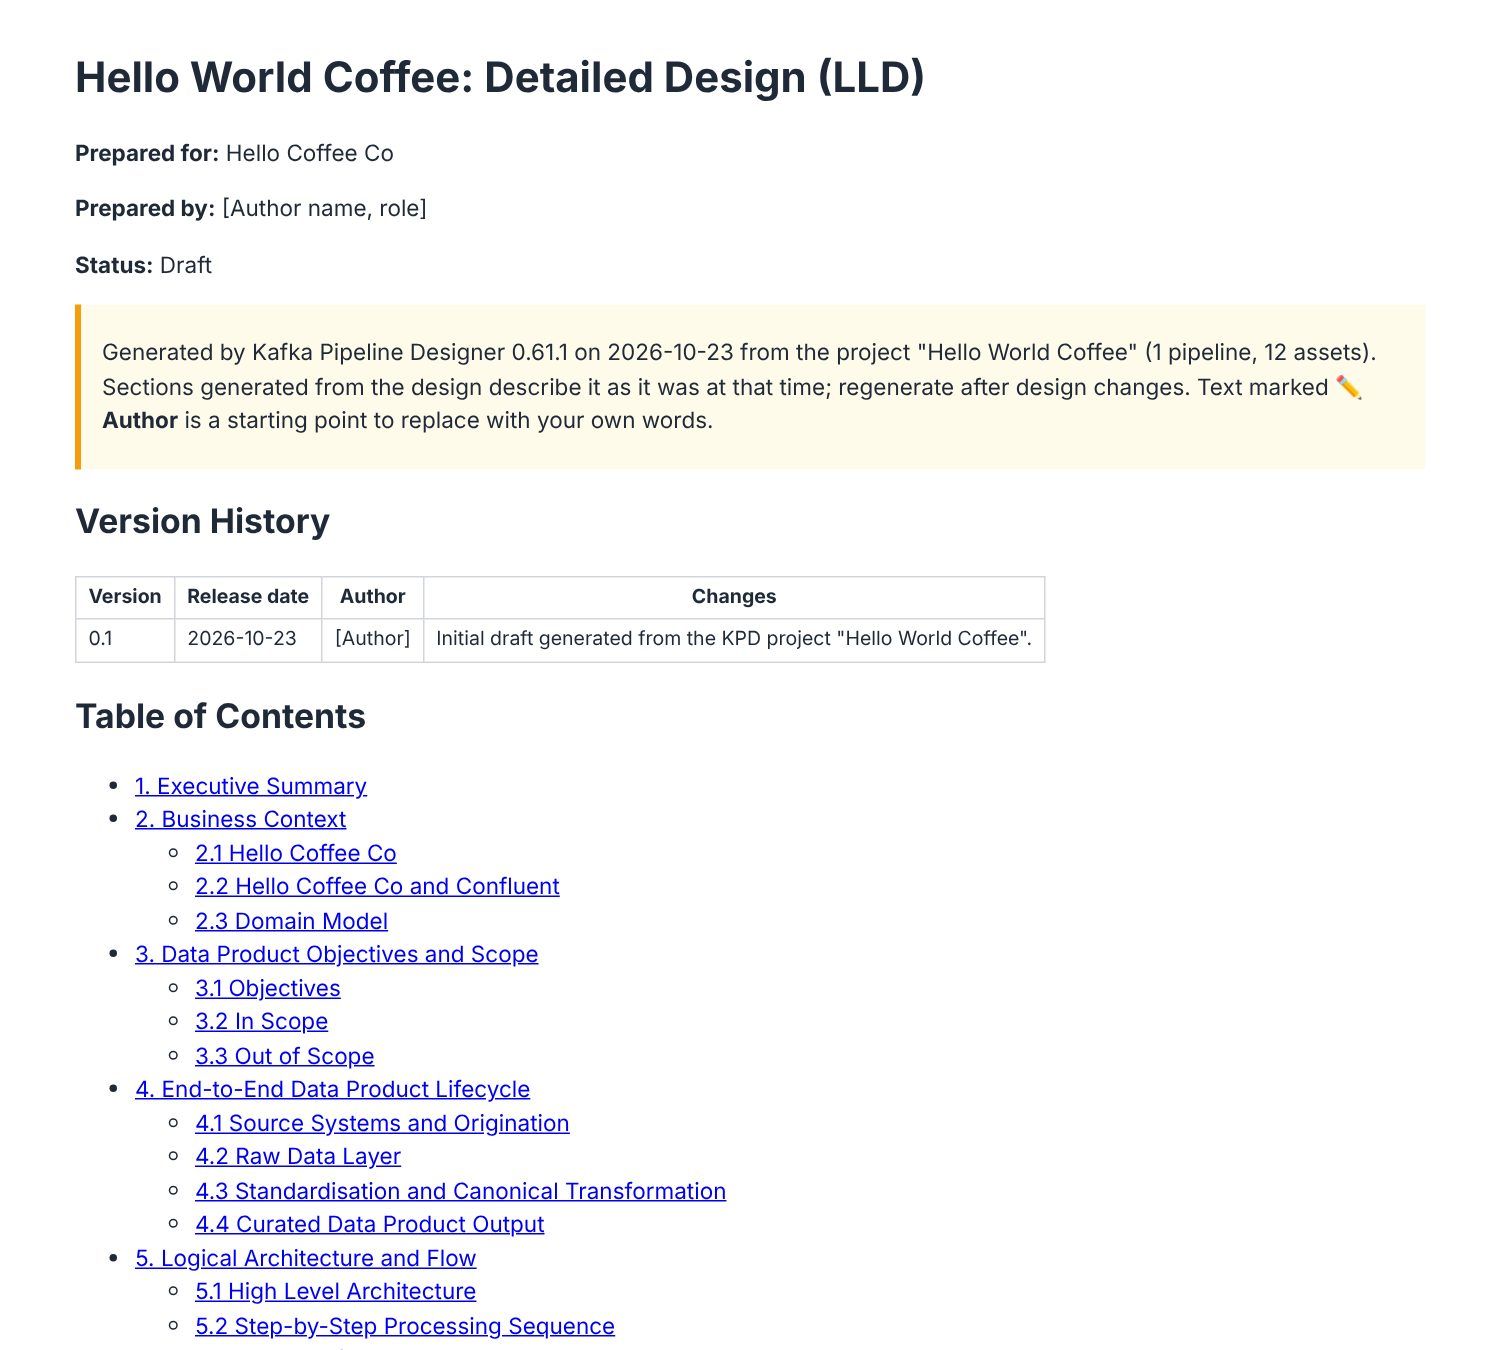
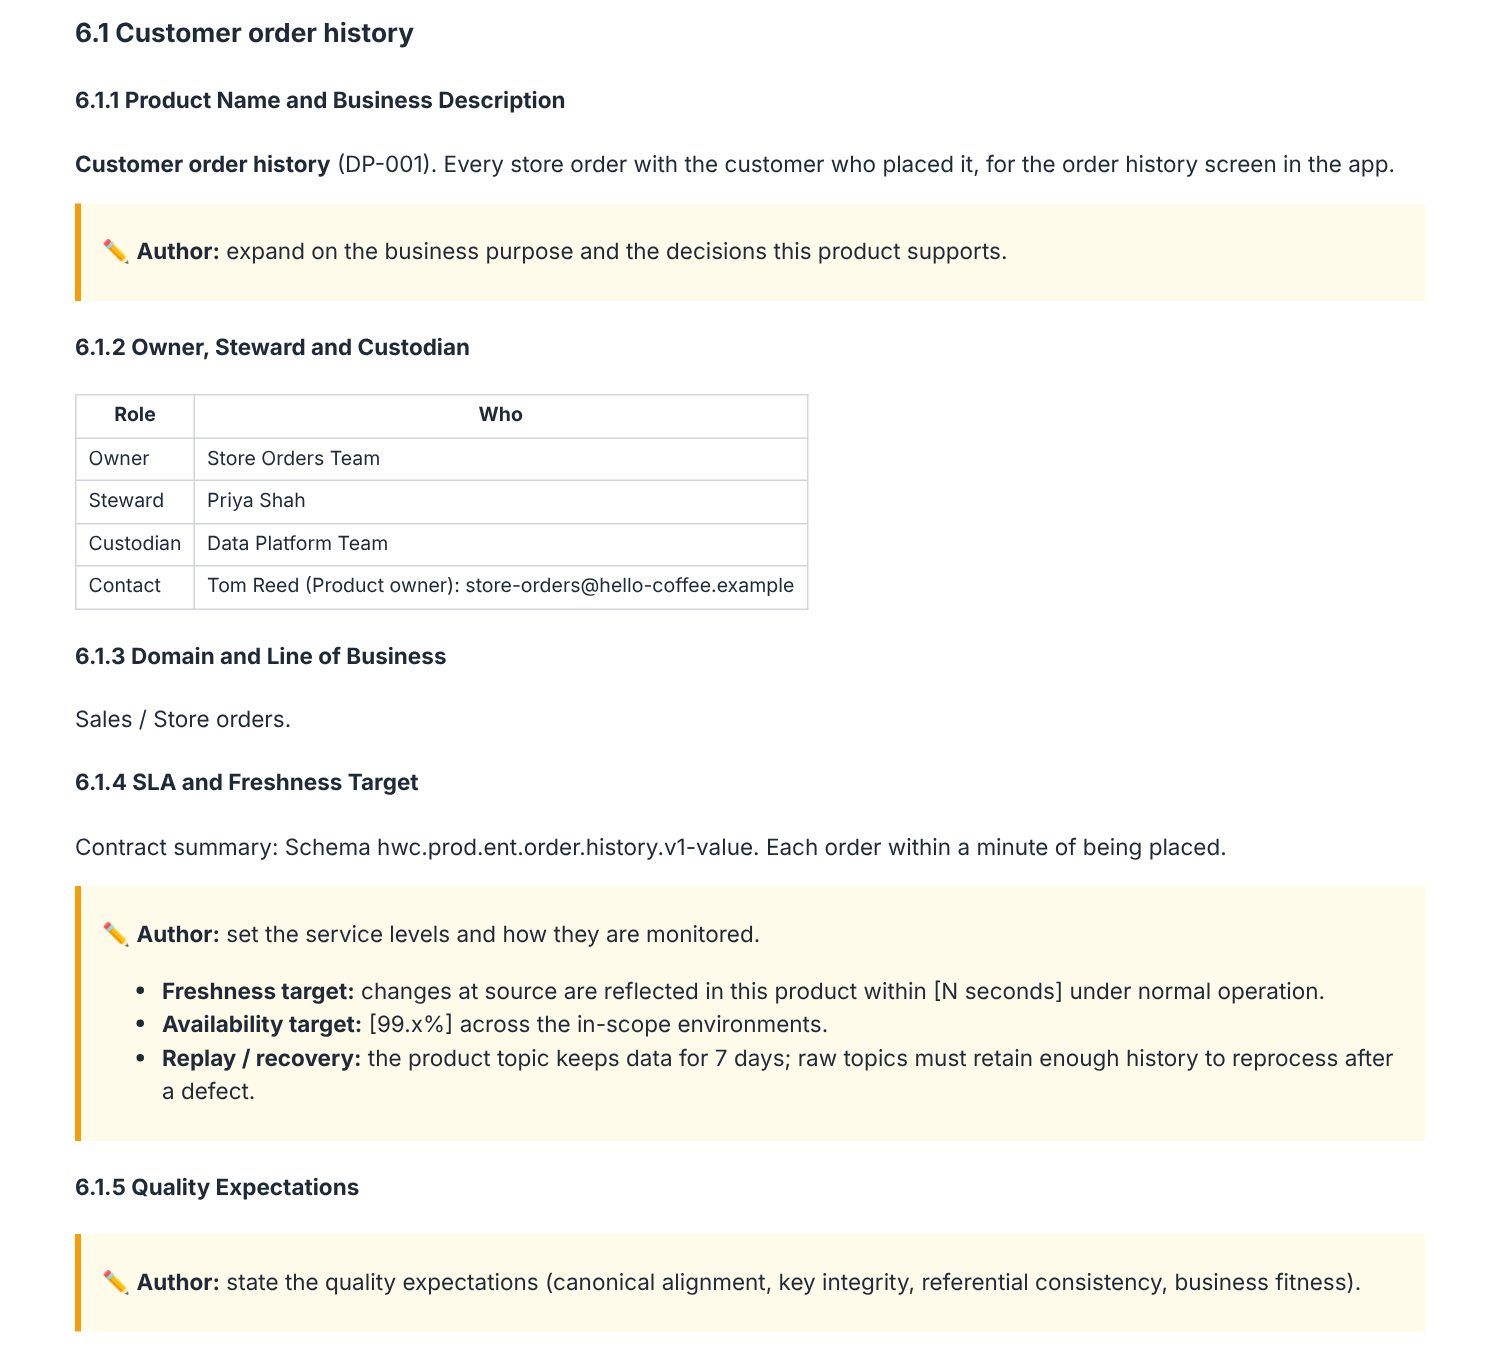
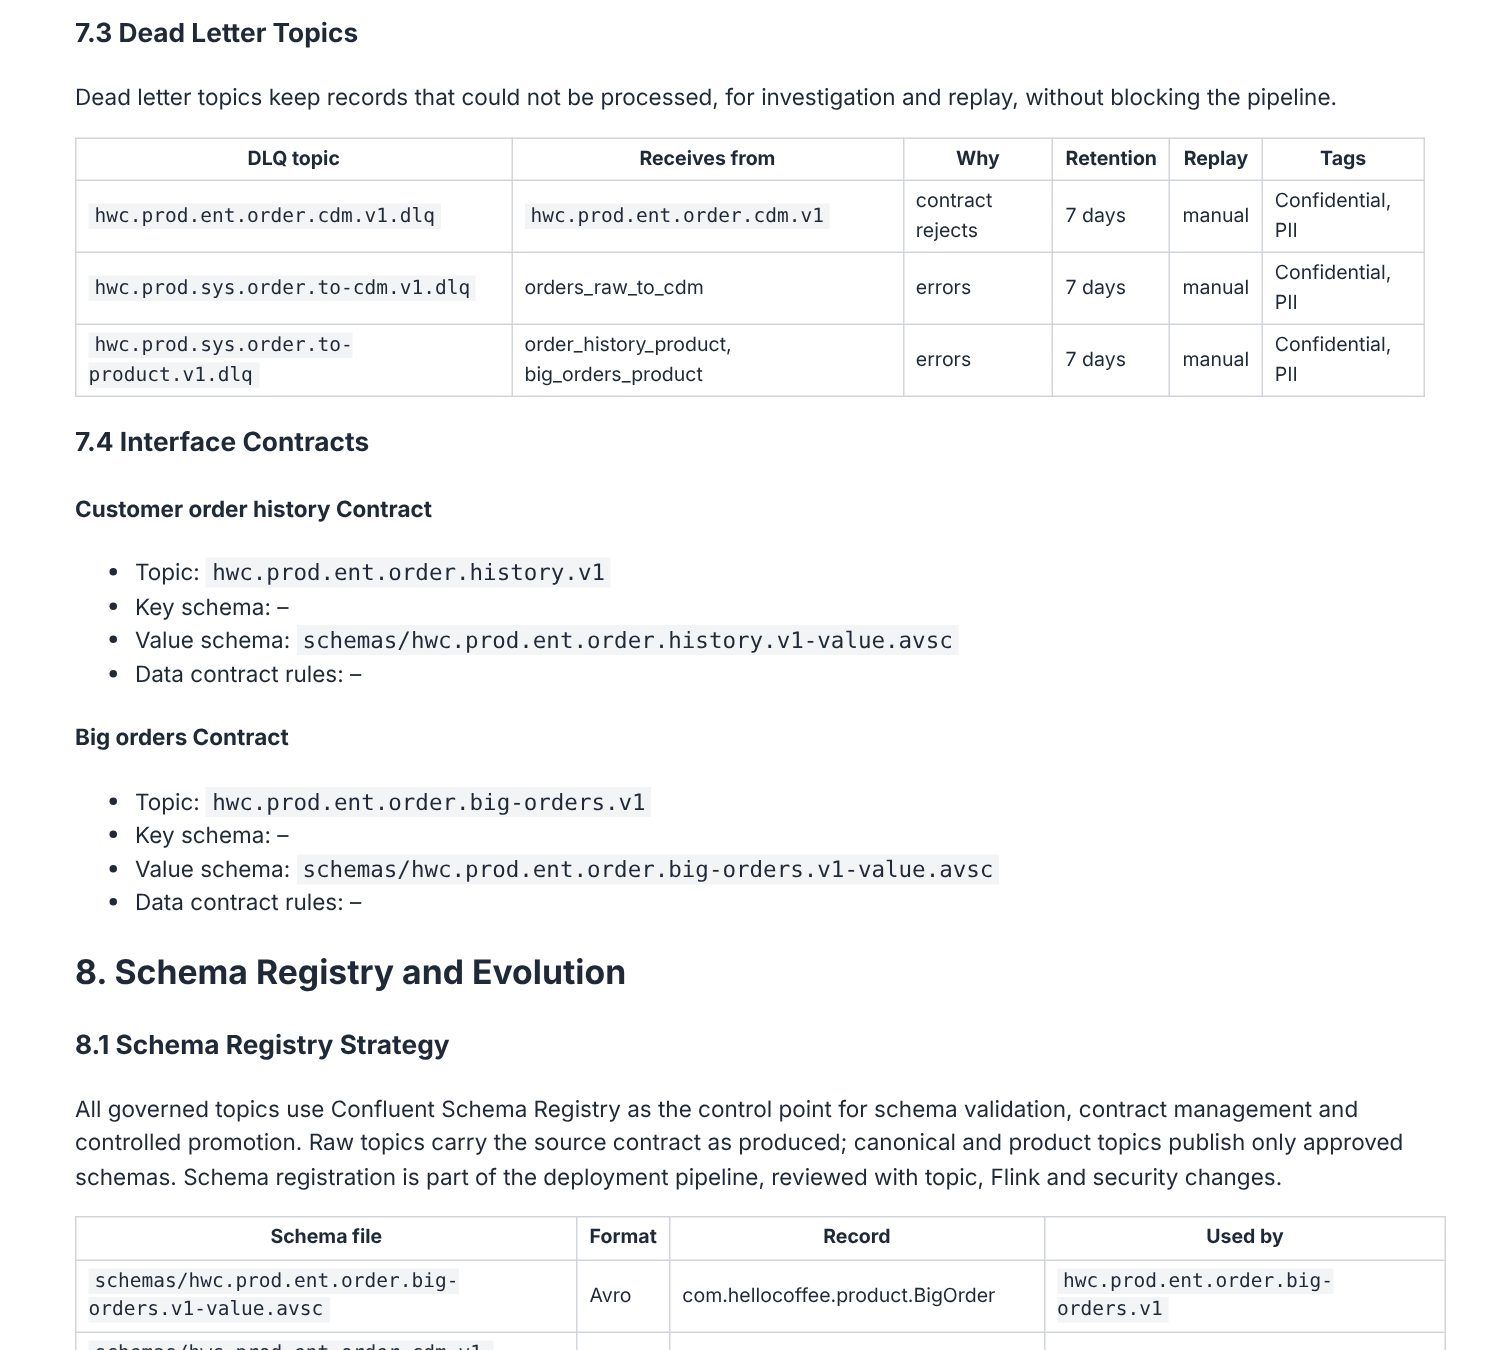
Everything KPD knows is written for you: the topic catalogue, schema field tables, the Flink SQL, role bindings, tags and metadata. Anything it can't know is marked ✏️ Author with a starting point to replace with your own words. Look at section 6: the data product definitions came from the catalogue metadata you entered in Part 5, and the owner and contact from the domain map.
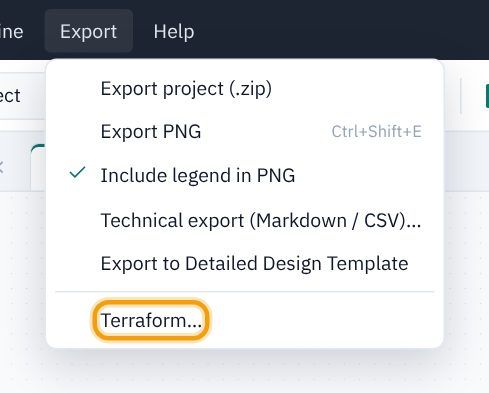
Terraform
- Choose Export → Terraform…
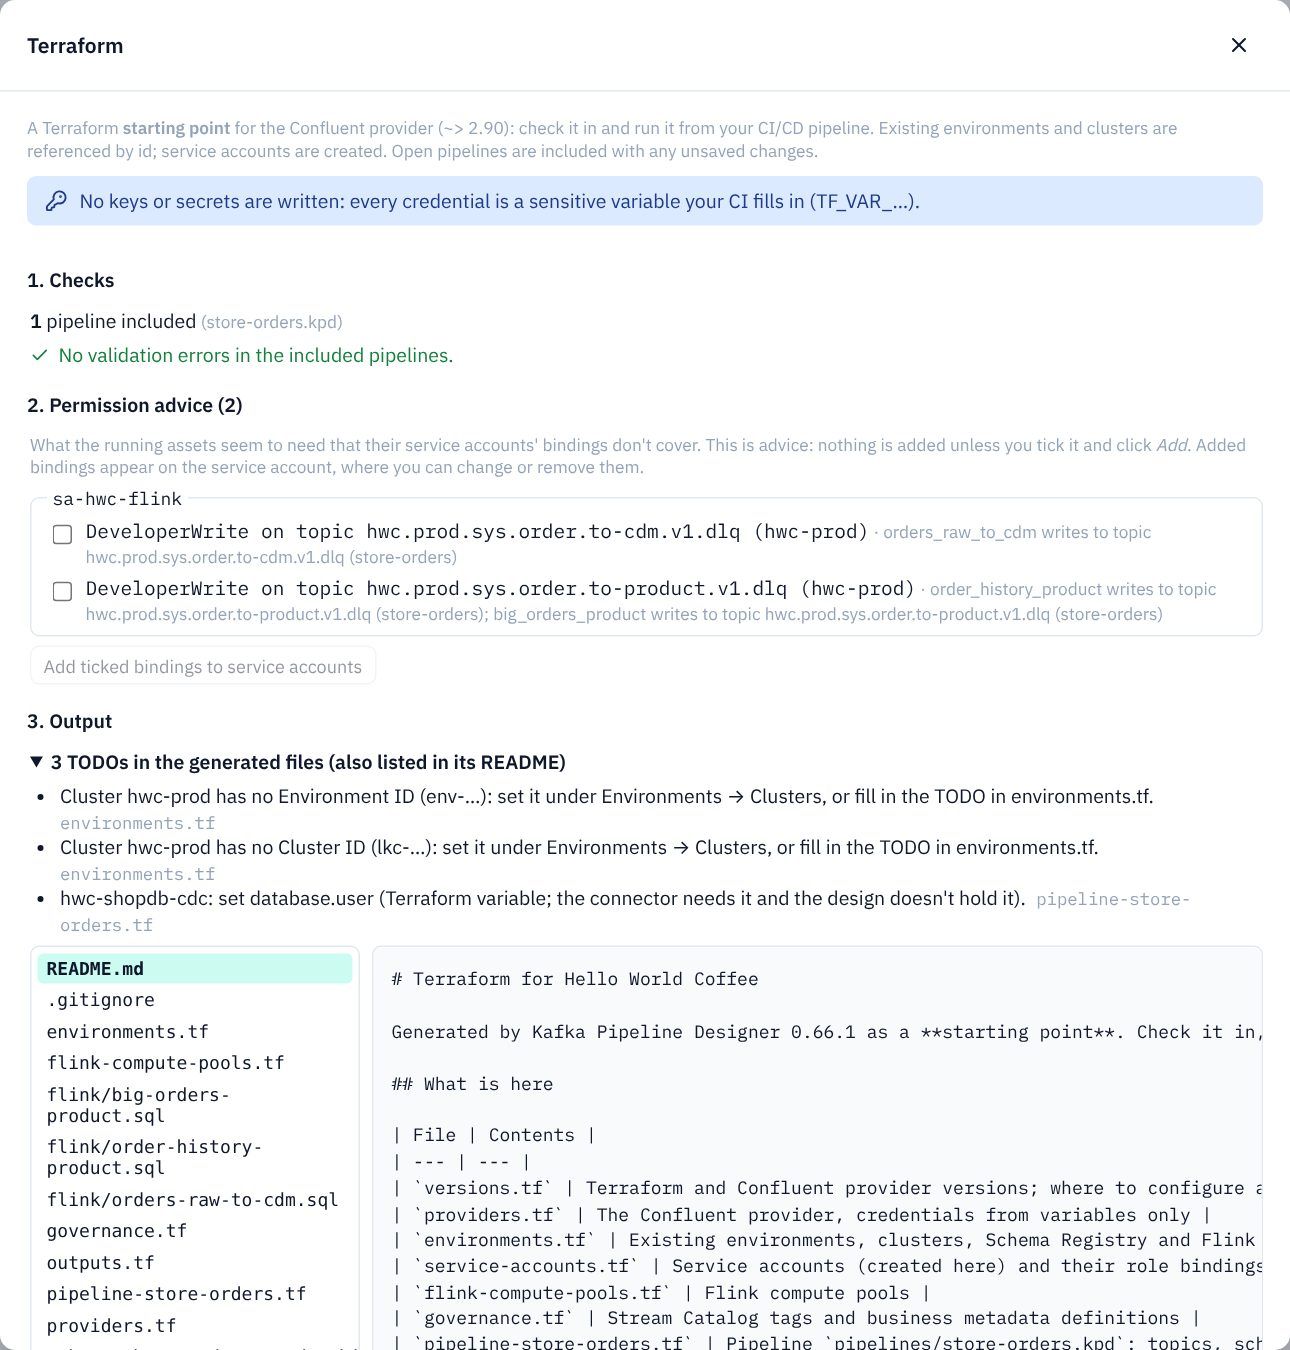
- The Terraform page has three sections. 1. Checks: one pipeline included, no validation errors. 2. Permission advice: what the running assets seem to need that their bindings don't cover. 3. Output: the TODOs and the files.
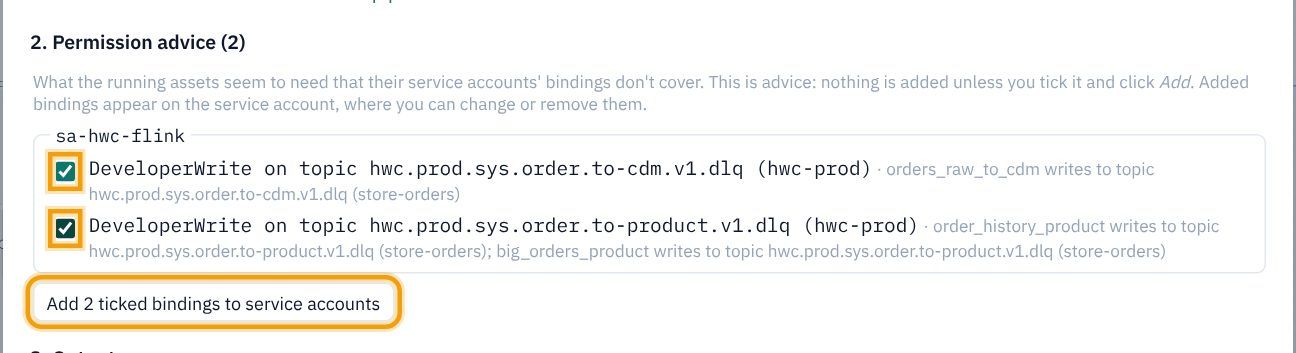
- Tick both suggestions:
sa-hwc-flinkneeds DeveloperWrite on each of the two sys dead letter topics. Click Add 2 ticked bindings to service accounts. (The connector's account needs nothing more: Terraform creates the raw topics before the connector starts, so the connector only writes to them, which Part 6 already allows.)
- The section now says Every running asset's service account has bindings that cover what it reads and writes.
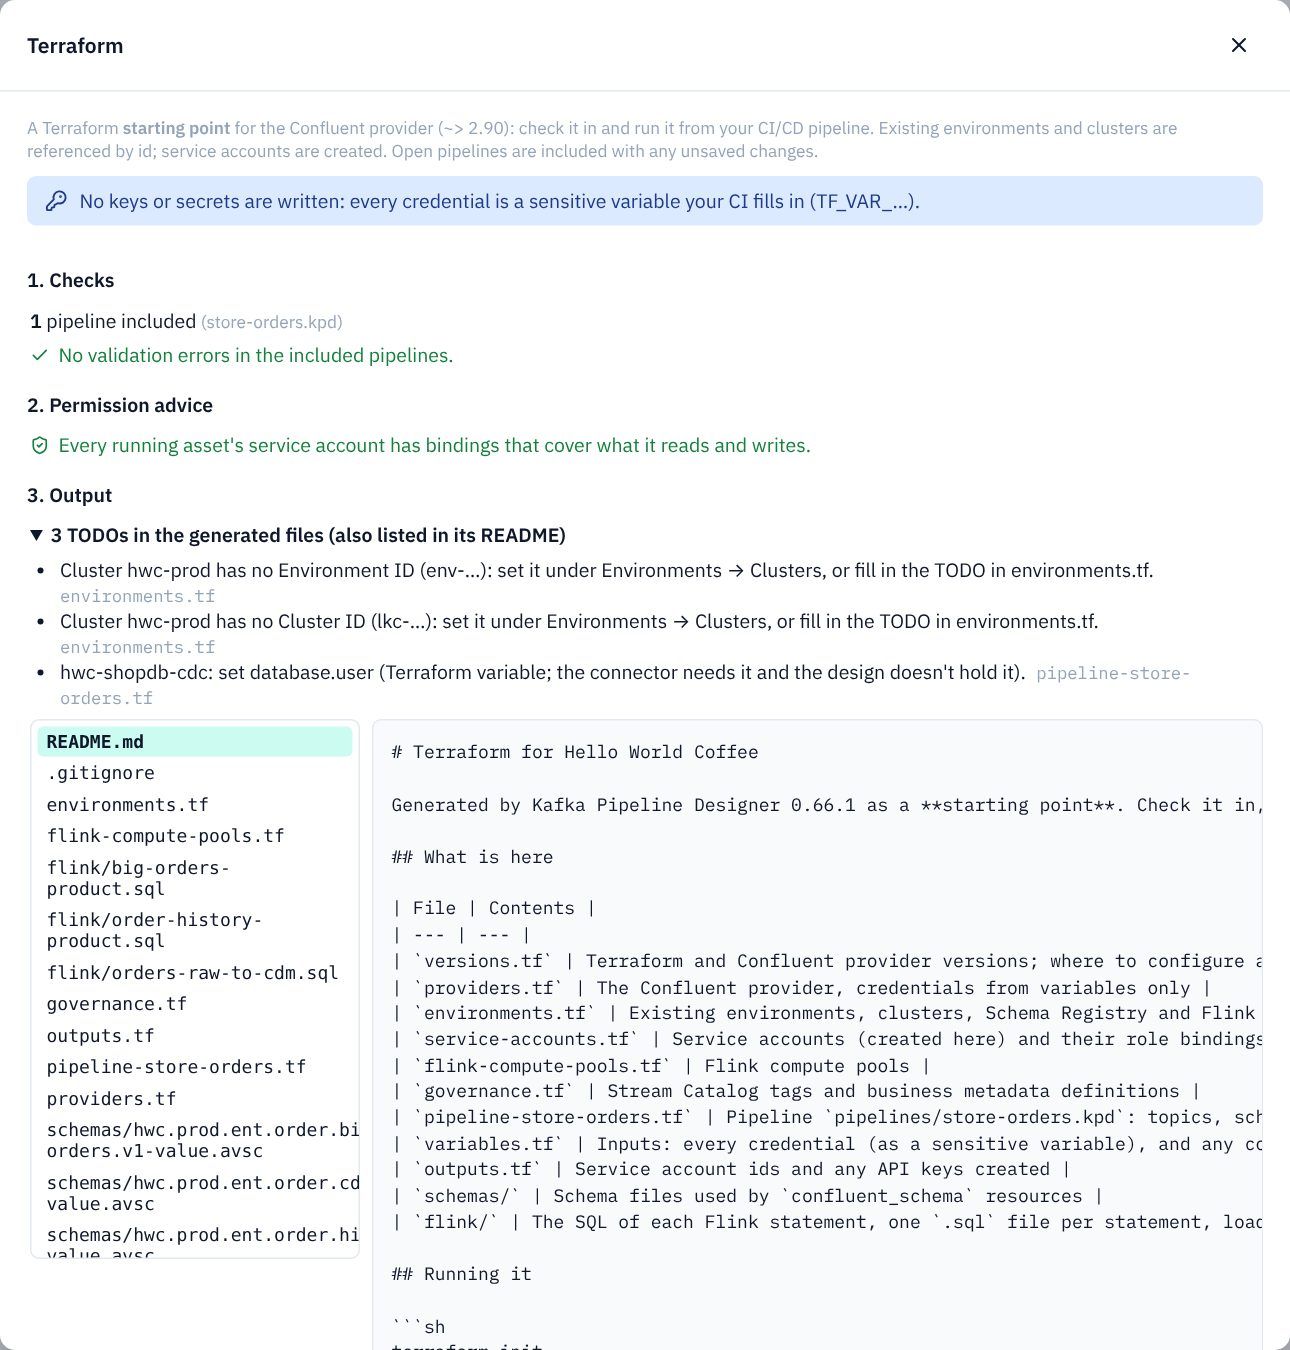
- Under 3. Output, click any file to preview it.
pipeline-store-orders.tfhas the topics (withprevent_destroy, so a topic's data can't be deleted by accident), schemas with their contract rules, tags, metadata, the connector and the Flink statements.
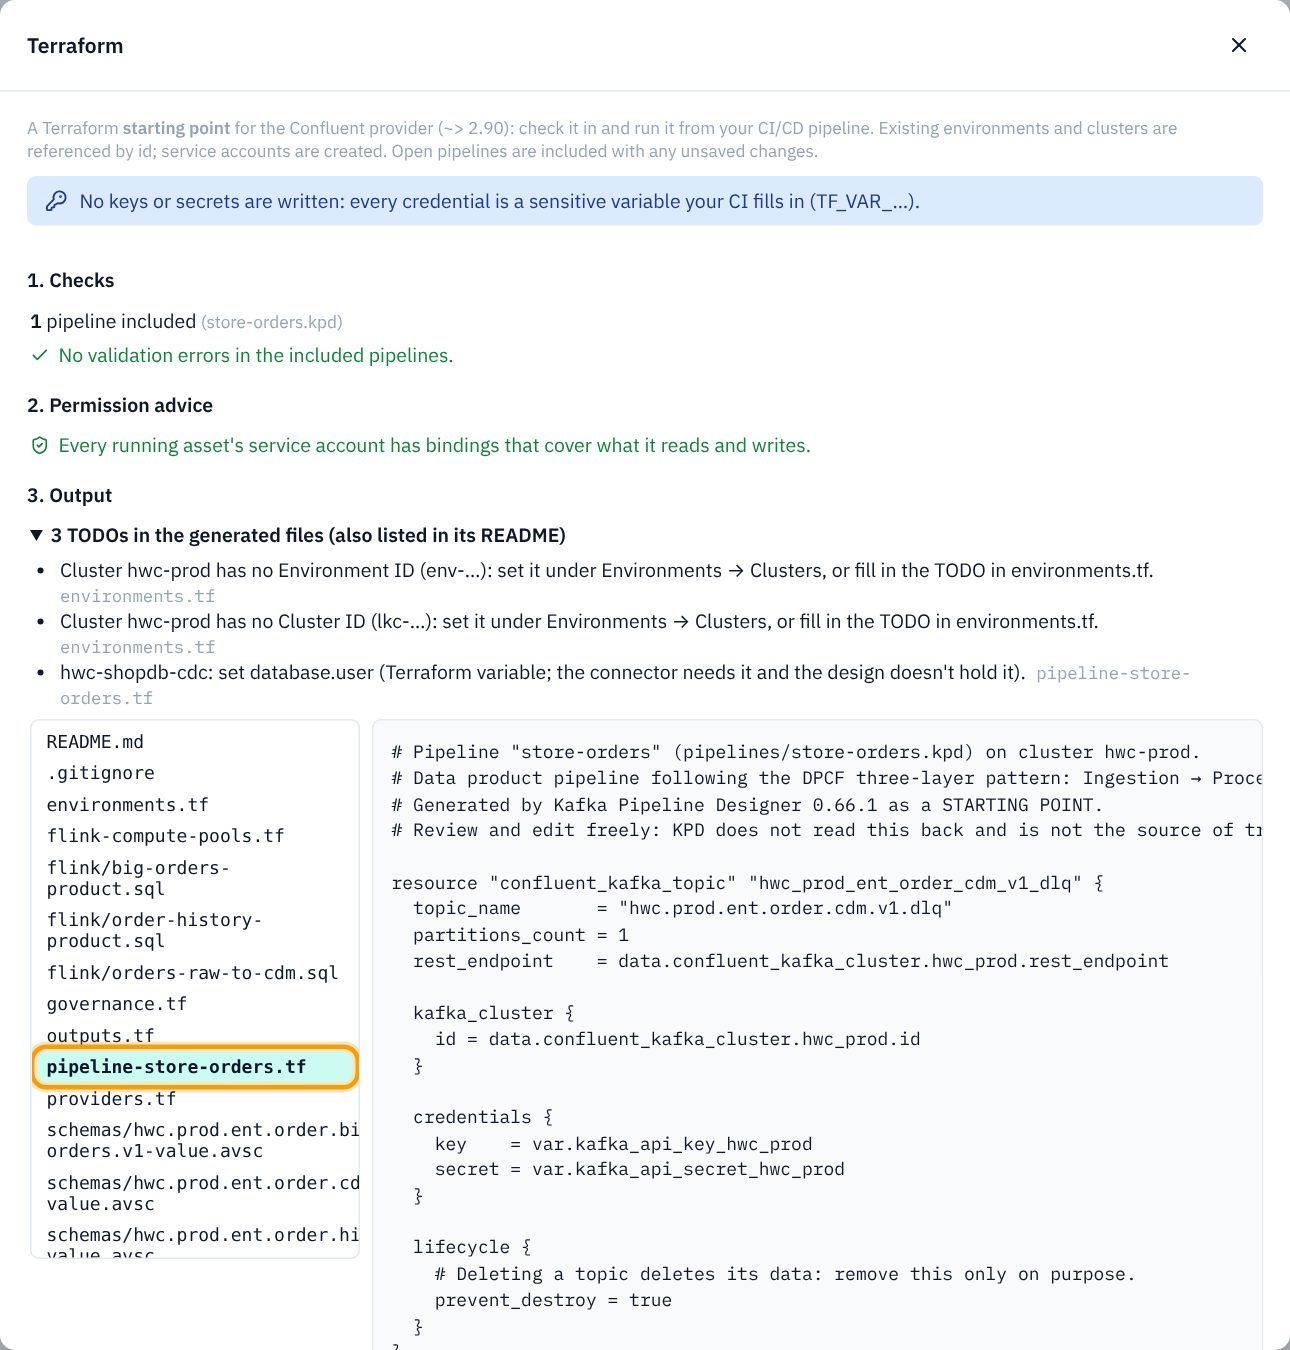
- The three TODOs: two say the hwc-prod cluster has no Environment ID or Cluster ID. That's right: fill them in on the cluster (Part 3) once the cluster exists, and they disappear. The third asks for the connector's database.user: the connector needs it, but a design doesn't hold it, so it is a Terraform variable you set for each environment.
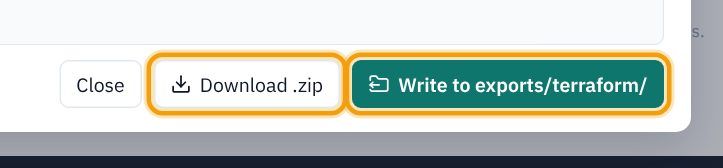
- Click Download .zip to take the Terraform away, or Write to exports/terraform/ to keep it with the project.
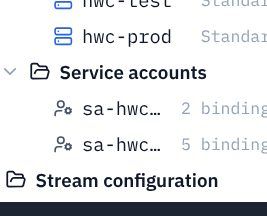
Back in the explorer, sa-hwc-flink now has seven bindings: the five you added in Part 6 and the two from the advice. Click it to see them; you can change or remove them like any other.
terraform init, terraform plan). KPD never connects to Confluent Cloud. See Terraform.9. Notes, decisions, actions, groups and shading
Record why the design is the way it is, and make the diagram easy to read.
A design is more than its assets. This part records why it is the way it is (decisions), what it takes on trust (assumptions), what must be in place first (dependencies), what is still to do (actions), and makes the diagram read well with groups and shading. None of it changes validation or Terraform; all of it appears in the exports.
Why record decisions, assumptions and dependencies?
A diagram shows what the design is. It doesn't show why it is that way, what it takes on trust, or what has to happen first. Those live in people's heads and in meeting notes, and they get lost: the person who chose CDC moves on, someone asks "why didn't we just poll the table?", and the team spends an afternoon working it out again. KPD keeps them on the canvas, beside the assets they are about, numbered so a document or a ticket can point at them.
| Record a… | When | Why it helps | In this tutorial |
|---|---|---|---|
| Design decision (D1, D2…) | You chose between real options: CDC or polling, one topic or two, which key to partition by, Avro or JSON. | Says what was chosen and why, so it isn't argued again, a reviewer can check the reasoning, and a newcomer understands the design. If the reason stops being true, you know which decision to revisit. | D1: log-based CDC rather than polling. |
| Assumption (A1, A2…) | The design relies on something you believe but haven't confirmed: a field is never empty, totals are in pence, volumes stay small. | Assumptions are risks. Writing them down makes them visible, names who should confirm them, and lets a review ask "has A1 been checked?" before go-live. When one turns out wrong, you can see exactly which assets it touches. | A1: totals are whole pence, so totalPence is an int. |
| Dependency / pre-requisite (DEP1…) | Something outside your pipeline has to be in place first, usually provided by another team: a database setting, network access, an account, a schema from upstream. | These are what delay go-lives. Listing them early lets a project plan include them and the team that owns them hear about them in good time. | DEP1: logical replication and a publication on shopdb. |
| Next action (ACN1…) | Someone has to do something: confirm an assumption, arrange a dependency, chase an answer. | Turns open questions into a to-do list with a date and a name, so nothing is forgotten between workshops. | ACN1 arranges DEP1; ACN2 confirms the big-order threshold. |
They work together: an assumption or a dependency usually leads to an action, and once the action is done, the assumption may become a decision. Linking each note to its asset (below) means the technical export quotes it under that asset, and the detailed design document lists them all in its section 13 with dates and authors, ready for a design review.
Say who you are
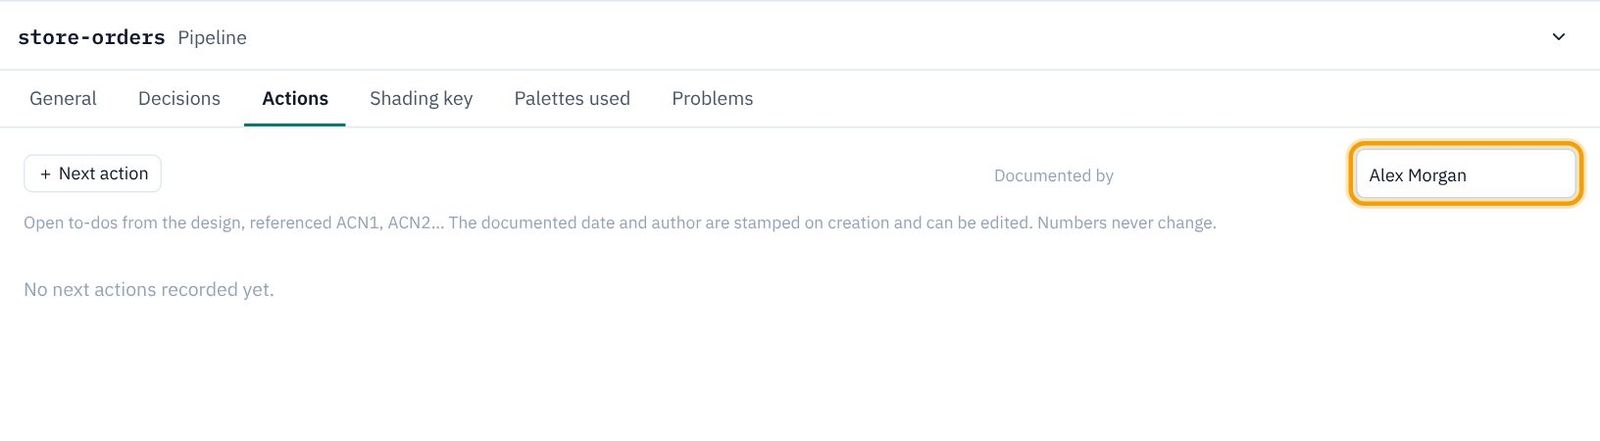
KPD stamps each decision, assumption, dependency and action with the date and an author. There is no login, so set your name once.
- Click an empty part of the canvas and open the pipeline's Actions tab (the same box is on Decisions).
- In Documented by, type your name (we used
Alex Morgan). Your browser remembers it.
A design decision
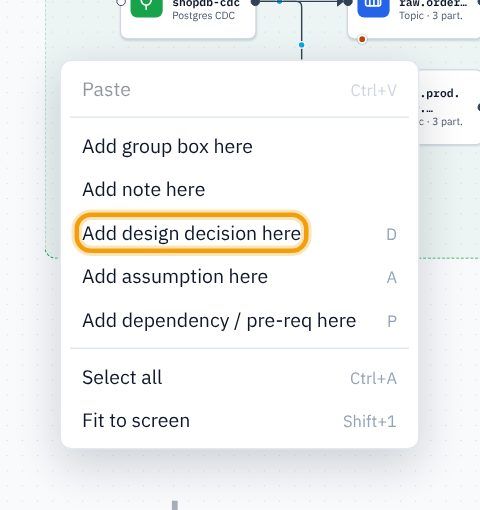
- Right-click an empty part of the canvas, inside the Ingestion box under the connector, and choose Add design decision here. (Or press D with the mouse over the canvas.)
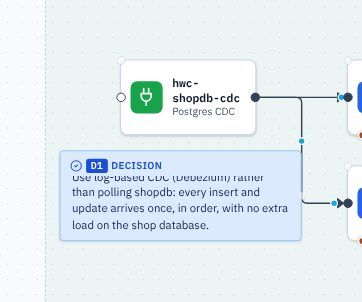
- A blue note appears, numbered D1, ready for typing. Type
Use log-based CDC (Debezium) rather than polling shopdb: every insert and update arrives once, in order, with no extra load on the shop database.and press Esc (or click away) to finish.
An assumption, a dependency and a plain note
Add three more the same way (right-click the canvas, or press the key):
| Kind | Key | Where | Text |
|---|---|---|---|
| Assumption A1 (orange) | A | Top of the Process box | Order totals are whole pence, never fractions, so totalPence is an int. Sales to confirm with the till supplier. |
| Dependency DEP1 (slate) | P | Under the Ingestion box | shopdb needs logical replication on (wal_level = logical) and a user allowed to create the hwc_shopdb_pub publication. The shop database team provides this. |
| Plain note (yellow) | N | Top of the Surface box | Order history leaves out customer emails: the app only shows names. |
Link notes to the assets they are about
- Every note has a connector dot on its right edge, and every asset has a small grey Notes dot at its top-left corner (both outlined below). Drag from the note's dot to the asset's dot.
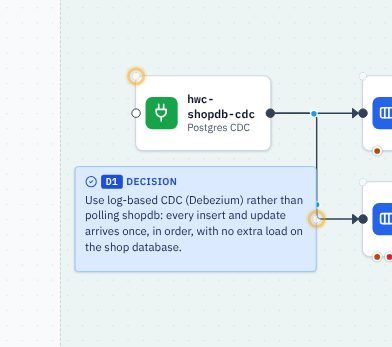
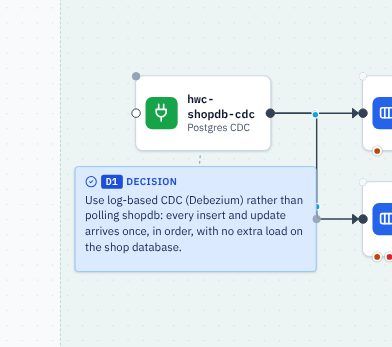
- Link DEP1 to the connector too, A1 to the canonical topic
hwc.prod.ent.order.cdm.v1, and the plain note toorder_history_product.
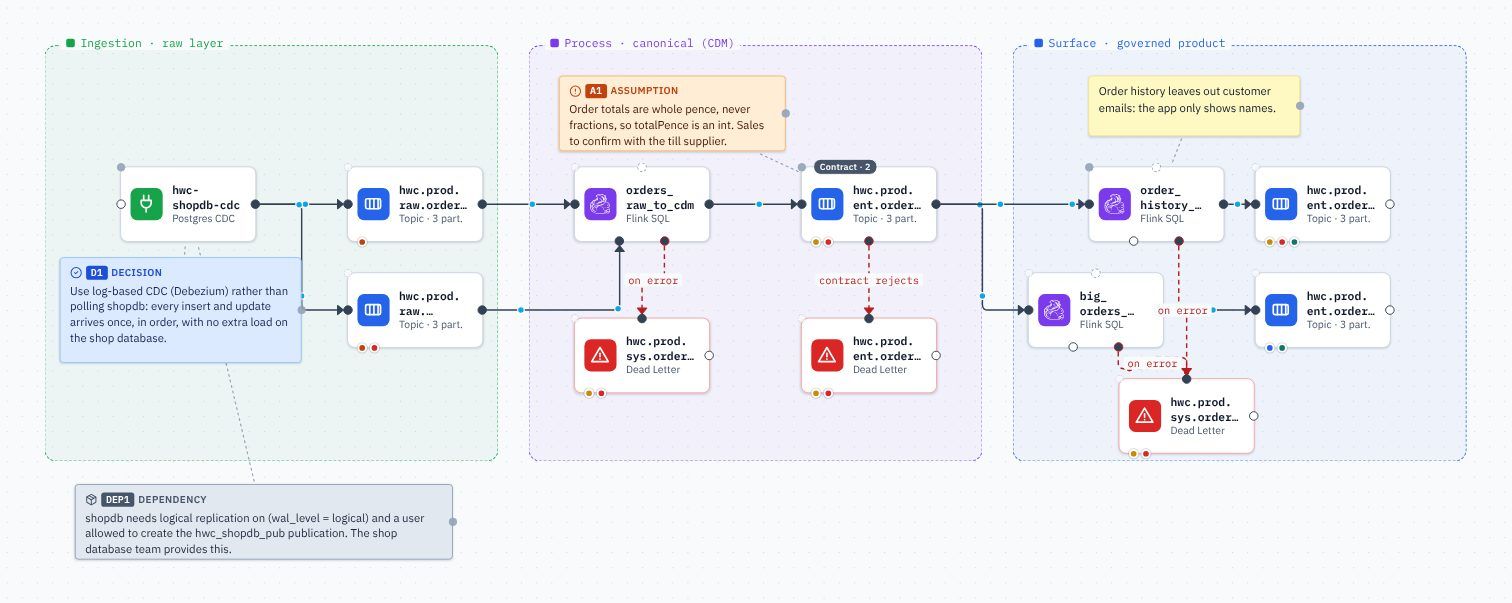
The decision log and next actions
- Click an empty part of the canvas and open the pipeline's Decisions tab. It lists every decision, assumption and dependency with its date, author and the assets it applies to. Click a row to jump to the note on the canvas. Dates and authors can be corrected here.
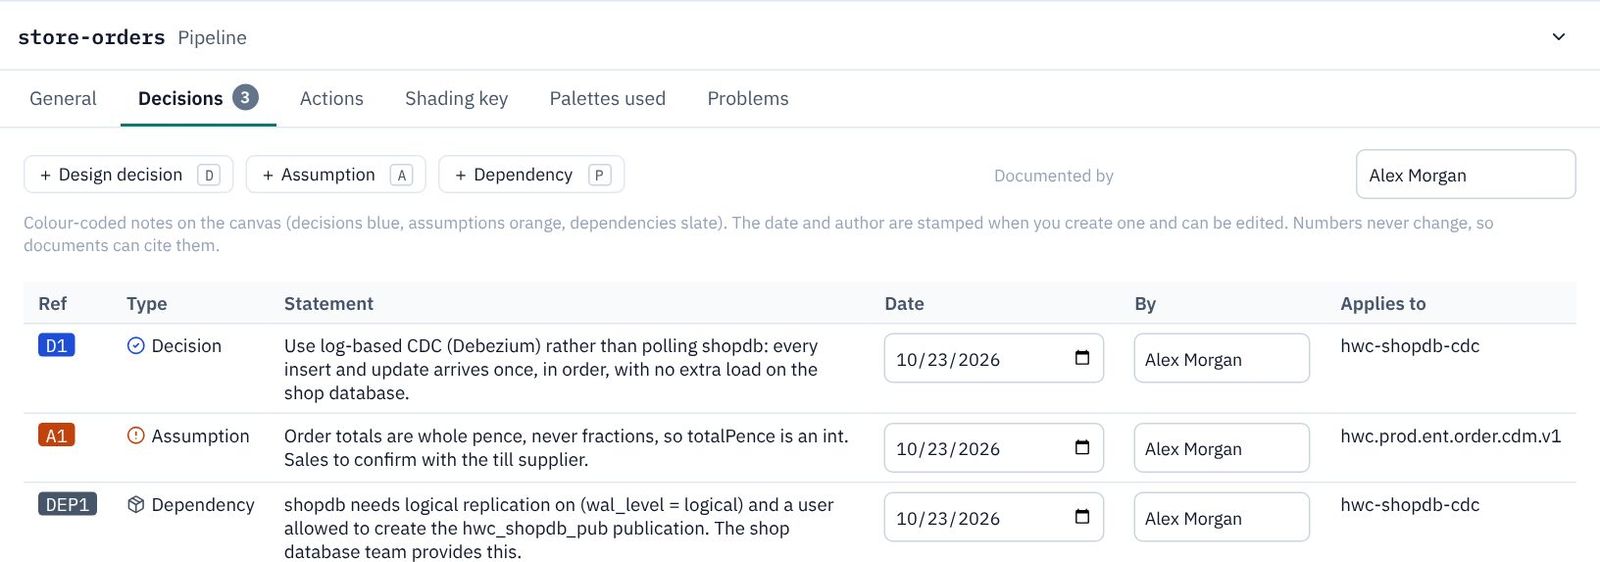
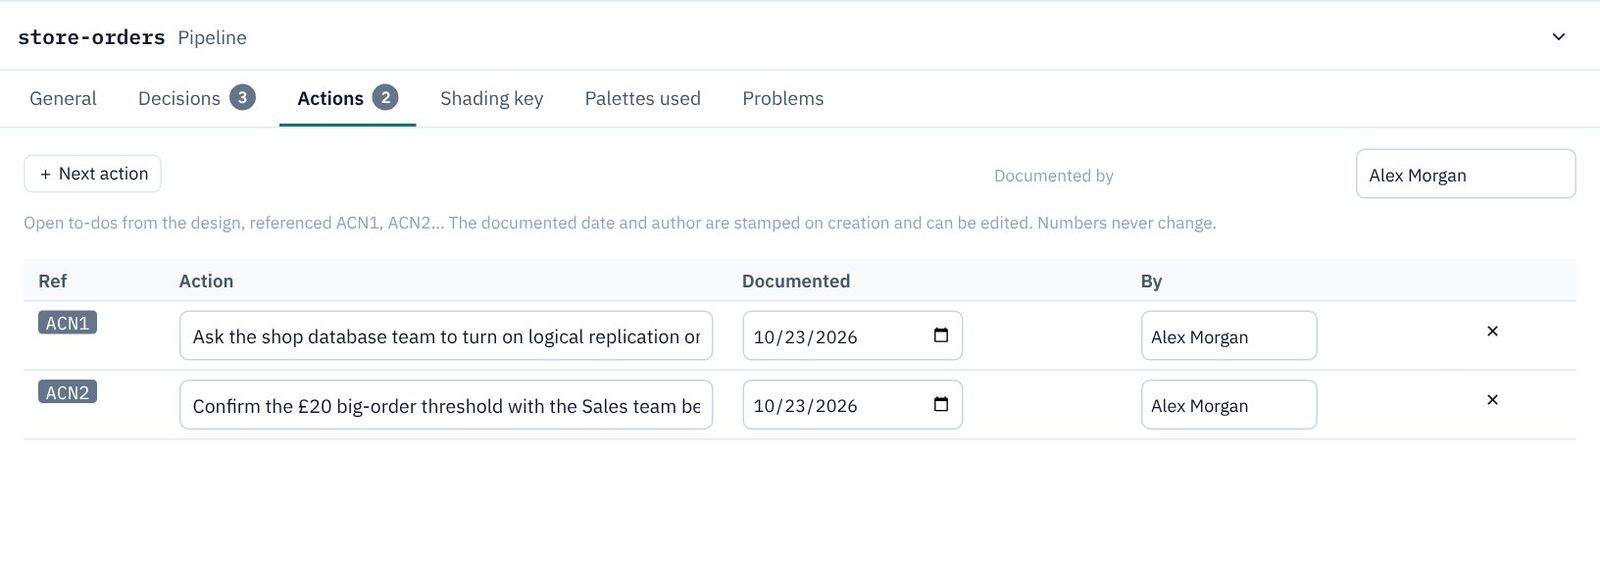
- Open Actions and click + Next action.
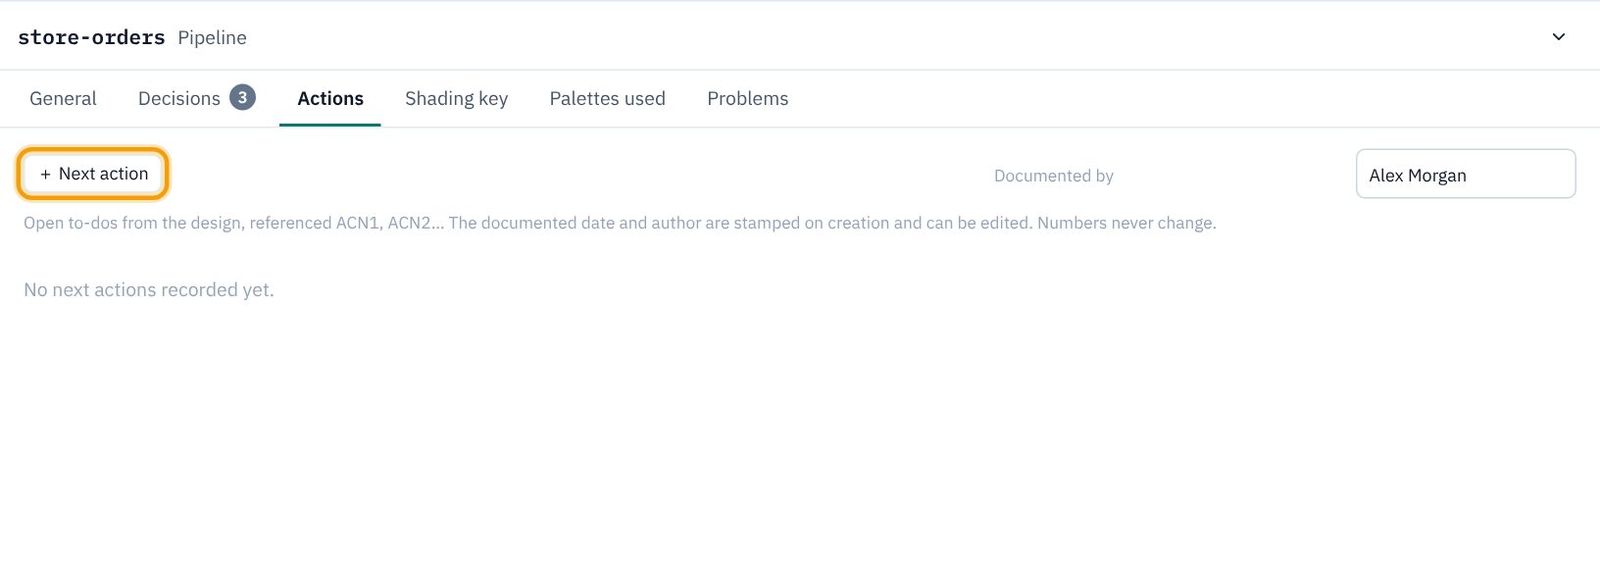
- Type
Ask the shop database team to turn on logical replication on shopdb and create the hwc_shopdb_pub publication (see DEP1).It becomes ACN1. - Add a second:
Confirm the £20 big-order threshold with the Sales team before the first release.(ACN2).
Groups
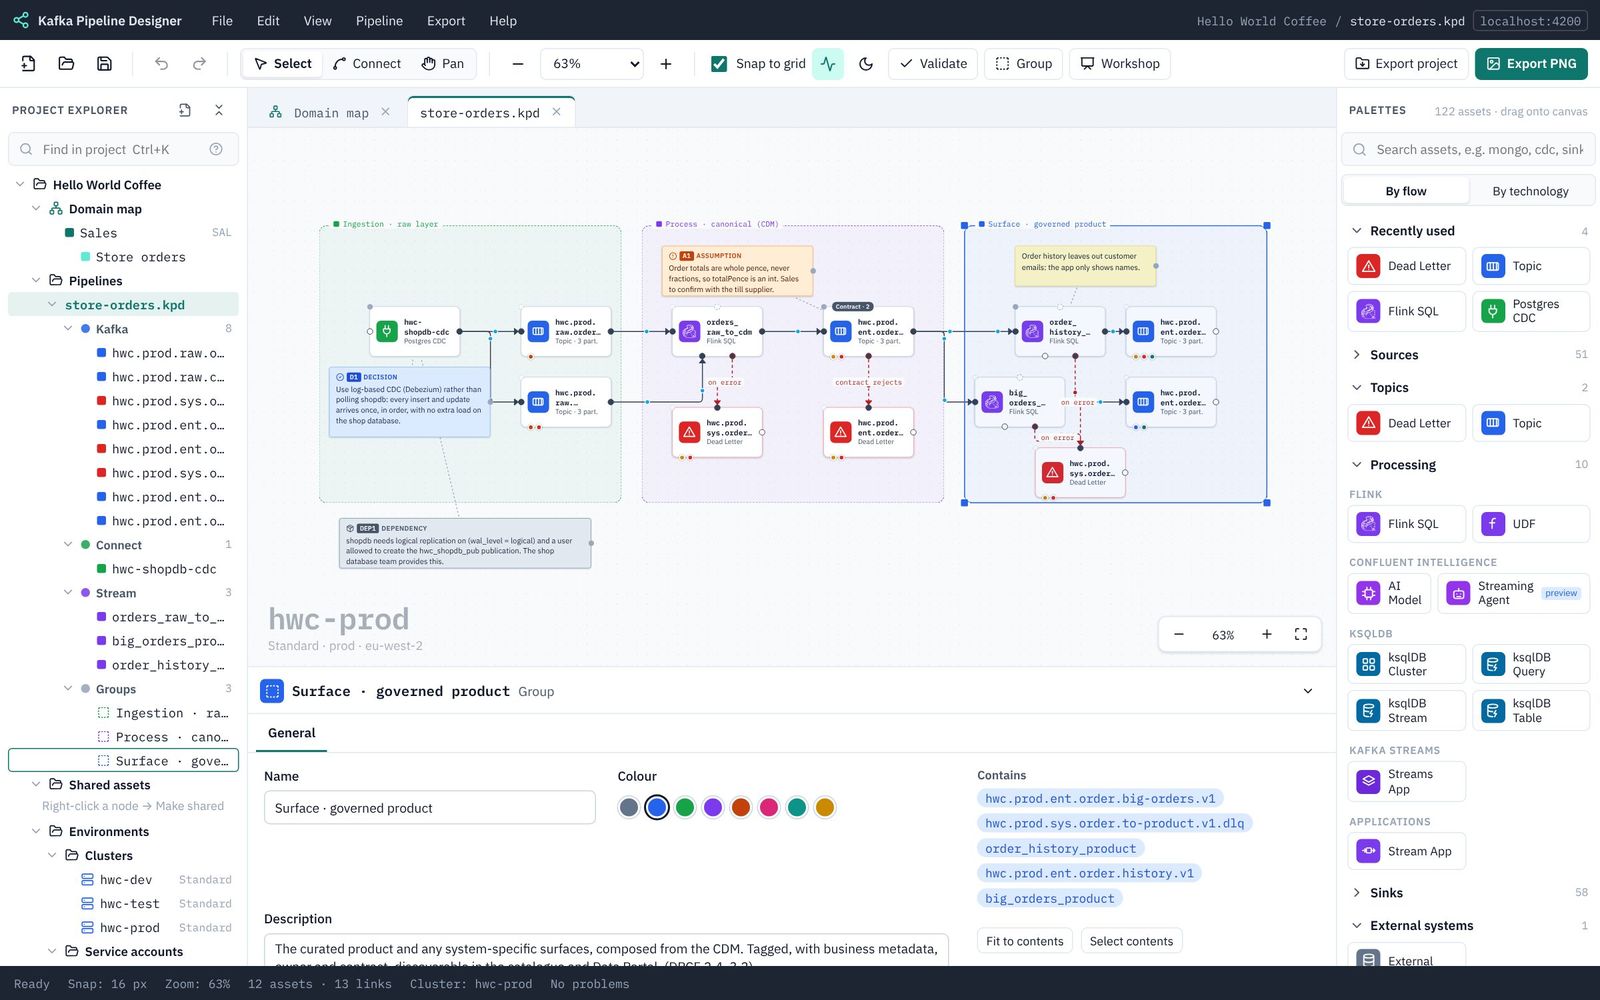
The three layer boxes are groups: labelled backgrounds for parts of a solution. The DPCF template drew them for you.
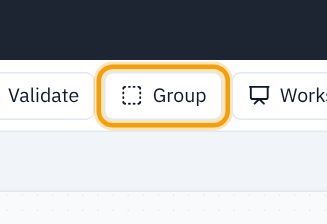
- To make your own, select some assets (drag a box around them, or Shift+click) and click Group in the toolbar (or Ctrl/⌘+G). KPD sizes a box around them.
- Click a group's label to select it. Its properties: Name, Colour, Description and what it Contains. Fit to contents resizes it around its assets.
- Drag the label or border to move just the box; drag its square corner handles to resize it.
Shading by data product
Shading gives assets a pale background to show what belongs together. Here, one shade per data product.
- Click
order_history_product. In the properties panel's header, click the pale blue swatch, Sky.

- Shade the topic
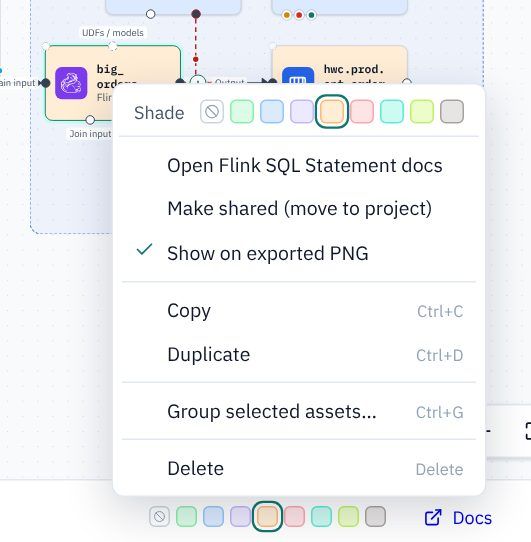
hwc.prod.ent.order.history.v1Sky too, and givebig_orders_productandhwc.prod.ent.order.big-orders.v1the pale orange, Peach. - You can also right-click an asset (or several selected together): the menu starts with the same swatches.
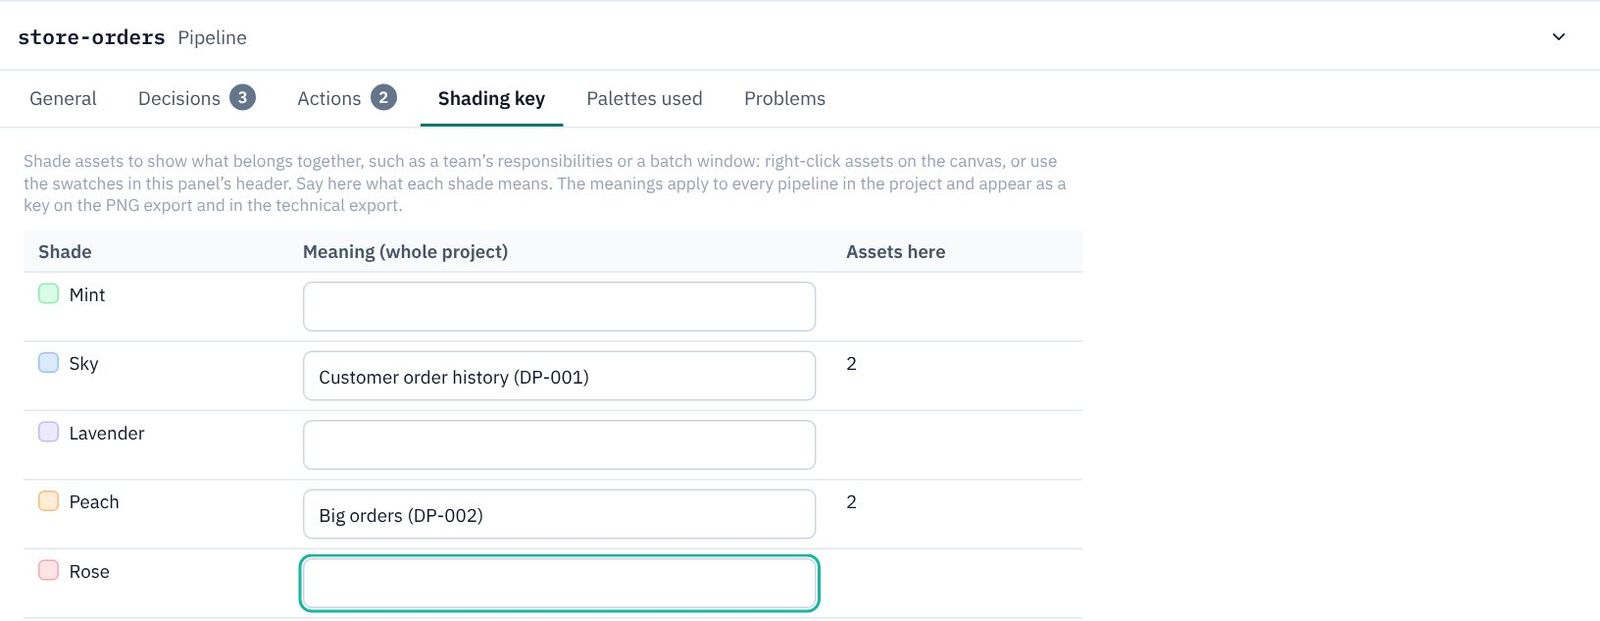
- Say what the shades mean: click an empty part of the canvas, open Shading key, and type
Customer order history (DP-001)beside Sky andBig orders (DP-002)beside Peach. Press Tab or Enter after each to save it.
Finished
Save, fit the pipeline to the screen (Shift+1), and click Validate once more.
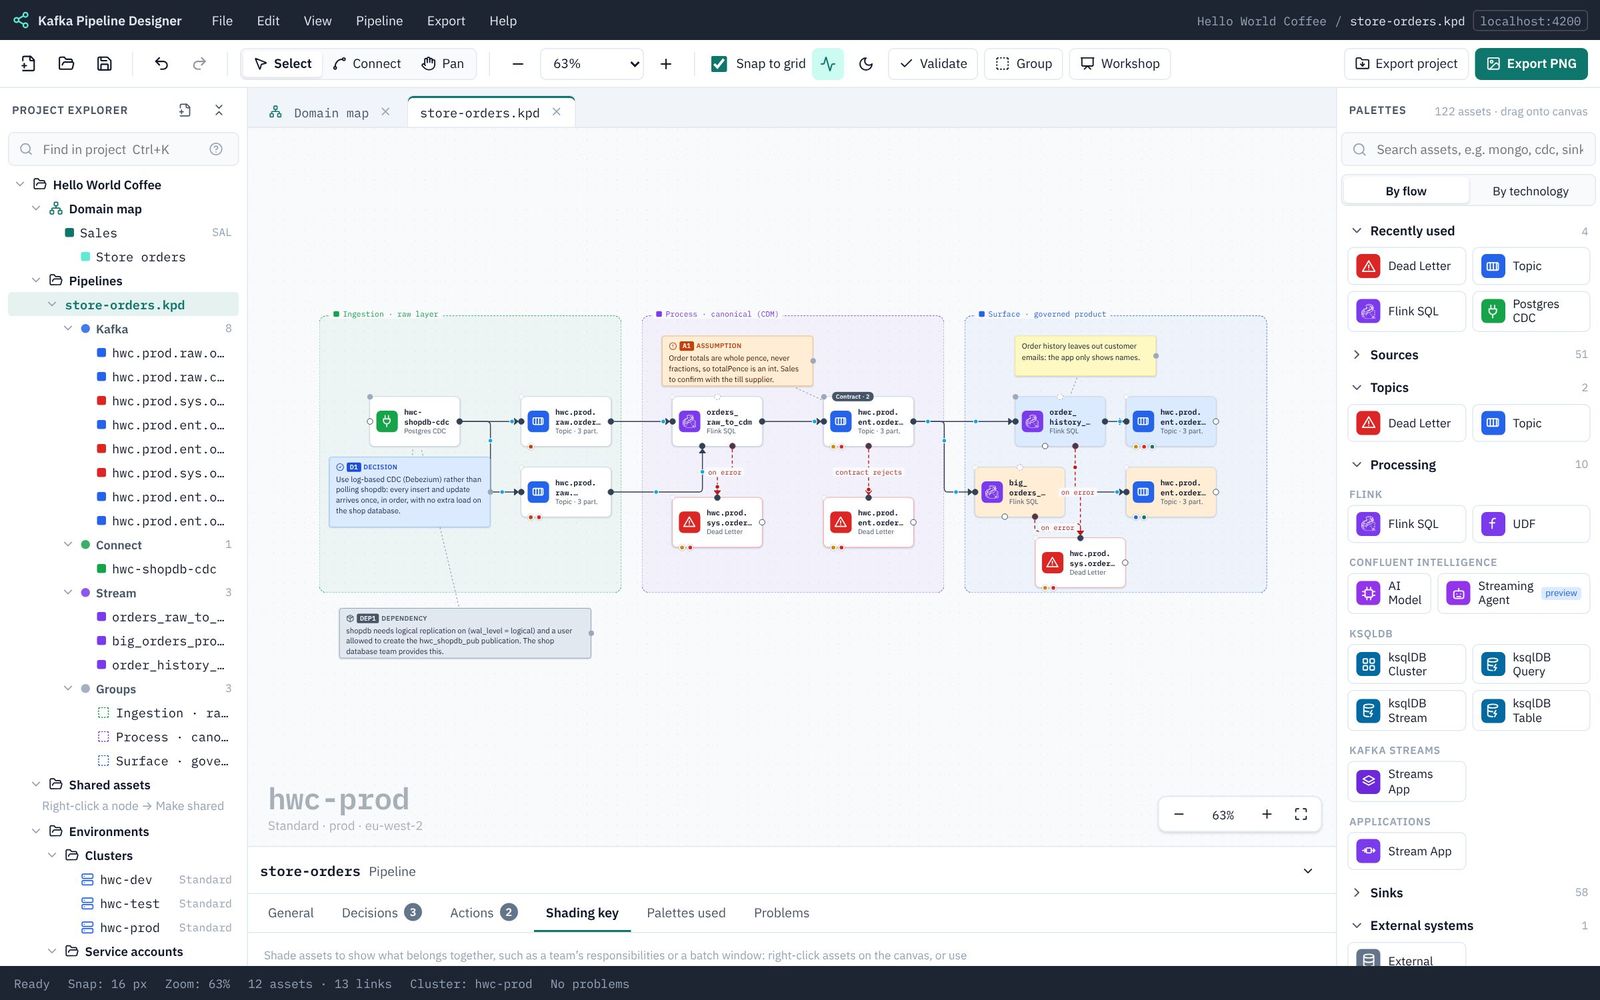
Export the PNG again: decisions, assumptions, dependencies and notes are in the picture, and the shading key is under the legend. Export the design document again too, and its section 13 now lists D1, A1, DEP1, ACN1 and ACN2.
10. Share it: export and import
Export the whole project as a zip, import one, and download our finished copy.
A project moves between people and machines as one zip: project file, pipelines, schemas, SQL files and exports together, so nothing is left behind.
Export your project
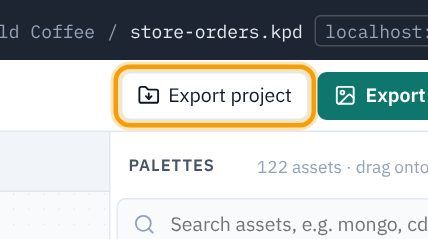
- Click Export project in the toolbar (or Export → Export project (.zip)). KPD offers to save anything unsaved first.
- Your browser downloads
hello-world-coffee-<date>.zip. Send it to a colleague, or keep it as a backup.
Import a project
- Choose File → Import project (.zip)…
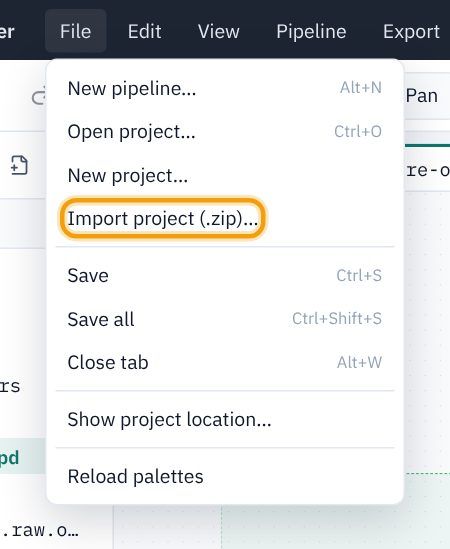
- Pick the zip. KPD checks it (it must contain a project file, and nothing unsafe), creates the project and opens it.
- If a project with the same name already exists, the new one gets
-1(then-2…) on the end, so nothing is ever overwritten. Below, importing our sample beside the one we built gave Hello World Coffee-1.
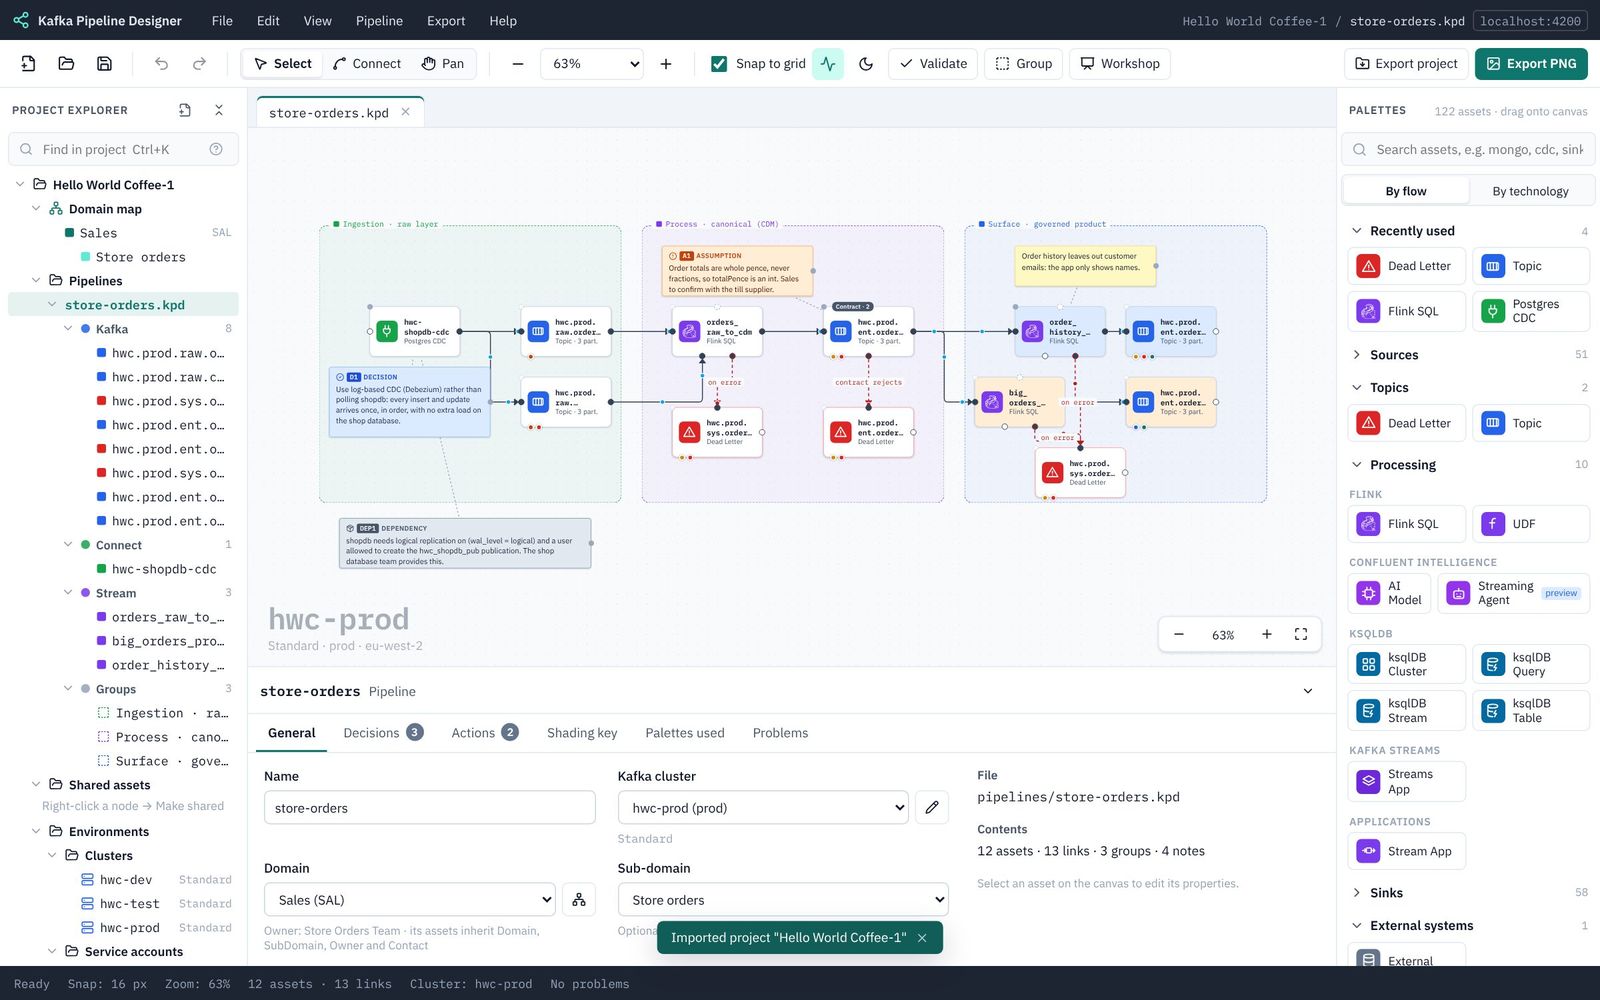
Where next
You have used every part of KPD on one small pipeline. Some ideas for your own designs:
- Open the bigger samples (Sample projects), especially Inclined Labs, a full data product design.
- Try a sink connector after a product topic, a ksqlDB query, or a Stream App (Assets and palettes).
- Press W for workshop mode, for designing in front of a client (Working on the canvas).
- Look up anything you are unsure about with the search box at the top of this guide.
When you find something confusing or broken, please tell us with Help → Send feedback. That is what the beta is for.
Download the finished sample
If you get stuck, or want to compare your work with ours, download the finished Hello World Coffee project. It is exactly what you build in this tutorial, and it validates with no errors or warnings.
Download hello-world-coffee.zip (11 KB: the project file, the pipeline, its five Avro schemas and three SQL files)
To open it in KPD:
- Download the file above and keep it as a
.zip. Don't unzip it: KPD reads the zip itself. (Some browsers unzip downloads automatically; if yours did, zip thehello-world-coffeefolder up again.) - In KPD choose File → Import project (.zip)…
- Pick
hello-world-coffee.zip. KPD uploads it, checks it, creates the project and opens it. You see a message such as Imported project "Hello World Coffee". - If you already have a project called Hello World Coffee (for example the one you built), the import is named Hello World Coffee-1, so nothing of yours is overwritten.
- Open store-orders.kpd under Pipelines in the explorer and press Validate to see it pass.
Part 10 shows these steps with pictures: Share it: export and import.
Download the finished sample
If you get stuck, or want to compare your work with ours, download the finished Hello World Coffee project. It is exactly what you build in this tutorial, and it validates with no errors or warnings.
Download hello-world-coffee.zip (11 KB: the project file, the pipeline, its five Avro schemas and three SQL files)
To open it in KPD:
- Download the file above and keep it as a
.zip. Don't unzip it: KPD reads the zip itself. (Some browsers unzip downloads automatically; if yours did, zip thehello-world-coffeefolder up again.) - In KPD choose File → Import project (.zip)…
- Pick
hello-world-coffee.zip. KPD uploads it, checks it, creates the project and opens it. You see a message such as Imported project "Hello World Coffee". - If you already have a project called Hello World Coffee (for example the one you built), the import is named Hello World Coffee-1, so nothing of yours is overwritten.
- Open store-orders.kpd under Pipelines in the explorer and press Validate to see it pass.
Part 10 shows these steps with pictures: Share it: export and import.